
Mountain Bike Reach Calculator and Tips/Tricks to Alter Bike Reach
Measuring your mountain bike properly will help you determine if your bike is correctly sized to your body, as well as the length and angle adjustments you will need to make to obtain optimal comfort and control when riding. Calculating the mountain bike inner-frame length (also known as reach), as well as center point height (known as stack) is the simplest method to avoid discomfort and muscle fatigue when riding. Even if you failed geometry in high school, don’t worry this crucial mountain bike geometry is not difficult and when done methodically you can easily use a mountain bike reach calculator to figure things out.
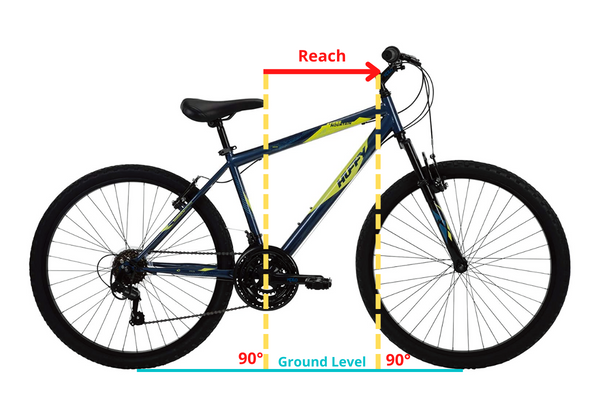
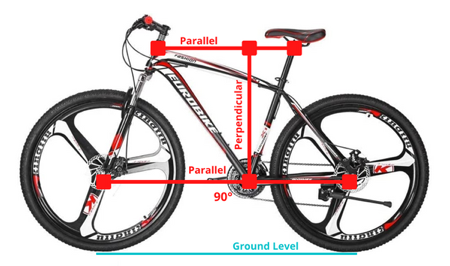
To calculate mountain bike reach, measure the horizontal distance from the top of the center of the head tube to the vertical line that runs from the center of the bike's bottom bracket. To choose mountain bike reach, stay seated on the bike saddle with one foot on the pedal, then stretch the arms and hold the handlebar grips. The body should lean 40-50 degrees, arms should be parallel and relaxed, and the handlebar should be easy to turn.
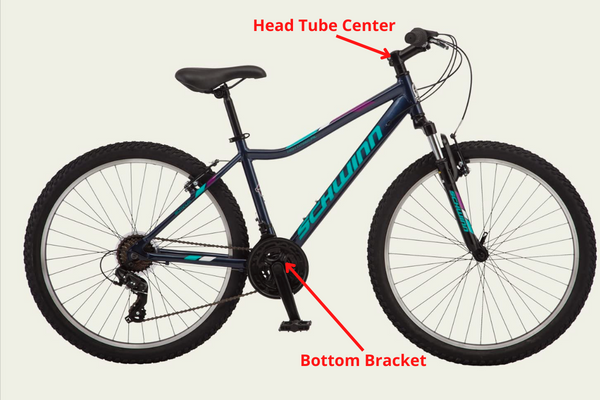
Before measuring the reach and stack it is important to locate the two main points on the bike from which these measurements are taken. They are the head tube and the bottom bracket.
The head tube is the part of the frame that extends from the wheel fork up to the handlebar. The center of the head tube is where the handlebar attaches to the steering tube.
The bottom bracket is the point on the frame where the chain stays, seat tube, and down tube converge, and is located on the join where the pedal crankset is attached to the bike. Knowing the locations of these two points as well as how to maintain balance around these points will ensure a better riding experience and rider safety.
What is a Reach on a Bike?
If you find that your back and arms ache during and after a ride, this could be due to muscle strain that results from an ill-fitting bike. Correct mountain biking posture will allow you to comfortably hold onto the handlebars without excessive back arching or overstretching to reach the handgrips.
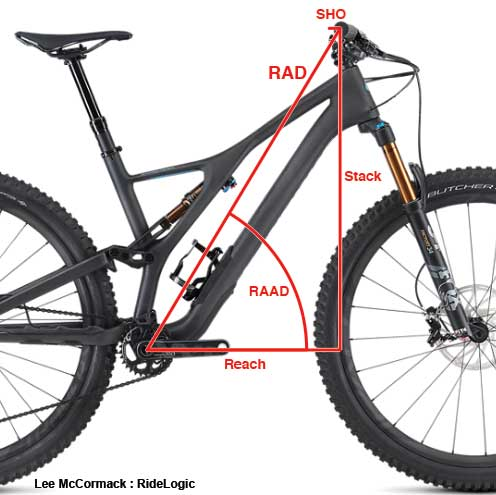
Mountain bike reach is the horizontal distance between the center bottom bracket and the head tube center. Draw an imaginary right-angled rectangle within these points to obtain the reach measurement which has a direct effect on handling when riding.
Our mountain bike sizing chart has tips and tricks to help as a reference when considering the correct size of your bike. But having a perfectly fitting bike requires more in-depth measurements and tweaks for ultimate riding comfort.
The ideal measurement for a mountain bike’s reach needs to allow the rider to maintain a secure hand grip on the handlebars without placing all their body weight on or over the handlebars. The rider’s weight needs to push through the center bottom bracket so that balance is maintained during regular riding as well as adventure riding maneuvers like tight cornering, arduous climbs, steep descents, jumps, drops, and hops. This balanced position is achieved when the reach measurement fits the rider's body proportions.
Why Does Reach Matter on a Mountain Bike?
A reach that is too short will cause the rider to feel cramped and awkward when riding. This can result in the rider having less control of the bike and could cause an accident. A longer reach could cause strain in the back and shoulder blades as the rider stretches to hold the handlebar grips. This is why a mountain bike reach calculator is so important to use.
For a mountain biker with long arms, a long reach will provide more space in the cockpit, better comfort, and greater stability. However, a long reach will be uncomfortable for a rider with short arms because it will force the rider to stretch their arms, lean forward more, and will cause neck pain. A mountain bike with a short reach and a high stack will force a rider to sit more upright.
As this study from Sports Medicine and Health Science explains, the bicycle configuration needs to fit with the particular rider’s body measurements and proportions to prevent joint and muscle injury.
Mountain biking involves dynamic maneuvers when scaling steep inclines and traversing rocky unpredictable paths. A rider must be able to maintain comfortable control of the bike through only three major contact points on the bike—the seat, the pedals, and the handlebars. If the rider’s contact is strained on any one of these three points this can lead to muscle fatigue and possible falls. Inadequate reach can cause tremendous strain on the hands, forearms, and elbows. Our article about where to hold mountain bike grips to maintain proper posture has several tips about how and where to place your hands on the handlebars.
As this video tutorial from Trail Breaker explains, reach and stack influence the rider’s posture, comfort, and responsiveness when on the trail. A rider that struggles to keep hold of the handlebars or correctly balance their weight over the center bottom bracket can't make safe and instantaneous shifts when the need arises. The video also explains what true reach and true slack are, which we will discuss a little later.

Similarly, you might find interest in learning how to adjust a mountain bike seat angle too. Be sure to check out our related article for more information.
1. Use a Long Reach if You Have Long Arms to Maximize Stability and Cockpit Space
The difference in reach between bike sizes can range from 15-20mm, according to this thread from VitalMtb, which doesn’t sound like a lot, but when you consider that 15-20mm can mean the difference between a relaxed elbow or fully locked elbow, this measurement becomes very important.
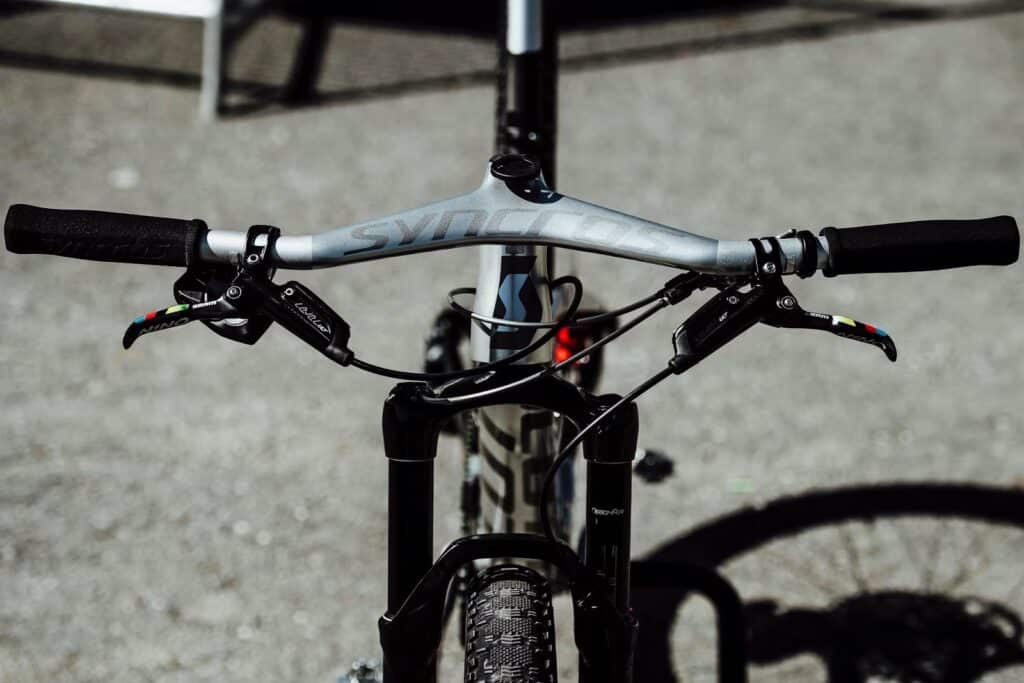
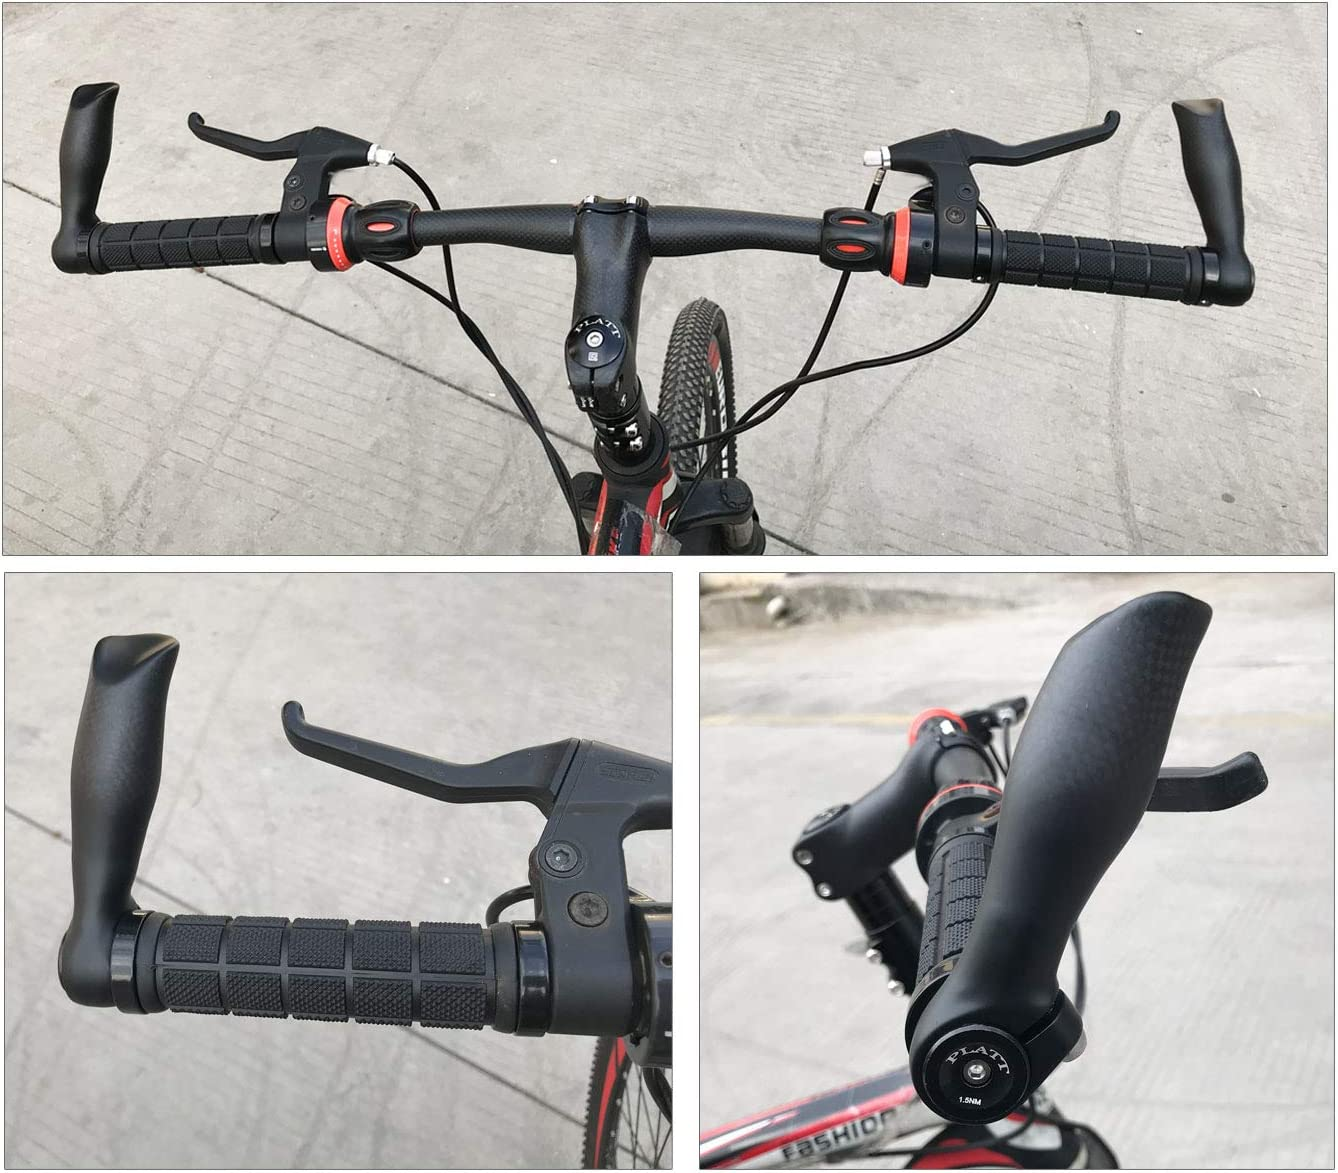
Ideally, a mountain biker should have relaxed forearms and slightly bent elbows when holding onto the handgrips like these. This will enable the rider to rebound over rocky terrain without injuring the wrist or elbow joints, which according to this article from the Sports-related Fracture, Dislocations, and Trauma Journal are some of the most common injuries among mountain bikers.
If you have long arms you would need to have a bike with a longer reach so that you don’t feel cramped when riding. This would also maximize the space you have on the handlebars (also known as cockpit space) and improve your stability on inclines and rocky trails.
2. Mountain Bikes With Short Reach and a High Stack Offer a Comfortable Upright Position
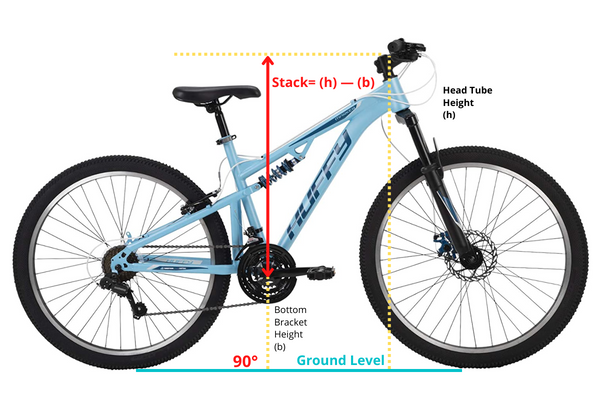
Stack is calculated by taking the height of the bottom bracket (measured from ground level) and subtracting it from the total height of the center head tube. The difference between these two measurements is the invisible line that runs vertically from the bottom bracket to the imaginary line that runs horizontally from the head tube center. Stack height is a factor that is often overlooked that can greatly influence a rider's control of their bike because it affects the rider’s posture and position on the bike.
A stack height that is too low for the rider’s body proportions (particularly their torso length) will result in the rider feeling cramped and then leaning too far forward to try and compensate for the height deficiency, which will then make the rider feel as if they might fall over the front of the handlebar. In this case, a bike like this with a higher stack would offer the rider better balance as their weight can be shifted back and directly above the bottom bracket.
A short reach with a high stack measurement will cause the rider to adopt a more upright posture which some riders might prefer when climbing and jumping and in casual riding situations. According to this article from MTB-Mag.com, a difference in stack height of only 5-10mm can significantly alter a rider’s comfort, and that riders who are looking for a relaxed ride prefer higher stack numbers. This can however adversely affect their cornering when riding uphill and traversing steep technical terrain.
3. Medium Bike Reach Makes Riding Comfortable and Easy to Handle
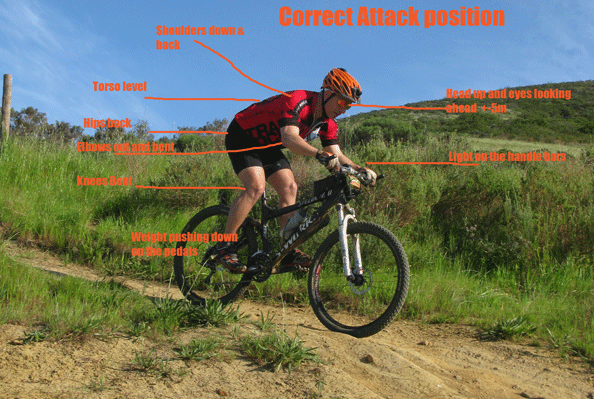
When encountering dips or rolling humps on a trail, a rider should adopt a more defensive standing position. This requires the rider to be balanced over the bottom bracket so that their weight is pressing down through the hip into the bike’s fulcrum. This positioning allows the rider to have full control of the bike as it rolls over roots and rocks, and is often achieved by having a medium reach that keeps the rider’s arms relaxed and encourages fluid movement.
When seated (or semi-seated) a rider needs to have relaxed knees and elbows for maximum agility and responsiveness in turns and jumps, this is best achieved with a medium reach that allows the rider’s body to flex with the terrain, especially when jumping and landing. A mountain bike like this with a medium reach will reduce strain on the muscles and joints because the rider isn’t over-stretching to maintain proper control of the bike.
4. Too Long a Reach Can Cause Body Pain
A long reach that is ill-suited to the rider’s body proportions will cause prolonged muscle strain, especially in the lower back, shoulder blades, neck, and arms. As this article from Research Quarterly for Exercise and Sport explains, discomfort in the torso and back of a cyclist can be reduced or completely eliminated by adjusting the bicycle setup and improving riding posture.
Riders who want a more aggressive posture that reduces wind resistance and drag might prefer a slightly longer reach with a short stack, according to this thread from VitalMTB, though this does not take the bike seat height or angle into account. Another reason riders often lean towards longer reach configurations is they feel this helps them ascend steeper inclines and offers them the ability to corner more tightly.
Because a longer reach causes a rider to over-stretch for prolonged periods they often start to feel fatigued sooner when on the trail. This can dampen their enjoyment of the ride, not to mention that tired riders are more prone to accidents and falls because they can’t concentrate as well or react as swiftly to surprises on the path.
How is Mountain Bike Reach Calculated?
Mountain bike manufacturers each have their own design principles and preferred angles, which is why bike sizing and aesthetics vary so widly from manufacturer to manufacturer. Not to mention the custom accessories like curved handlebars and handlebar risers that can alter the look and feel of a mountain bike. All of this feeds into a mountain bike reach calculator.
To measure mountain bike reach, use a measuring tape and measure from the center of the headtube to the vertical line from the mountain bike’s bottom bracket. True reach is calculated by placing a length of tape or tying a piece of string from the center of one handgrip to the center of the other. Measure from the center of this line to the vertical line that runs from the bottom bracket to get the true reach measurement.
Our article explaining how to choose between mountain bike drop bars vs. flat bars has examples of the benefits and drawbacks of both of these types of bars and compares different riding styles and habits that each handlebar type suits
Because some handlebars curve slightly and some are straighter, true reach is a more accurate calculation of the distance between the bottom bracket and the spot where the rider’s hand actually rests on the bike. Reach is a fixed measurement that can’t be changed on a bike frame, whereas true reach can be altered slightly with accessories like curved handlebars, handlebar extenders, stem spacers, and stem adapters. The rider can also tweak true reach by altering the seat angle or even pivoting the handlebars forward a little.

Average Mountain Bike Reach by Type Chart (MM), Short, Medium & Long
| Type of MTB | Short Reach | Medium Reach | Long Reach |
| Enduro Bikes | 426mm | 453mm | 472mm |
| Xc Bikes | 415mm | 445mm | 470mm |
| Dh Bikes | 431mm | 461mm | 480mm |
| Free Ride Mtb | 376mm | 384mm | 393mm |
| Fat Bike | 405mm | 430mm | 454mm |
| Gravel Bikes | 383mm | 385mm | 378mm |
| Track Bikes | 404mm | 429mm | 449mm |
| Rr & Tri Bikes | 390mm | 401mm | 412mm |
How to Choose the Right Reach on a Mountain Bike
As with most things related to mountain biking the ideal reach measurement will often be determined by the type of terrain and style of riding you plan on doing, as well as other accessories that are already installed on the bike. Seat height and angle as well as the handlebar style that you have chosen play an important role in determining what reach is right for you. Perhaps most importantly, your body proportions like your torso length, arm length, leg length, and hand size play a crucial role when it comes to cycling comfortably and maintaining proper posture.
To choose mountain bike reach, stay seated on the bike saddle with one foot on the pedal, then stretch the arms and hold the handlebar grips. The body should lean 40-50 degrees, arms should be parallel and relaxed, and the handlebar should be easy to turn.
Here are the considerations for choosing the right reach on a mountain bike:
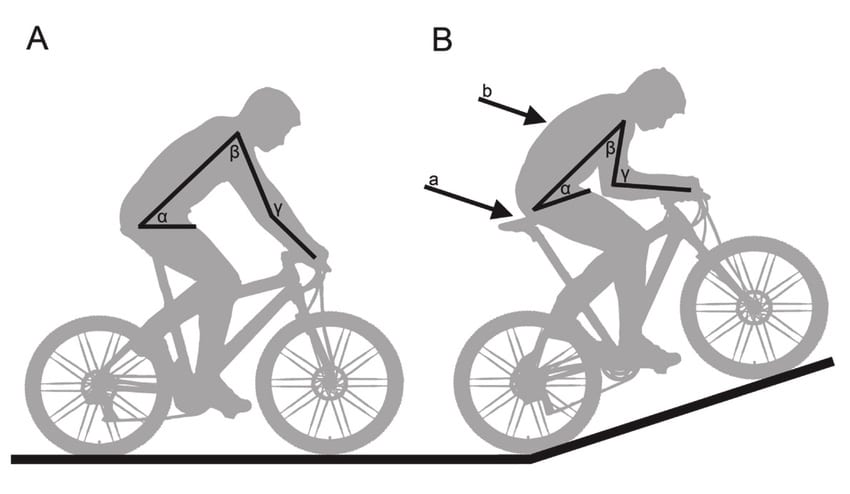
1. Choose a Reach that Offers a Leaning Angle of Between 40-50%
To maintain comfort and improve aerodynamics when cycling a rider should have around a 45° leaning angle that is measured from the hip flexor to the spine when seated. During an uphill climb, this angle will decrease to around 35°- 40° as the rider shifts forward on the seat. If however, the rider lifts off the seat into a semi-seated or standing position this angle opens up to anywhere from 50°- 70°. This research paper from Researchgate explains the various postures that riders can assume when riding as a way to efficiently use their energy to traverse various inclines or uneven road surfaces.
The ideal lower body posture means having the knees directly over the middle of the pedal axles when cycling. This ensures the maximum amount of power is transferred through the legs down into the rotating pedals. Reach also assists with making pedaling power effective because the rider is not straining their muscles to exert unnecessary effort to maintain control of the handlebars.
Seat angle can also play a factor in reach. A seat that is angled back will increase the reach because the rider is leaning slightly toward the rear of the bike. A seat angle that is leaning forward will decrease the reach because the rider’s position has shifted slightly toward the front of the bike.
At this point, you may also find interest in learning how to choose the ideal MTB saddle position or how to improve mountain bike saddle comfort. Be sure to reference those related articles to find out more.
2. Ensure That the Arms are Parallel and Relaxed When Holding the Handlebars
During an uphill climb the rider’s elbow will form an angle of approximately 90° from the shoulder joints to the wrists. As the rider ascends the hill their forearms will form a line that is almost parallel to the ground, provided their elbows are relaxed and the line from their forearms to their wrists is straight.
A rider should never rest all their weight on their forearms and wrists as this can lead to a wrist injury, and numb hands when riding. Our article about choosing mountain bike grips for numbness has tips that will help you improve your hand position on the handlebars as well as various recommendations on grips size and style that will improve hand comfort when riding.
Depending on the type of terrain, a rider’s arms can be parallel to the gradient of the ground, or (if standing) their arms can be extended into an almost straight line. The arms should never be fully extended and the elbows must never lock. According to this extract from Mountian Bike Magazine’s Complete Guide to Mountain Biking Skills, if your reach is too long you might have to lock your elbows to maintain your hold on the handlebar grips which could cause injury to the elbows and arms as you rebound over rough terrain.
3. Make Sure the Arms Can Freely Maneuver the Handlebar
A rider who has relaxed elbows that are wide open when holding the handgrips has better control than a rider who has restricted steering due to elbows that are held stiff and closer to the body. This video tutorial from Global Mountain Bike Network explains the five most common posture mistakes when mountain biking as well as tips to correct them. They explain that having open flexible elbows give the rider more stability to maneuver in tight corners, helps them maintain their balance, and improves their ability to flex with the path during jumps so that the landing isn’t jarring to the joints in the arms and wrists.
As a rider swerves through tight and winding turns they swivel their handlebars and pivot their position on the bike to maintain momentum and compensate for these dynamic maneuvers. Being able to move freely while keeping full control of the bike means that riders can sustain their speed whether the path is straight or curved without sliding out or falling.
A properly calculated reach will ensure the rider can safely navigate the bike through challenging turns. Handlebar grips can also play an important role in the maneuverability of the bike because they provide a comfortable and tacky surface for the hands to hold onto. Our tips and tricks for choosing mountain bike grip diameter will help you choose the right size grip for your handlebar size and hand size.
How to Increase the Reach on an MTB
It is not technically possible to increase the reach on a mountain bike because the head tube and bottom bracket are fixed on the bike frame. You can however make adjustments to the handlebars by swapping them out for a style that is straighter or make tweaks to the head tube by installing a stem adapter to reduce the stem length.
To increase reach on an MTB, reduce the stem length by about 2cm and increase handlebar length by about 1.5cm, decrease the sweep of the handlebars to pull the body forward, or install a wider handlebar. A straight handlebar can increase true reach because it places the rider’s hands further ahead of the center of the head tube.
If you feel cramped in the cockpit and that your handling and control of your bike are not ideal for your preferred riding style, then you probably need to increase your reach. Removing spacers on your steering tube, swapping spacers around, or changing the type of spacers are a good way to tinker with your bike’s reach without making permanent changes that are not reversible, as this thread from Mtbr.com explains.
Some mountain bikers prefer to cut the steer tube to increase the reach measurement which is not ideal as this is a permanent change to the frame that can’t be undone. But if you are absolutely sure about your reach calculations and you have tried several head tube configurations to find the ideal reach, then you can have your steering tube cut to the precise height you want. Just make sure you take it to a professional bike shop to have it done, and that you have adequate space for handlebar clamps.
First prize would be to purchase a bike with the correct reach for your body proportions. This is why we recommend going to a store to try out a few styles of mountain bikes to get a feel for their fit. Even if you plan on buying your MTB from online stores, first going to a store to actually sit on the bike will help you determine the right size for your body. A mountain bike reach calculator can only help so much. It could also be beneficial for you to read our article that covers what mountain bike you should buy to help you choose the right one.
1. Decrease Stem Length
Decreasing stem length won’t make any change to the actual reach measurement because (as explained earlier) the reach is measured from the center head tube to the vertical line that extends from the bottom bracket. When you reduce your stem size, you are merely making the length of those vertical lines shorter—the horizontal reach line remains the same length because it is perpendicular to the stack measurement. However, decreasing the stem length will cause you to stretch a little more than before, creating an artificial reach adjustment.
Decreasing stem length can be as simple as removing and rearranging spacers on the steering tube. According to this thread on Mtbr.com, placing spacers above the stem might result in a cap that sits too high above the steerer which could be dangerous if you’re in an accident. So, make minor adjustments to the spacers with caution and test between each addition or spacer reposition to see if this will significantly alter the reach to your liking.
You could also replace your existing handlebar stem with a shorter one like this 30 degree short handlebar stem or this this 35mm short stem which will alter the angles on your stem so that the reach feels longer with minimal adjustments.
More and more mountain bikers are taking to cutting their steerer tube to obtain their ideal reach. Ed Burke’s book ”High-Tech Cycling” recommends against cutting the tube because if a mistake is made you could end up with a steering tube that doesn’t have enough space to attach the steering clamp to and you are essentially left with a useless bike frame. Another cautionary warning against cutting the steering tube would be if you ever want to sell your bike, as this shorter tube might deter a possible buyer.
If however, you have made your mind up about cutting the steering tube then we recommend using some bright electrical tape to tape out the reach measurements you are trying to achieve. First place the bike on a bike stand and orientate the wheels so they are perfectly in line with the bike frame. Start with a strip of tape that runs from the rear wheel to the front wheel and is parallel to the ground. Next run a length of tape across the top of the frame from the seat post to the spot where you would like the center head tube to be, making sure it is also parallel to the ground. Then, run a piece of tape that extends from the bottom bracket to the top piece of tape. Measure their placement and tweak the tape according to the bike reach calculation you measured earlier.
2. Increase the Length of the Handlebars
Choosing wider handlebars will enable you to spread your arms out further and lean your body more forward, creating another artificial reach adjustment. Bike bar extenders like these allow you to extend your handlebar sideways while extenders like these attach to the handlebars and extend forward to give the mountain bike more of a road bike feel. Installing extenders on your mountain bike gives you the freedom to alter your hand positions according to the type of terrain and will reduce muscle fatigue because you can change your posture if your muscles start to cramp or ache.
3. Increase the Forward Sweep of the Handlebars
Forward swept handlebars were popular in the 1980s but would often cause wrist strain as the cyclist was forced to place their wrists in awkward angles on the handgrips to maintain control of the bike. A suitable alternative to a forward sweep handlebar is a straight or flat bar like this because this bar accounts for the natural hand position that keeps the rider’s forearms and wrists aligned to reduce injury and strain.
A forward sweep handlebar is also known as a reverse sweep handlebar, and though they are harder to find these days you might be able to find one secondhand or ask a bicycle mechanic to make a custom one for you. You can give your current handlebars a forward swept feel by simply loosening the clamp on the stem and rolling your handlebars forward about 1-2cm. See if you like the way this new angle feels before hunting down or custom ordering a forward sweeping handlebar.
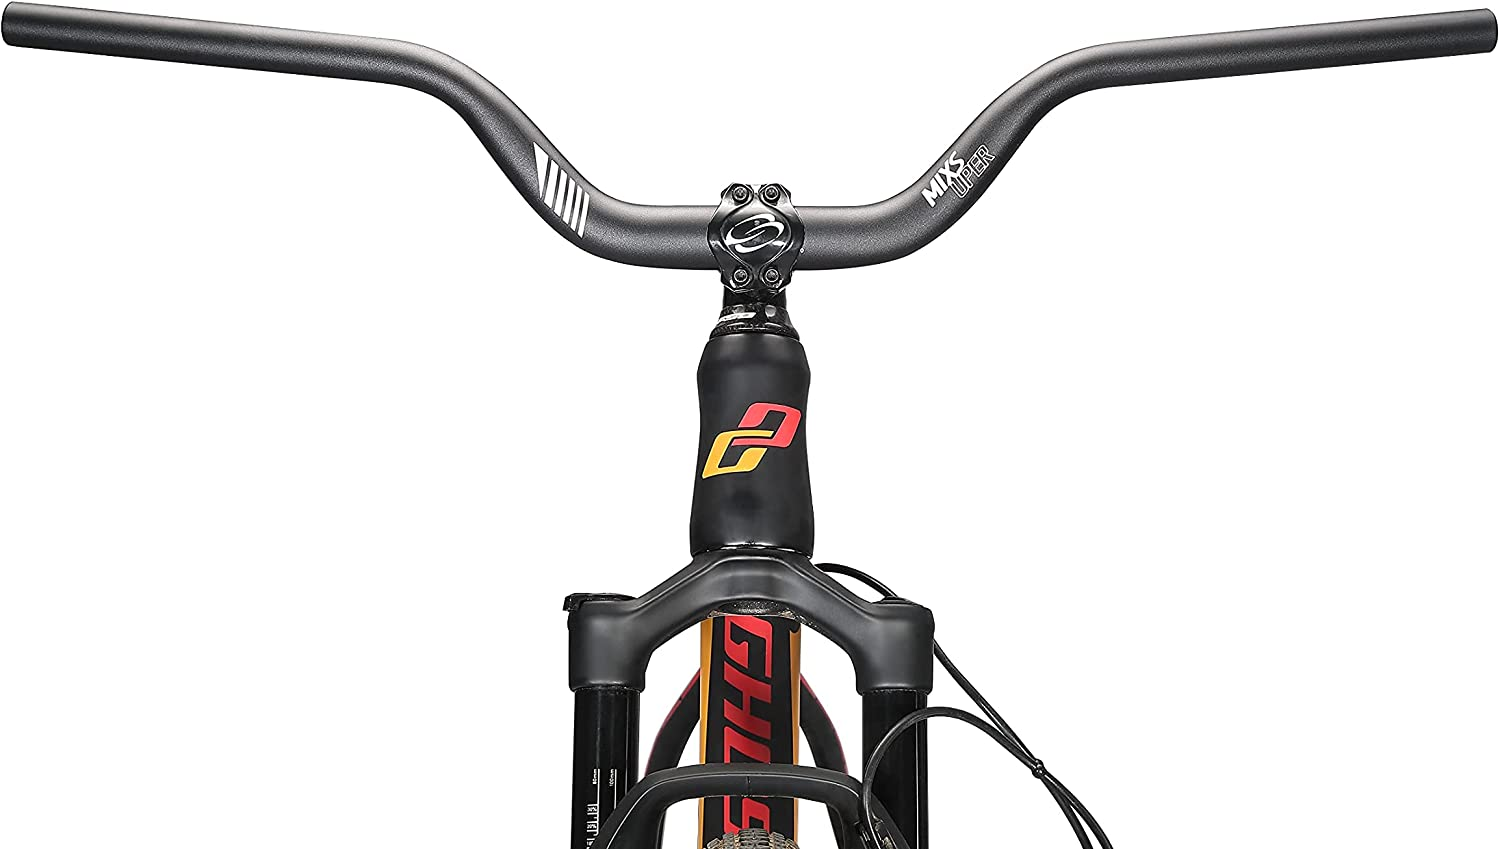
4. Use Wider Handlebars
Wider handlebars like this force the rider to hold the handgrips further out. This means their posture is leaning forward more to accommodate the altered reach. Many mountain bikers who prefer strenuous trails with lots of twists and turns enjoy using wider handlebars because they feel the wider bar gives them better control and maneuverability in tight corners.
This article from the Journal of Applied Ergonomics confirms what mountain bikers and stunt riders have been saying about handlebar width. The article states that handlebar configuration has a significant impact on handling and control, particularly in maneuvers like circling, slalom, and figure-eight movements. Most notably, the article tends to agree with mountain bike professionals that wider handlebars are best for more experienced riders as they are more difficult to steer swiftly in quick-reaction situations.
5. Adjust the Angle of the Handlebars
A slight rotation of the handlebar angle can help increase reach if you are only looking to make small adjustments. If your reach needs a slight increase of 1-1.5cm then turning the handlebar forward might be enough. If you need more than 1.5cm to be added to the reach, then this is not the method for you.
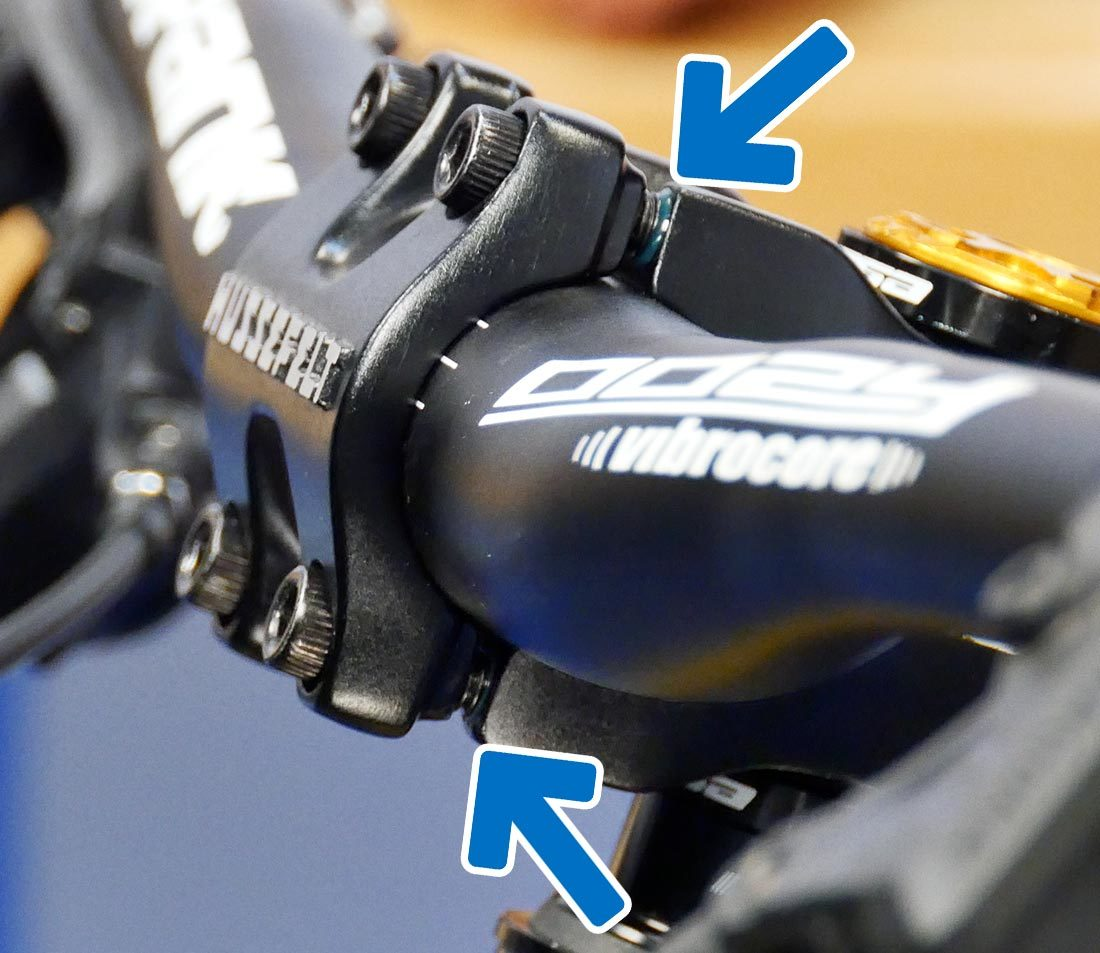
To change the handlebar angle first locate the stem faceplate on the front of the handlebars. Using an Allen wrench from a set like this or torque wrench like this, loosen the screws by a few turns. You don’t need to completely remove the screws because you are only rotating the handlebar while it is still in the clamp. Next, rotate the handlebar away from the bike so that the curve is pointing slightly forward. When you have found the correct position to achieve the reach you want then tighten the screws to fix this position.
Adjusting the angle of the handlebars is a less invasive method of altering the reach on a mountain bike because you are not cutting the stem, nor are you purchasing a new handlebar that you might not like. And if you find that the new handlebar angle doesn’t improve your comfort and handling, you can always change it back to its original position.
6. Adjust the Seat Angle Backward
Take care when adjusting the seat angle because an angle that is shifted too far back can cause pain in the hips and lower back. As this article from the International Journal of Sports Physical Therapy explains, poor positioning on the bike seat can cause the muscles to become overloaded. This can lead to referral pain in the posterior hip muscles, gluteus maximus, deep hip rotators, and upper hamstrings, which will make riding for long distances unbearable.
Small angle adjustments to the seat can be made in ¼-inch increments as long as you make sure that the knee sits directly above the ankle when cycling and the hip angle doesn’t become cramped into an angle smaller than 35 degrees for long periods of time, as advised in this article from The Physician and Sportsmedicine Journal.
The ideal riding posture for mountain bikers is a slightly upright forward-leaning angle that pushes the rider’s weight through the legs to the bottom bracket. The bottom bracket is the center point of the bike so having the rider’s weight directly above this point encourages better control and pivoting over uneven terrain. A seat that is angled too far back will throw this balance point out and cause the rider to strain when compensating for bumps on the trail.
You might also find interest in learning how to fit a mountain bike saddle. If so, be sure to check out our related article for more information.
Summary of Accessories That Can Increase Reach on a Mountain Bike
| MTB Accessory/Adjustment | Amazon Product Example | Price |
| Shorter Stem | 31.8 Short Bike Stem Forged MTB Stem | ~$20 |
| Handlebar Extenders | Origin8 Compe Lite Bar End | ~$20 |
| Flat Handlebars | 25.4mm Bike Handlebars | ~$20 |
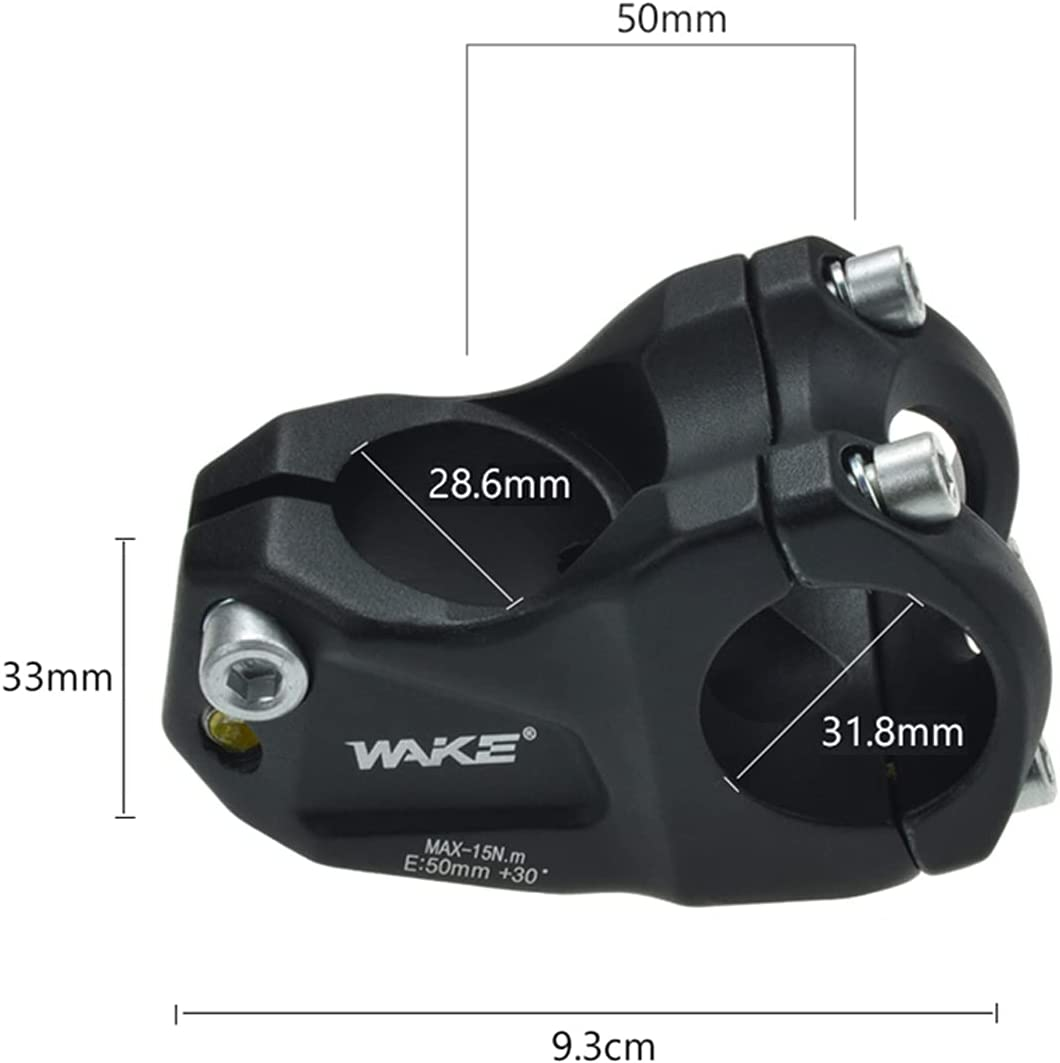
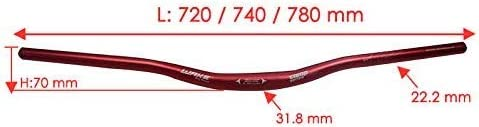
| Wide Handlebars | Wake Bicycle Handlebars 31.8 mm Mountain Bike Handlebar 780mm | ~$30 |
How to Shorten Reach on Bike
There are several ways to reduce the reach distance on a mountain bike. One of the quickest and simplest ways is to change out the handlebars for ones that sweep back toward the rider. Drop bars have a pair of downward sweeping ends that curve down and back so that the rider adopts a more crouched position.
To shorten reach on a bike, increase the stem length by 1.5 cm -2.0cm or swap it with a shorter stem, increase the backward sweep of the handlebar, or swap out flat handlebars for drop handlebars.
Our article about whether you can install drop bars on a mountain bike explains the benefits of installing drop bars as well as some reasons why drop bars might not suit your riding style. Drop bars can be expensive because you will often need to also replace your shifters and brake levers with something like these, so we recommend that you do some research to help you make a well-informed decision, especially if you want to alter your reach.
1. Increase the Length of the Stem
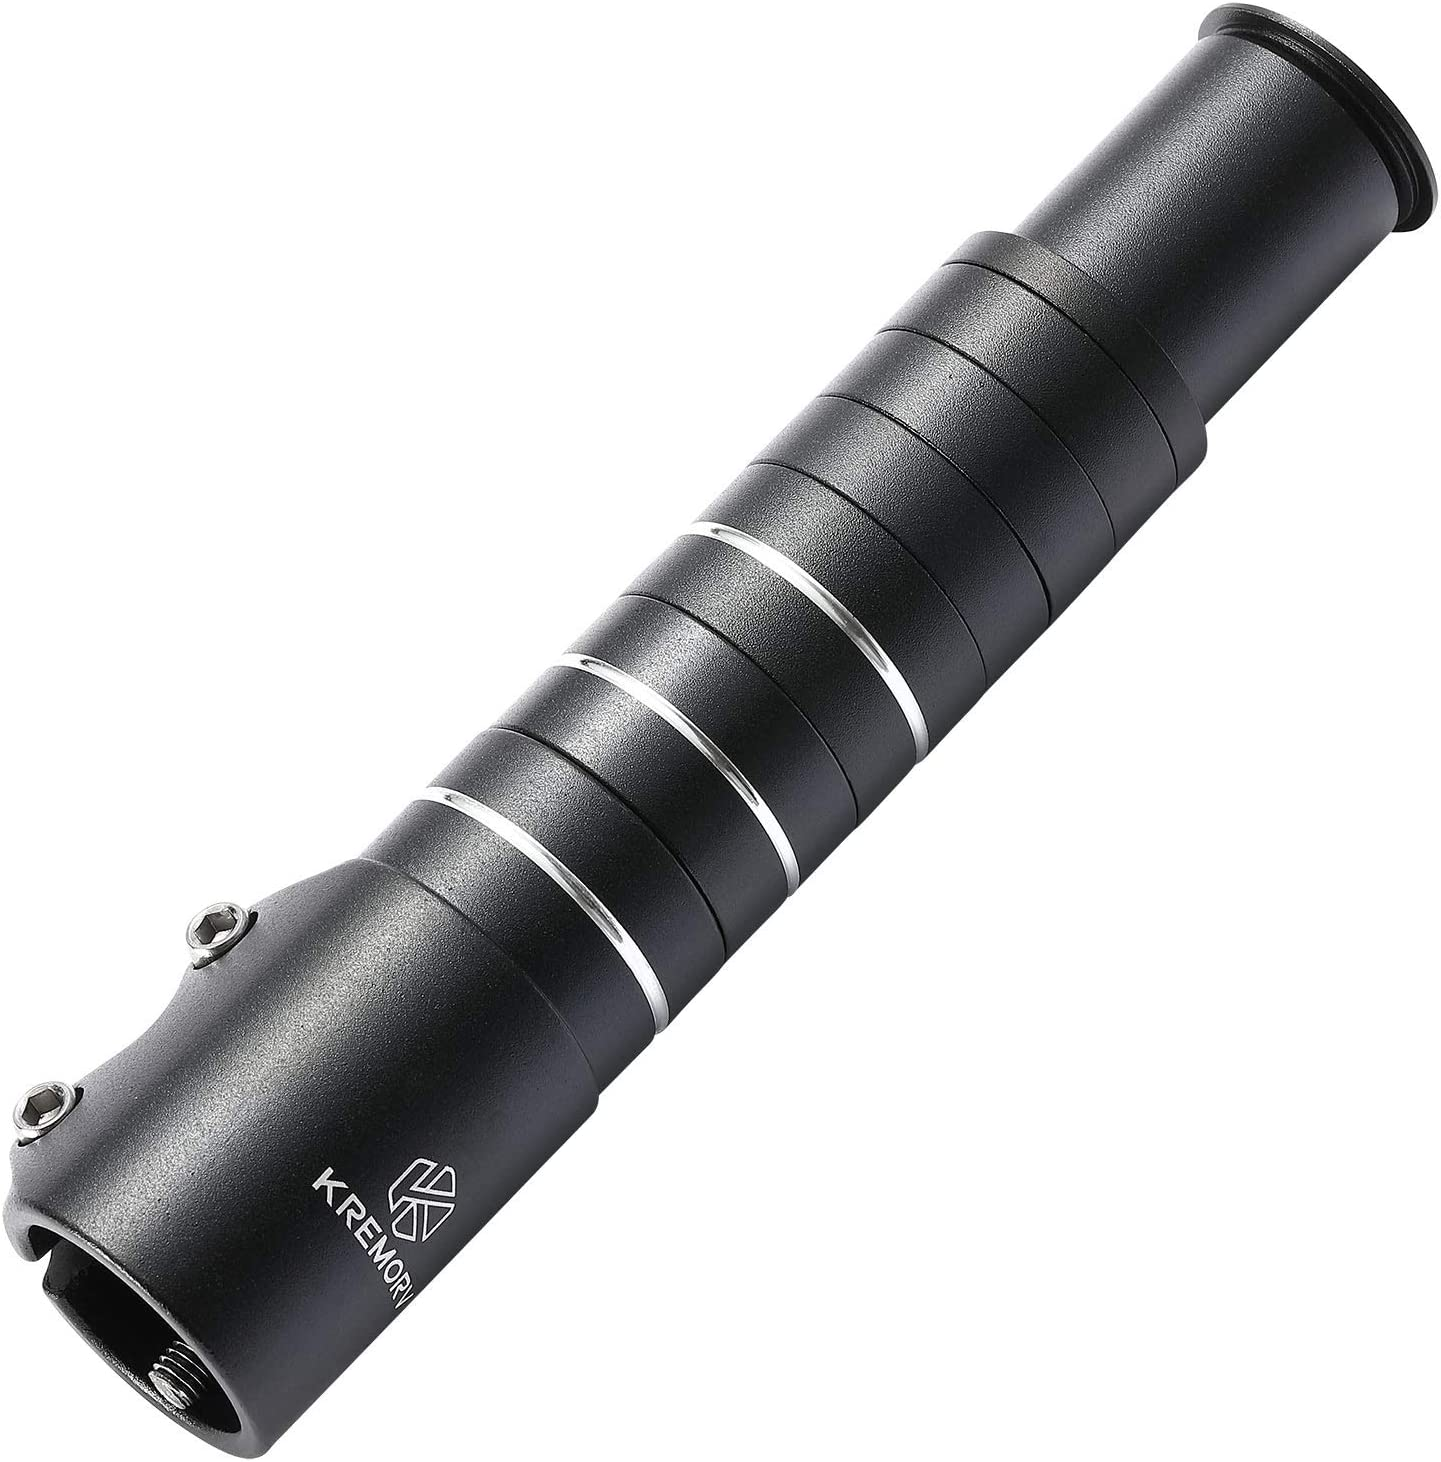
Increasing the stem height or length brings the handlebars up higher so that the rider sits more upright and the handlebars feel closer. This setup is a great solution for a rider who has short arms or a shorter torso. Buy a stem extender like this one which increases the stem length by about 180mm and also includes 6 spacers for additional height, or this one that adds 145mm of length to a stem and has angled adjustments to further customize your reach.
Be careful about raising your handlebars too high because this can cause shoulder pain if the angles in the arms and shoulders aren’t kept at a comfortable 130 and 90 degrees respectively. According to this article from Frontiers in Human Neuroscience, the elbow should be flexed at 129.4 degrees during casual riding and should not straighten more than an additional 10 degrees to prevent the joint from locking and injury during jumps and rebounding. This article from Jericho Physio the angle of reach on the shoulder joint should be around 90 degrees during casual riding and can decrease to around 40-80 degrees when climbing, descending, or jumping.
2. Increase the Handlebar Backward Sweep
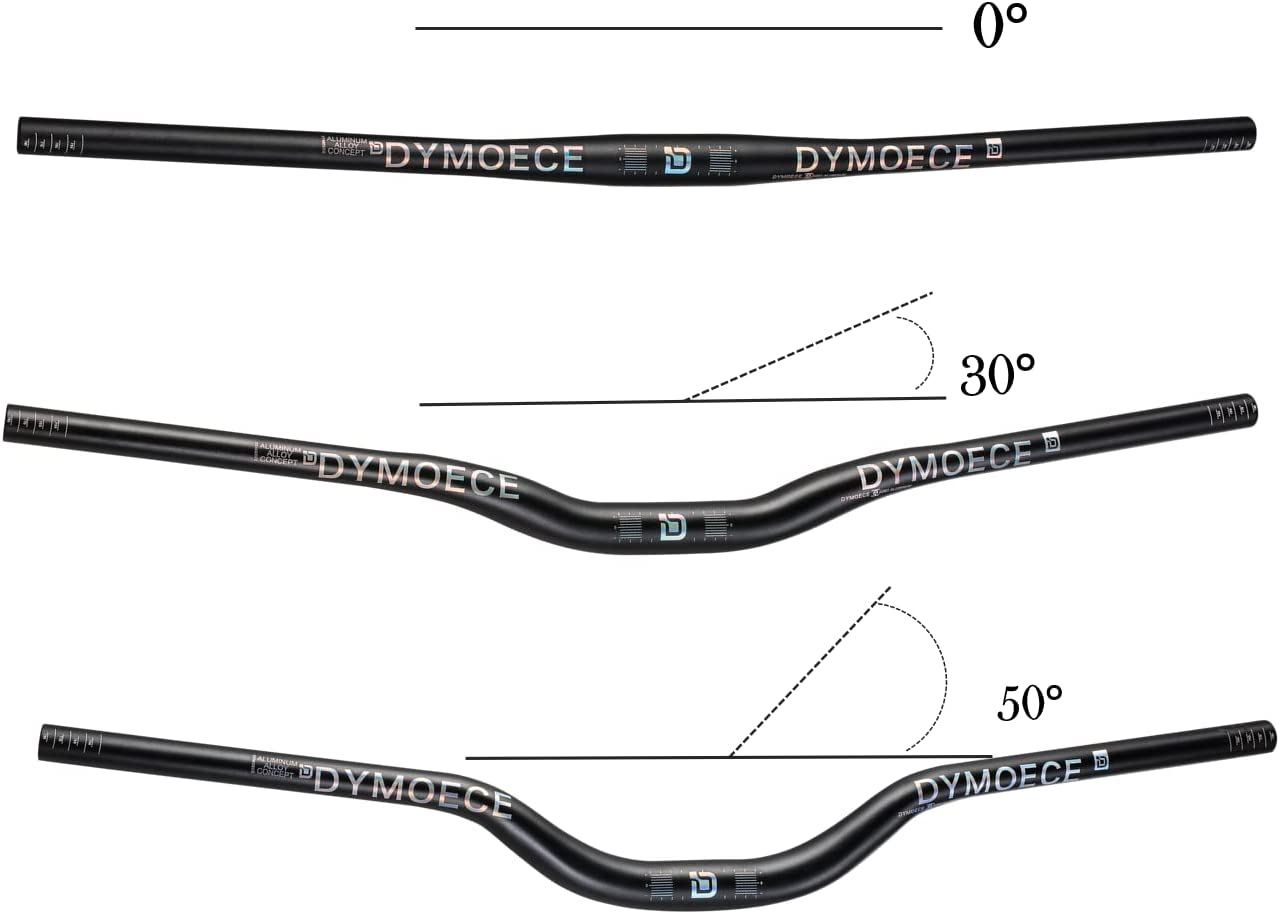
A handlebar that sweeps back will bring the handgrips closer to the rider and reduce the reach distance. The sweep angle can range anywhere from 9 degrees, like this one, up to 30 degrees or 50 degrees. These vintage highway handlebars have the largest backward sweep which is not ideal for mountain bikes but is better suited to casual road bikes.
Back swept handlebars bring the entire cockpit control closer to the rider, which can be perfect for riders with short arms, but might start to feel cramped for larger riders, especially when they have to maneuver through tight corners.
3. Replace Flat Handlebars with Drop Bars
Drop handlebars like these are gaining popularity with mountain bikers because they provide the rider with multiple places to put their hands when riding. For example, when taking a relaxed ride a rider can place their hands on the top of the handlebar for a more upright posture, on the hoods for better shifting and braking control, or on the ramps to ease the muscles on the inside of the arms. During more aggressive riding situations the rider can place their hands on the drops or hooks to get into a more aerodynamic position, especially in tight corners and sprints.
Drop bars offer the rider versatility and flexibility for long rides, and they create a custom look and feel for your bike too. Our article about what drop bars are and why you need them will help you choose the correct drop bar for your riding style and desired reach measurement.
4. Install Narrower Handlebars
Narrow handlebars work in the opposite way too wide bars because they bring the rider's hand placement closer toward the center of the bar. This moves the shifter controls and brake levers closer to the rider and helps with better stability and control. Narrow handlebars are also better for riders who ride on trails with lots of closely packed trees and rocky walls because the handlebar ends are less likely to accidentally clip the tree trunks or boulders as the rider passes them.
The smallest handlebar is around 440mm like this and is used on kids’ bikes. While a 600mm handlebar like this is the narrowest handlebar that can be fitted to an adult mountain bike.
5. Choose Handlebars With a Higher Rise
A handlebar with a higher rise like this looks almost like a backward sweep handlebar because its shape is similar. The difference between the two is that a high-rise handlebar, when fitted to the bike, has the handlebar curving up where the backswept ones will point toward the rear of the bike. High-rise handlebars typically come with rises of 30mm, 50mm, 70mm, and 90mm.
Summary of Accessories that Can Shorten Reach ona Bike
| MTB Accessory/Adjustment | Amazon Product Example | Price |
| Longer Stem | MTB Bicycle Bike Fork Stem Extender Handlebar Riser Adaptor | ~$20 |
| Backward Sweep Handlebar | Northroad Touring Handlebar | ~$40 |
| Drop Bars | Easton EA30 DG Ergo Handlebar | ~$40 |
| Narrow Handlebars | Mountain Bike Road Bike Handlebar Aluminum Alloy Flat Bar Riser Bar 25.4mm*600mm | ~$20 |
| High Rise Handlebars | Mountain Bike High Riser Handlebar 31.8mm Length 720mm Rise | ~$40 |