How to Adjust a Mountain Bike Seat Angle to Maximize Performance and Comfort
When you’re riding your mountain bike, you want to be in the perfect position to avoid any long-term health problems like back or knee pain. Along with using the right-sized bike, making sure your handlebars are the right height, and putting the seat post in the correct position, you need to make sure your mountain bike seat angle is correct.
To adjust a mountain bike seat angle, first gather a multi-tool with an Allen key, an open box wrench, and a mountain bike seat angle adjuster. Then, loosen the bike seat using the Allen key, install a mountain bike seat adjuster to easily adjust the seat while on rides and use the bubble level to make sure the seat is level. Finally, tighten the seat back up.
If the angle is too far forward on your mountain bike seat, you tend to slide off while you pedal. But if the top of your seat is too high, it puts pressure on sensitive areas which makes your ride uncomfortable and can have bad, long-lasting health effects. So to avoid this, you want your mountain bike seat to be as level as possible.
Be sure to get a friend to help you out. Adjusting a mountain bike seat angle is tough to do on your own! This article from REI explains how to set your mountain bike seat up.
Here are the steps to adjust your mountain bike seat:
Step 1. Make Sure You Have All the Tools to Adjust Saddle Tilt
It’s super important to make sure you have all the tools you need to adjust your saddle tilt before you get started. Since you need a friend’s help to do this, you don’t want to waste their time because you have to run out to the local bike shop to buy something.
To learn more about all the different tools needed for mountain bike maintenance, be sure to check out our article.
Tool 1. Multi-Tool With an Allen Key
In general, you’ll want a multi-tool with you whenever you are riding your mountain bike. This tool helps you with flats or if you come into any other mechanical issues while riding. Incidentally, you may find our step-by-step instructions to change a mountain bike tire useful.
If you don’t, buy a multi-tool before you go on your next bike ride, make sure that you check out our mountain bike tool bag ideas to ensure that you have everything you may need if something goes wrong.
Most bikes require a 5mm hex key like this to loosen the back bolt underneath your bike seat so you can adjust the angle. Only loosen this bolt slightly so you can adjust the seat, don’t loosen it all the way. There are a lot of parts connected to this bolt and can be confusing to put back together.
Tool 2. Open Box Wrench
If you have an older bike, instead of a hex tool you may need to use an open box wrench from a set like this. When you look at the bottom of your bike seat, if there’s a nut you need to loosen instead of a bolt, then you need an open box wrench. For older bikes, the nut size will be 12mm, 13mm (1/2″), or 14mm (this size is pretty rare though), so purchase the corresponding open box wrench size.
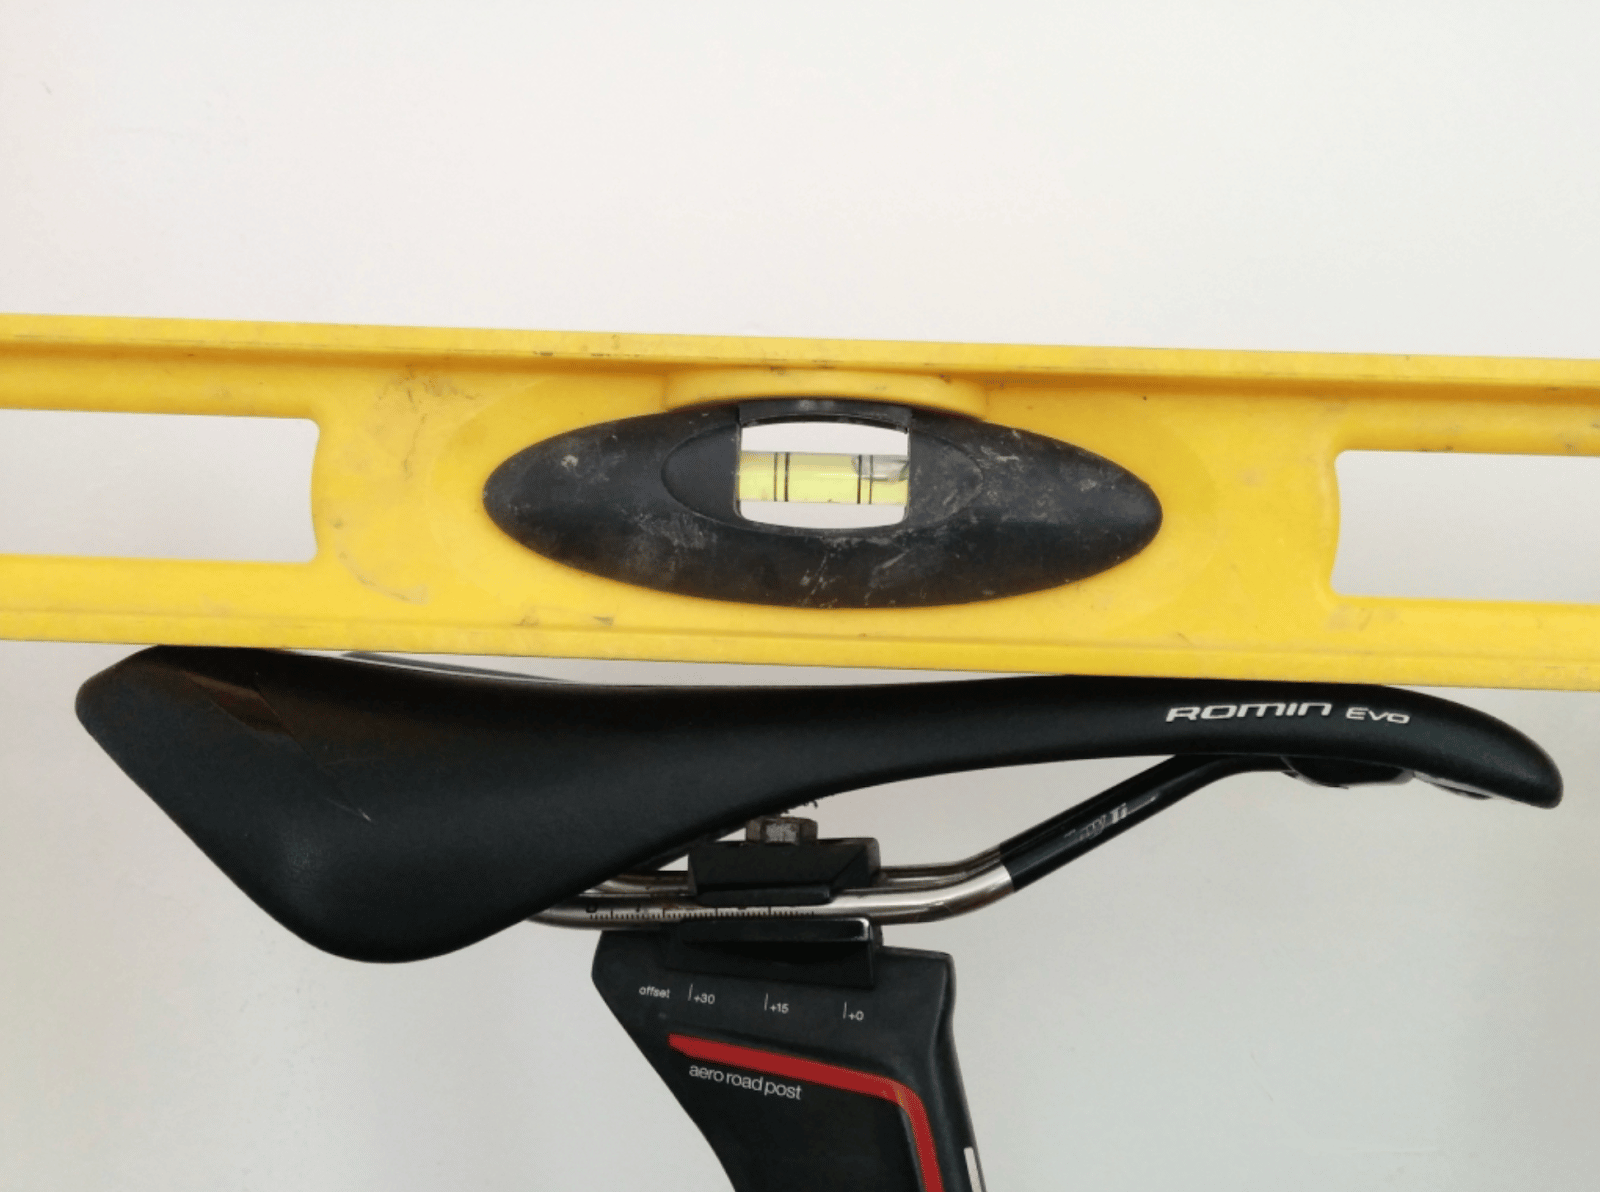
Tool 3. Bubble Level
You can’t tell a mountain bike seat is straight just by looking at it. And while there are lots of fancy levels you can purchase, a good old-fashioned small bubble level like this will do the trick. Use a bubble level to determine if your bike seat is flat or not while adjusting.
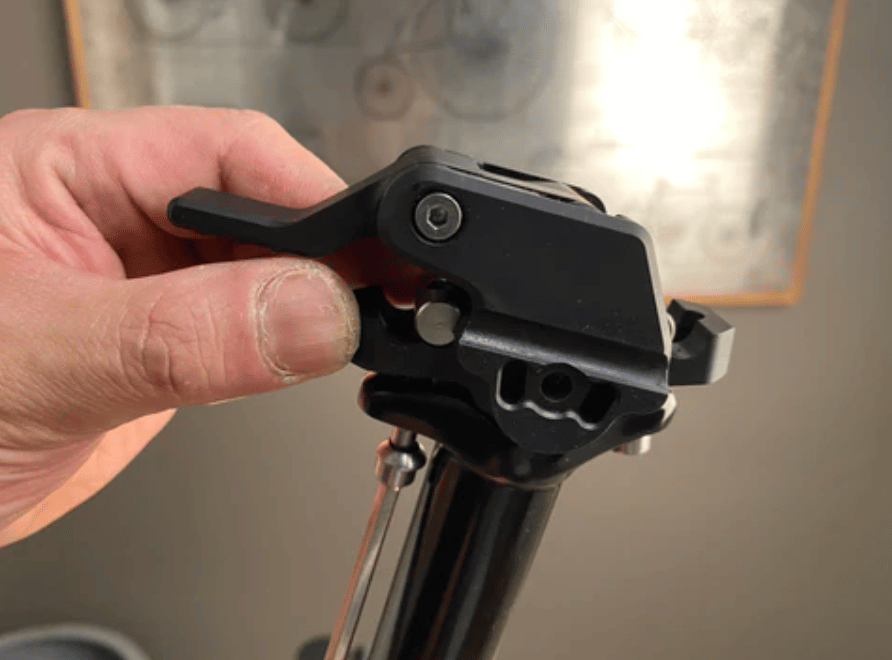
Tool 4. Mountain Bike Seat Angle Adjuster
Some people prefer to switch the angles of their mountain bike for either ascending or descending hills. To make it easy to switch your mountain bike seat, you can add a mountain bike seat angle adjuster like this to your bike. This tool allows you to switch between three riding positions: a negative 10-degree climb position (nose-down saddle), a 0-degree neutral position (flat saddle), and a positive 12-degree descend position (nose-up saddle).
Here is a summary of the tools that you will need:
| Tool Name | Function | Example | Price |
| Allen Key | Loosens the back bolt underneath your bike seat | Ceco USA 10 Function Bike Tool | ~$15 |
| Open Box Wrench (For older bikes) | Loosens the nut underneath your bike seat | Craftsman Combination Wrench, ½ Inch | ~$10 |
| Bubble Level | Shows you if the seat is flat or not | Dowell 9 Inch Magnetic Box Level | ~$10 |
| Mtb Seat Angle Adjuster | Allows you to change the angle of your seat easily during your ride | Aenomaly Blackout SwitchGrade | ~$285 |
Similarly, if you're interested in learning how to choose the right mountain bike saddle height, be sure to read our related article.
Step 2. Check Visual Cues to See What’s Wrong With Your Current Mountain Bike Seat Angle
Use helpful visual cues to assess what’s wrong with your current mountain bike seat angle. Have a friend take some pictures or help hold your bike while you’re on it so you can figure out the problem.
If you’re sliding forward on your seat or your butt is coming off the back a little bit, that means your seat is angled down too much.
If you’re stretching to reach your handlebars or find yourself struggling to stay on the back of your seat, then your seat is angled up too much. We actually discuss this in greater detail in our guide that provides a mountain bike reach calculator.

Step 3. Use a Tool to Loosen Your Mountain Bike Seat
Grab that Allen wrench on your multi-tool or your open box wrench. It’s a good idea to take a picture of the angle of your bike seat before you get started. Once you loosen the bolt or nut, the bike seat will be quite floppy.
Gently loosen the bolt or nut. If you have a newer bike, it will be a bolt, if you have an older bike, it will be a nut. Loosen this slowly, because you don’t want to fully remove the nut or bolt. You just want it loose enough so that you can adjust the seat, but not so that all the pieces come apart.

Step 4. Install a Mountain Bike Seat Adjuster as an Optional Extra
Installing a mountain bike seat adjuster is quite complicated, so be sure to follow the installation instructions like these, carefully. There are different types based on the specifications of your specific bike, so read through the site thoroughly so you buy the seat adjuster that’s right for your bike and follow the correct instructions. You must fully remove your bike seat before adding the adjuster, so it’s best to do this between steps 3 and 4.
Step 5. Use a Bubble Level to Set Your Bike Seat Straight
Place a bubble level on top of your bike seat. Slowly move the seat either up or down until the bubble in the level is in-between the two lines. This is really tough to do accurately on your own, so it is crucial that a friend help you with this.
Step 6. Tighten the Bike Seat
Once the seat is in the correct position, have your friend hold that position. Grab your Allen key or open box wrench and tighten the bolt or nut so the position holds. You want the nut or bolt to be tight, but not so tight that it’s impossible to loosen again. But tighten it enough so that the seat angle won’t move at all during your bike ride.
Obviously you want to keep your seat nice and tight throughout your ride. Otherwise, you open yourself up to a world of injuries and discomfort. For more information, be sure to read our related article explaining how to fix a mountain bike seat that keeps moving.
Reasons for Mountain Bike Saddle Angle Adjustment
There’s nothing that shortens a bike ride faster than pain. Whether it’s in your rear end, your elbows, or your knees, you can’t do those long rides in the mountains if you can barely tolerate being on your bike. So if you’re experiencing any pain or discomfort, that’s the number one reasons you should adjust your mountain bike saddle.
Adjust the mountain bike saddle angle for saddle discomfort, knee problems, numb hands or forearms, neck and shoulder pain, or to be more comfortable when ascending or descending steep tarrain.
Reason 1. Saddle Discomfort
Your saddle is incontact with sensitive parts of your body, so you don’t want an awkward saddle position to irritate those areas. If you ride a lot of mountain bike trails, then you do not want to be in a nose-up saddle position. This puts too much pressure on nerves and blood vessels, causing intense pain in the area on your seat. This can cause long-term problems, so don’t try to fix this issue just by wearing shorts with extra padding. Change the saddle position so it’s flat and level as we explain in our guide on how to adjust a mountain bike seat angle.
And if you’re experiencing tons of saddle discomfort after making all the adjustments you may just need a different type of bike saddle as explained in this article by the experts at REI. Be sure to also read our related article explaining how to choose a mountain bike saddle cushion for comfort and performance. You might also be interested in learning how to manage mountain bike saddle numbness so be sure to check out our related article.
Reason 2. Knee Problems
If your saddle is angled too low, this can cause you to slide to the front more. Sitting too low or too high on your bike strains your knees. Instead of the pressure from pedaling being at the ball of your foot, it’s focused on your knee joint, which causes pain and long-term health problems.
To find the right placement, put one foot flat on the floor and the other on the pedal at a six o’clock position. In this position, a weighted string from your knee should just come over the ball of your foot. You can actually do this by attaching something small and heavy to a long piece of string and holding it at your knee. This is called a plumb line.
And if adjusting the saddle angle doesn’t fix this problem, you may need to adjust your saddle height in which case this article by the enthusiast at Rei could be helpful. And if that still doesn’t help then you may need to check out our mountain bike sizing chart to see whether you bike isn’t perhaps just the wrong size for you.
Reason 3. Numb Hands and Forearms
When you angle your seat too far down, this causes you to slide forward in your seat. You’ll start to feel discomfort in your seat, and it’s natural to try to exert pressure in other places to relieve the pain. So, you automatically might start to put more pressure on your handlebars. But this causes numbness and pain in your hands and forearms. So, make sure your seat is level and this might fix your hand and arm pain. If not, our tips and tricks for choosing mountain bike grips for numbness could help.
Reason 4. Neck and Shoulder Pain
If your saddle is angled too far upward, this causes your body to slide to the back of the saddle. In this position, you’ll have to reach too far to grab your handlebars. This awkward position can cause stiff necks and shoulder pain, affecting your ability to move and complete daily tasks. If you’re feeling excessive neck and shoulder pain after a mountain bike ride, try leveling out your saddle to see if that fixes it and also make sure that you are holding your mountain bike grips to maintain proper posture as we suggest.
Reason 5. More Comfort When Ascending or Descending
While it’s better to leave your saddle in neutral while you’re riding, some riders prefer to angle the saddle more up or down while ascending or descending.
When going up a steep or long hill trail, you can angle the nose of your saddle down about negative 10-12°. And once you get to the top and before you start your descent, take it back down to your level position or even tilt the nose up to about positive 10°.
These small adjustments can add rear-wheel traction, alleviate pressure and numbness, and helps you meet the angle of the trail so you can climb faster and improve your gross efficiency as this article from the Journal of Applied Physiology explains. However, stopping to adjust your mountain bike seat takes time away from your ride, so if you have the money, you can purchase a mountain bike seat adjuster like this that convenieintly allows you to change the angle of your seat.
Similarly, you may find interest in learning how to choose a mountain bike saddle for big guys. If so, be sure to read our related article for more information.
Pro Cyclist Saddle Tilt Values & How They Help
Recently, UCI changed the rules for professional riders. Instead of only being allowed to adjust their saddle to a 3° negaitive tilt, they can now change it as far as a 9° negative tilt. This has significantly changed how professional riders can ride.
Pro cyclist saddle tilt ranges between a 0 degree and 9 degree negative tilt. An aggressive saddle tilt allows them to be more aerodynamic and to straighten their spine while crouched, but this tilt should only be used by cyclists that have a similar body type, physique, and goals as a professional cyclist.
This video tutorial by Bike Fit Adviser explains a bit more about the saddle tilts that pro-bikers tend to prefer.
Here are the benefits of an aggressive saddle tilt:
Benefit 1. Allows Pro Riders to be More Aerodynamic
It’s important for pro cyclists to be able to crouch as low as possible on their bike so that their bodies won’t cause any extra wind resistance and slow them down. With a 9° negative tilt, this allows riders to get even lower in their seat. Make suer that you use an daccurate level like this to measure the tilt of your saddle.
However, this puts a lot more pressure on your hands, neck, shoulders, and chest muscles, so it may not be worth it for just a causal mountain biker.
Benefit 2. Allows Pro Riders to Straighten Their Spine While Crouched
Professional cyclists are more flexible than the average rider. With an aggressive forward tilt, pro riders can tip their pelvis forward to be more aerodynamic. This makes their back flatter, which helps with lower back pain.
Also, pro riders drop their handlebars super low so they can avoid any extra air resistance. An aggressive seat tilt forward makes it even easier to grab those low handlebars.
However, for an average rider, a 9° negative tilt makes it more likely for your pelvis to roll forward on the saddle and even fall off. This makes for an unstable ride, which can lead to crashes or other injuries.

How to Tell if You’ll Benefit From an Aggressive Seat Tilt
The average cyclist will not benefit from such an aggressive seat tilt as pro cyclists do. But if you consider yourself to be a pro or semi-pro cyclists, this might be something for you to consider.
Pro cyclists are typically quite young, in their mid-teens to late 30s. If you’re older than that, then you probably won’t have the upper body strength needed for this position.
Pro cyclists also spend lots of time on their bikes, usually 20-30 hours a week. They know exactly what positions they need, will work hard to achieve their riding goals, and they have tons of practice time to perfect this. If you spend 20-30 hours a week on your bike, then you’ll have the same kind of experience and know what’s best for your body.
Another big thing to consider is that pro cyclists are extremely light. You must consider the effect that your body weight has on your bike. Pro cyclists typically weigh less than normal for their height, so even if you’re in good shape, you may have 40-50 pounds on a pro cyclist. This means all that extra weight will put lots more pressure on your upper body if you choose to have an aggressive seat tilt, which can cause upper body discomfort and pain.
The last thing to consider is how fast you’re cycling. Pro cyclists are transferring mega watts of energy into their pedals so that they can move as fast as they do which is made easier by the tilt of their saddle. Most recreational riders are not traveling at the type of speeds that would warrant them needing this.
So all in all, aggressive seat tilts should be saved for pro cyclists or for people who have similar riding practices to pros.
If you’re looking for general ways to be more aerodynamic on your mountain bike, it would be better to consider a drop bar like this as we suggest in our article about what mountain bike drop handlebars are. You can install drop bar extenders like these so you can keep your current straight handlebars and just add drops to them.
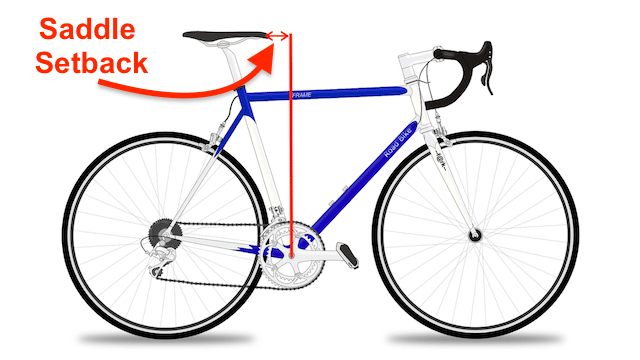
Should an MTB Seat be Forward or Back?
Your MTB seat shouldn’t be aggressively forward or back, it needs to be in the exact right position. If not, it can cause knee pain, climbing issues, and upper body issues.
To tell if a mountain bike seat needs to be more forward or back, use a plumb bob. If the weight falls in front of the pedal spindle, then the seat needs to be moved back. If the weight falls behind the pedal spindle, the seat needs to be moved forward.
The correct position of your mountain bike seat, often referred to as the “fore-aft saddle position,” depends on where your knee is. You’ll need a friend to help you figure this out.
Sit on your bike with a friend holding it. Backpedal so that your feet are at the 3 o’clock and 9 o’clock positions. Then, you’ll use a plumb bob like this (a long piece of string with a small weight at the end of it) to figure out if you need to move the seat more forward or back. Have your friend hold the top of the string of the plumb bob at the front of the kneecap that’s more forward. The string should line up with the pedal spindle and axel.
However, even with the plumb bob test, it can be hard to tell if your seat is too far forward or back before you actually start riding. Here are some other clues to help you tell once you get a ride or two under your belt on your mountain bike.

How to Tell if Your MTB Seat is Too Far Forward
If your hands and arms ache after each bike ride, your seat might be too far forward. This is because when your seat is too far forward, instead of your bodyweight being supported by your pedals, it is being supported by your arms. Also, you won’t be able to take breaths that are as deep while you’re relying on your upper body muscles to support your weight instead of your core and legs, so you’ll have to take shorter and shallower breaths. It is important that you are mindful of your breathing while cycling as this article by Cyclist explains.
Knee pain is another key indicator. If you feel pain under your knee cap in the front of your knee, then you need to scoot your seat back a bit.
How to Tell if Your MTB Seat is Too Far Back
It’s possible to overcorrect when you move your seat back, and positioning it too far back. If you are going up a steep hill and feel like you can’t get enough power unless you stand up, then your seat is too far back. This will feel quite comfortable on flat roads and minor gradients, so you may not realize it until you try a steep incline.
If you’re feeling like you can’t cycle quickly at a fast cadence, then your bike seat might be too far back. You’ll also likely be feeling some knee pain, but different than if your seat is too far forward. When your seat is too far back, you’ll feel knee pain at the back of your knee rather than behind the kneecap.
When you recognize any of these issues, try scooting the mountain bike seat position up a few mm.