Should I Add a Mountain Bike Mudguard Extension to My Bike?
Keeping your mountain bike clean is not always possible on rainy days, but you can decrease the amount of mud that sticks to your body and your bike by installing mudguards. Mudguards not only benefit the rider but also reduce the amount of water and mud that sprays onto other riders. The further a mudguard extends over the tire arch, the better its coverage and ability to deflect dirt and debris away from the rider. In this article, we’ll discuss whether you need a mountain bike mudguard extension and how to choose the best ones.
Add mountain bike mudguard extensions to improve coverage, prevent mud splatter, reduce damage to bicycle components, and protect fellow riders from water, mud, and debris that is flung up by the tires.
What is a Mudguard Extender?
Mudguards are placed over the wheel so that they deflect muddy water downward and away from the rider and the bike frame. This helps to shield the rider from getting soaked when riding and prevents mud from accumulating on the frame, pedals, and chain.
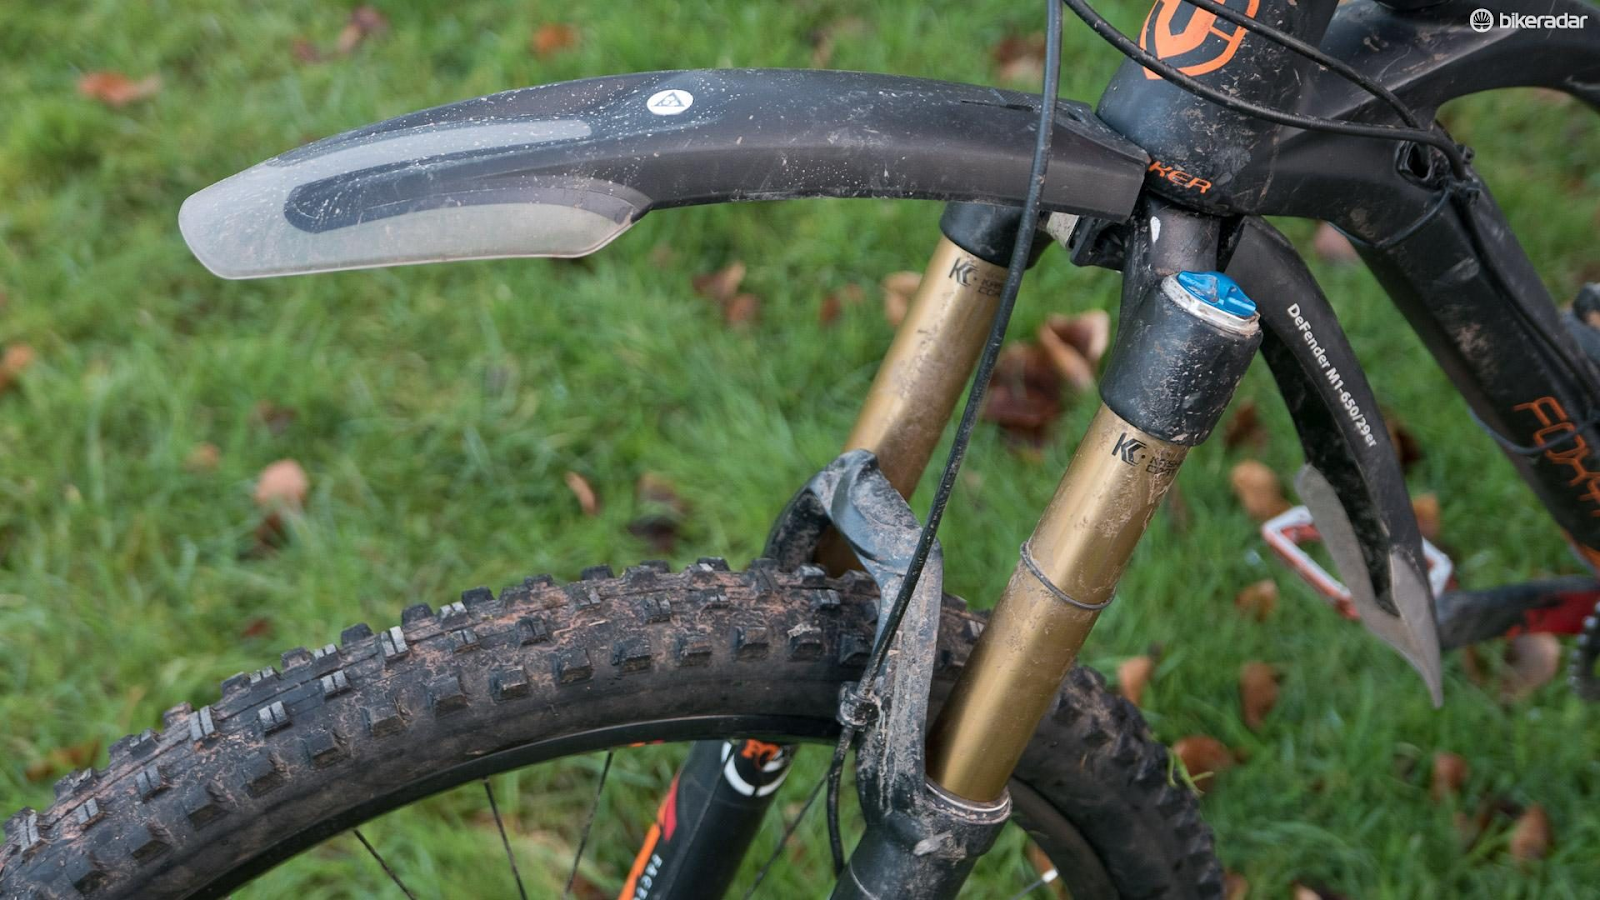
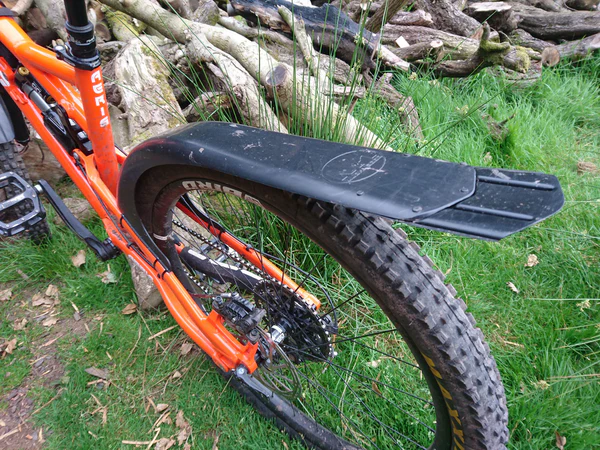
A mudguard extender is an attachment that lengthens the mudguard and provides coverage over the tires, protecting the rider’s clothes, body, and bike when riding on muddy trails.
A mudguard works as a shield over the tire that keeps the debris from splashing onto the rider's body. You can learn all about the benefits of mudguards from Century Cycle, a manufacturer of bicycles and accessories. A mountain bike mudguard extension is an added layer of protection as the classic mudguard is not very long, and more coverage and a higher level of splash protection are needed. Our tips for choosing mountain bike fender extensions could help you choose the right one for your mountain bike fender.
Mudguard extenders like this can be permanently attached to the original mudguard, or you can purchase an extending mudguard like this and fold it out only when the trail requires more protection.
Adding a mudguard and extender to your mountain bike can make riding even in unpleasant conditions smoother and cleaner. And they're not only there for wet weather—mudguards are great at keeping sand and pebbles away from your body. Our tips for choosing mountain bike fender extenders explain what size and type of extension would best fit a particular size tire.
Are Mudguard Extenders Good for Mountain Bikes?
Some riders prefer not to attach mudguards to their bikes because they don’t like the overall aesthetic. However, many mountain biking clubs and race organizers insist that riders install fenders on their bikes in order to protect other riders and make the ride more enjoyable for all participants.
Mudguard extenders are a good addition to mountain bikes because they improve safety, keep the bikers’ bodies and bikes clean, and allow them to ride in unfavorable weather conditions.
Our article about whether you need mudguards on a mountain bike explains when it is a good idea to attach mudguards to a bike frame.
The advantages of installing mountain bike mudguard extensions onto the bike include extra protection for the rider and bike against debris, as well as keeping dirt and mud from flinging up onto other riders.
Benefits of Mudguard Extensions
The front mudguard can keep your vision clear, and increase road safety, no matter the trail you're riding on. In addition, accumulated dirt and water can affect the rider's stability and lead to loss of balance on more challenging trails, which mudguard extensions can help minimize. Cycle Scheme, a bicycle financing company, talks about the benefits of mudguards in this article.

1. Safety
The front mudguard prevents water and mud from flying into your face and eyes, covering your glasses, or staining your clothes. This helps improve your safety when you’re on a downhill ride because a brief moment of unclear vision can lead to an accident. Check out our guide on how to buy downhill mountain bike armor for ideas on protective wear for downhill rides.
Furthermore, mud and water on your handlebar can lead to your hands slipping or being unable to reach the brakes when needed, and maintaining a good grip on your handlebars is important when steering and braking
2. Keep Dirt and Water Away
Special riding gear and clothes are made from water-resistant materials that wick moisture away from the rider’s skin. But adding mudguard extensions to your bike will help deflect more water and mud away so that you become less dirty and wet. Our article about how to choose your mountain bike armor kit will help you choose the gear you will need for a particular terrain or ride.
As water splashes all over your bike, it inevitably ends up in the drivetrain and settles on the chain, derailleurs, brakes, and chainrings causing rust. As mountain bike mudguard extenders and mudguards also protect the bike from accumulating water and mud, they will protect your bike from rust.
3. Keep Riding Buddies Dry
Want to keep your riding pals? Then invest in rear mudguards. They do the same for the rider behind you, that the front mudguard does for you.
Rear mudguards prevent water and mud splashes from flying over your riding pal's handlebars and into their face. You'll keep them clean and safe each time they end up behind you on the track.
4. Aid In Motivation
A weekend ride was on your calendar this whole week, but it rained, and now the tracks are soggy, and you know how messy it can be. You can still enjoy your ride if you have mudguards. Mudguards (and their extension pieces) will help you get in the mood for a ride, even though the track might feature a puddle here and there.
Disadvantages of Mudguard Extensions
A lot of mountain bikes don't come with mudguards. Some mountain bike riders tend to avoid installing mudguards and extensions, so we explored the main reasons behind this decision. Most riders find that mudguards with extensions for mountain bikes add weight, make a noise, don’t look good, can rub against the tire, require complex installation, and quickly wear.
1. Noise
Let's be honest; mudguards are made of thin plastic that can produce a lot of noise when riding over an uneven surface. Unfortunately, most bike shops or mechanics won't disclose this to you upon selling the mudguards.
While the mudguards save you from mud, they also accumulate that mud under the surface. And when the debris comes in contact with the tire, especially during braking, an unpleasant noise results.
Encrusted and accumulated mud can easily be cleaned out from under the mudguard at the end of every ride, which will eliminate this minor annoyance. This is why we recommend cleaning your bike after every ride.
Our guides on how to clean mountain bike gears and quick & mountain bike chain maintenance explain the benefits of regular cleaning and maintenance of your bike’s components to prolong its lifespan.
2. Increased Drag
Mudguards can decrease momentum and speed when riding because they add weight and drag to the bike. Larger mudguards with extenders can affect the bike’s aerodynamics, causing a slight drag on your forward momentum. According to research from SAE Mobilus, mudguards can slow you down by as much as 4.6%.
3. Added Weight
The average weight of a pair of mudguards is around one pound. Considering that mountain bikes can range between 21 and 37 pounds, an added pound can make a notable difference when riding. Any extra pound of weight, whether from the rider or a bike modification, leads to increased rolling resistance and eventually slows you down.
4. Affects the Bike’s Aesthetics
Unlike road bikes, mountain bikes are slightly bulkier but still hold an elegant line that can be ruined with the addition of mudguards. Unfortunately, these extensions are not pleasing to the eye, especially the rear ones.
If you're more of a practical and less of an aesthetic person, this will not bother you—however, many avid mountain bikers love to keep the clean look of their bike.
Here is a summary of mountain bike mudguard extension pros and cons:
| Mountain Bike Mudguard Extender Pros | Mountain Bike Mudguard Extender Cons |
| Increased safety | Unpleasant noise |
| Keeps you clean | Slows you down |
| Beneficial for riding pals | Added weight |
| Increases riding motivation | Doesn’t look good |
Related articles:
A guide to mountain bike handlebar width
Where to Find Full-Length Mudguards for Mountain Bikes
Mountain bike mudguards come in various sizes, most ranging between 26 and 29 inches. You can add only one (either the rear or front) or fit them in pairs. The longer mudguards do a better job at protecting the rider from water and mud splashes, while the shorter ones are a more common choice for the front of the bike.
Full-length mudguards for mountain bikes can be found at local bike shops, large retailers, or on Amazon. Seeing mudguards in person is helpful for riders who want to make sure the extender matches the style of their bike, but there are many more options online.
How to Make a Custom MTB Mudguard
If you have never tried mudguards and aren't keen on investing a lot, DIY mudguards are an option. Of course, they will not have the exact shape of the store-bought mudguards but will give you an idea of what to expect during the ride.
DIY mudguards can be made using a variety of materials, including plastic, rubber, and aluminum, and by following easy steps.
Our step-by-step guide for making a mountain bike mudguard explains what materials work best for DIY mudguards. And Budget Friendly Biking has a great video tutorial that shows you exactly how to make a DIY mudguard.
Materials for a Custom Made MTB Mudguard
| Tools Needed For A DIY Mudguard | Why You Need It | Approximate Price |
| Plastic Sheeting | To cut the body of the mudguard out of | ~$30 |
| Zip ties | To secure the mudguard in place | ~$10 |
| Scissors | To cut the mudguard out of plastic or aluminum | ~$20 |
| Sharpie Permanent Marker | To line out the stencil | ~$25 |
| Hole Punch | To make holes for the zip ties | ~$5 |
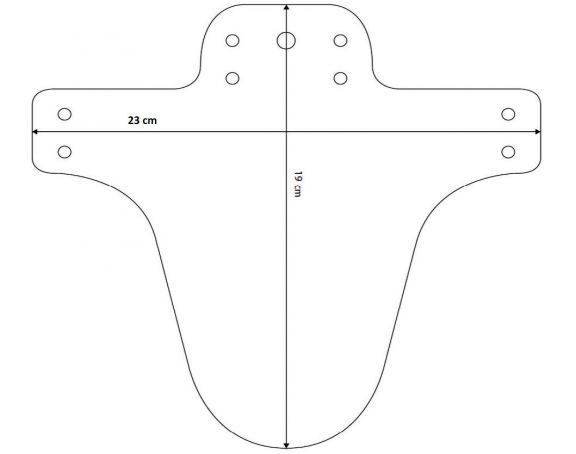
Step 1. Design or Print Out a Mudguard Template
You can get most of the supplies for DIY mudguards from Amazon, Dollar Tree, or Walmart. For the mudguard stencil, you can use a free sample like this from Google, in the size you prefer or according to your bike size. If you don't have a printer, download the stencil on a USB and print it at your nearest printing office for as low as $0.19.
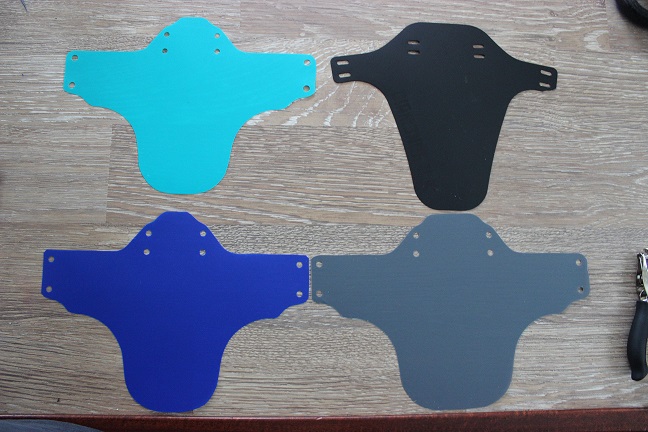
Step 2. Trace the Mudguard onto the Plastic
Place the stencil over the piece of plastic or aluminum and hold it in place while carefully tracing it out. Then using strong multipurpose scissors like these cut the mudguard out. Use a hole punch like this to make holes in the designated spots on the mudguard’s body.
Step 3. Punch Holes in the Plastic and Insert Zip Ties
Insert zip ties like these through the holes. Next, attach the zip ties to the rear or back wheel fork - depending on your preference. Attach the zip ties on top first, center them, and secure them well. Then tighten the side zip ties to each of the tubes.
Step 4. Customize the Mudguards
Make your mudguard unique by adding some stickers like these, or drawings, or make it in flashy colors. Our mountain bike fender accessory tips have many suggestions for accessories that you can add to to your mudguards to make them look more attractive.
Mountain Bike Mudguard Installation
If your mudguard is not installed correctly, it loses its functionality. It will move during rides failing to do the job, and it might rub against the wheel, ruining your riding experience. DIY and store-bought mudguards have a few installation methods to prevent this from happening.
For mudguard installation, clean the fork, place zip ties through the openings, center and secure the zip ties in place, and cut the ends protruding from the zip ties.
Mudguards come in various types, and each has its own installation method. Some like these are clip-on, while others like these require wires and bolts, and are a little more complex. However, mudguards with zip ties are one of the most affordable ones on the market and easy to install, so we'll focus on how to do this correctly.
Materials Needed for Mountain Bike Mudguard Installation
| Tools Needed For Mudguard Installation | Why You Need It | Price |
| 4 Zip ties | To install the mudguard | ~$10 |
| Microfiber towel | To clean the fork | ~$15 |
| Scissors | To cut off the excess of the zip ties | ~$15 |
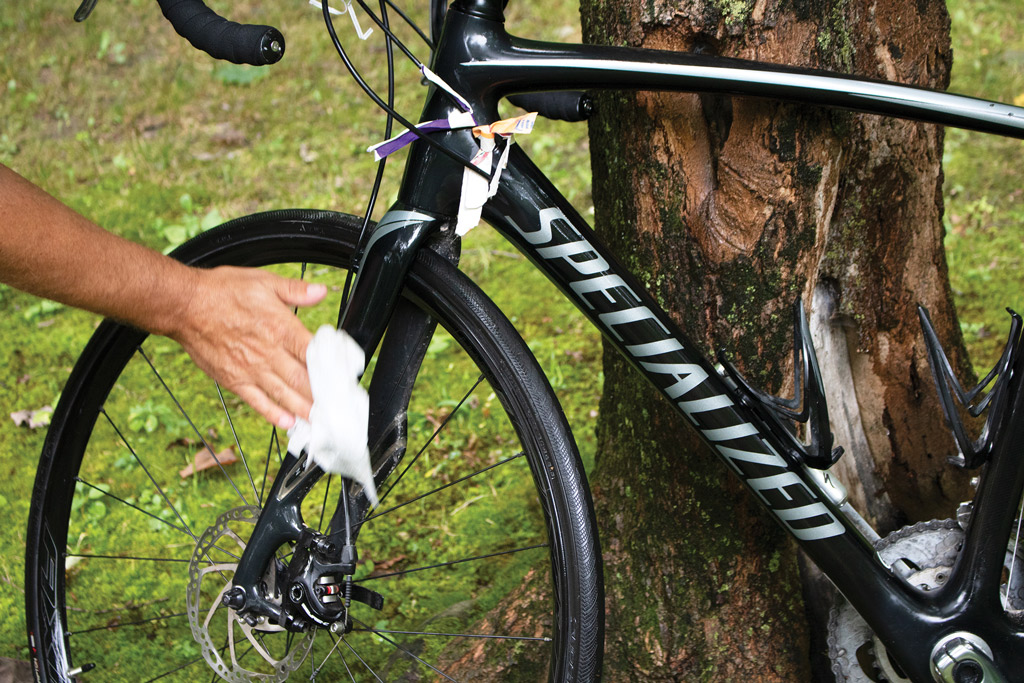
Step 1. Clean the Bike Fork
Start by cleaning up the bike fork with a damp microfiber towel so the zip ties will go onto a clean surface. Let it dry before installing the mudguards.
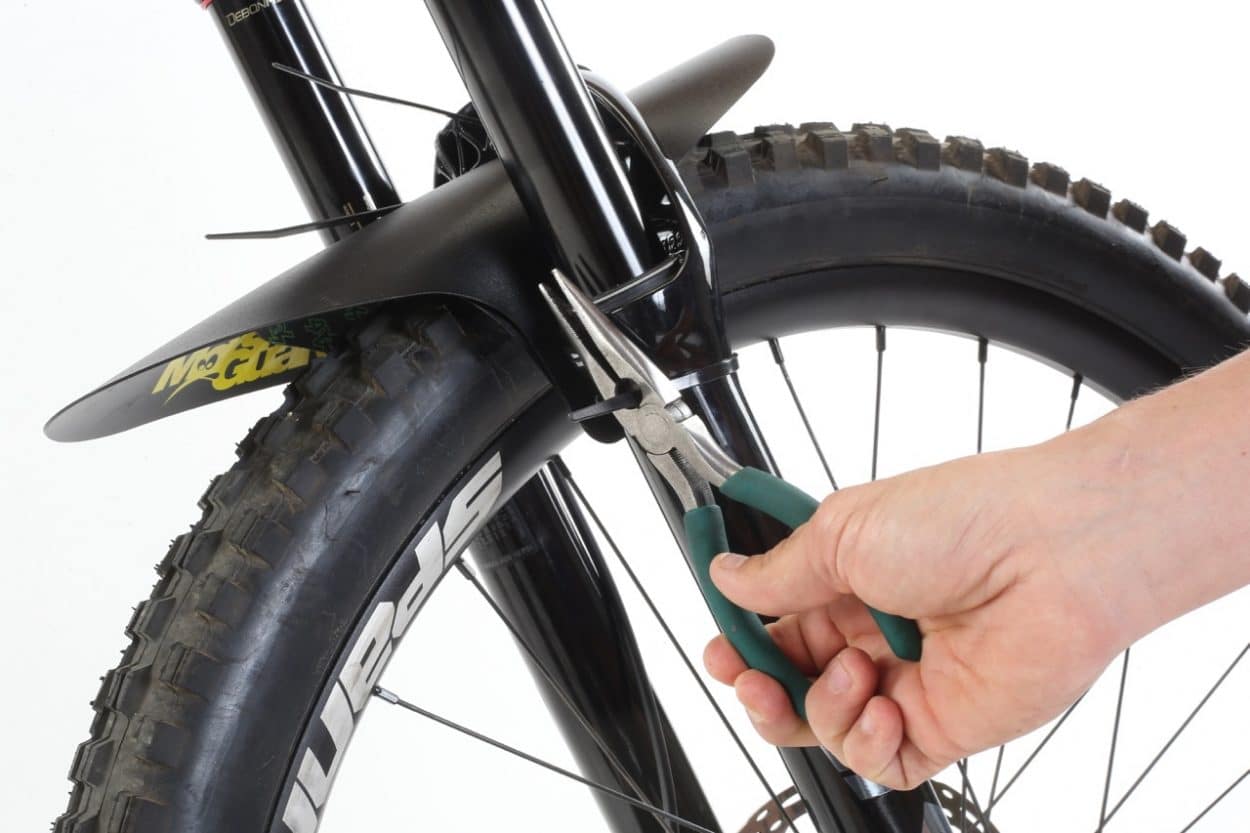
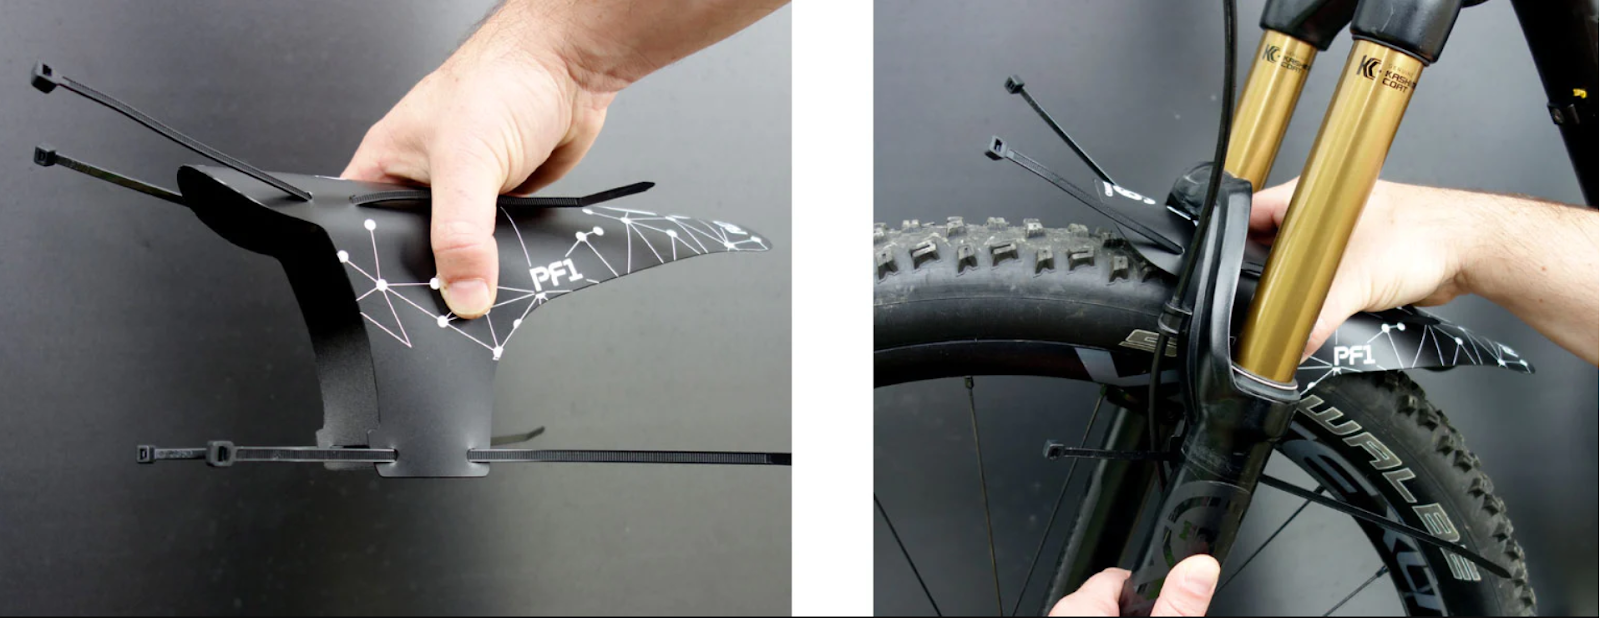
Step 2. Insert the Zip Ties Through the Holes
Thread the zip ties through the holes. Start by holding the mudguard with the long side pointing towards you when on the bike. Then guide the zip ties through the matching holes.
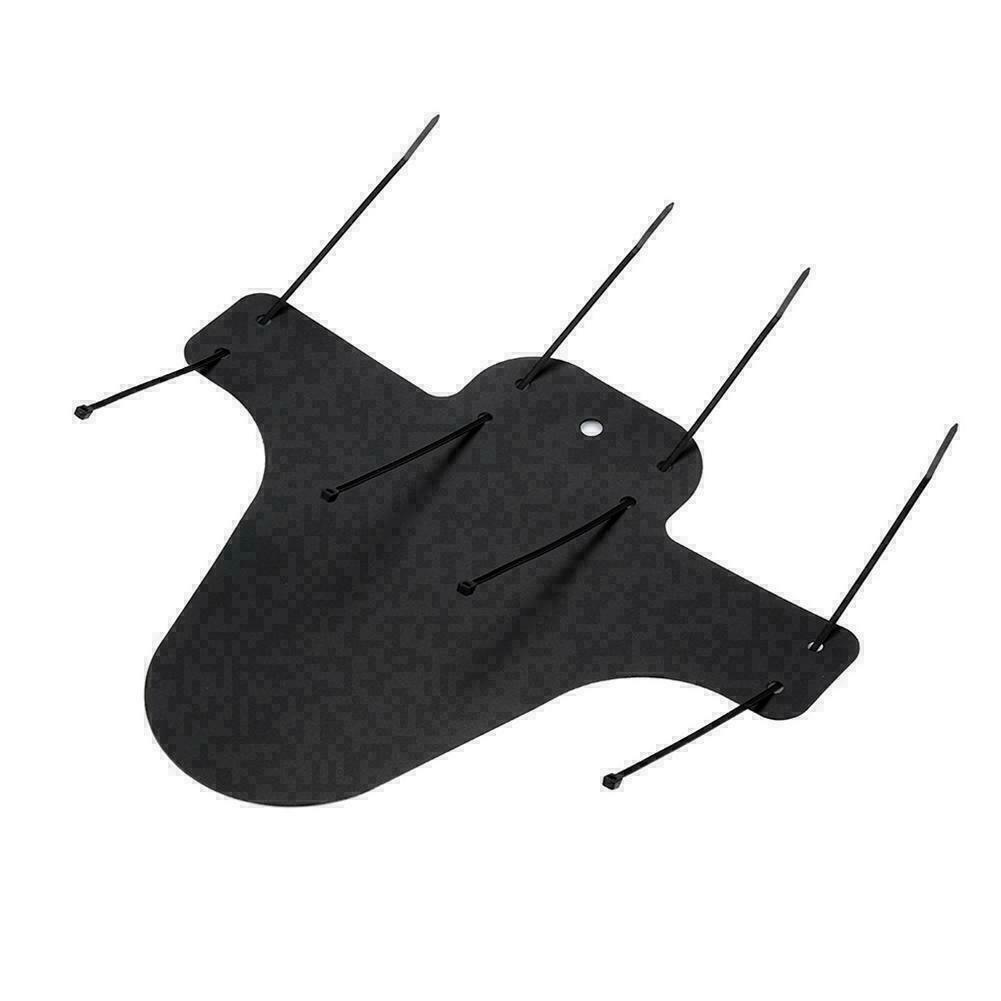
Image Source: Ebay.
Step 3. Bend the Mudguard to Curve Over the Tire
Gently bend the mudguard and slide it between the fork and the tire. Secure the top zip ties first, then move on to the side walls of the fork. Beware of positioning the zip ties under the brake hose as the zip tie might damage it, and a repair can be costly. You also want to make sure that the mudguard doesn’t make contact with the tire and is curved over the tire correctly so that it provides proper coverage. Our article about choosing mountain bike fender width properly explains how to ensure adequate tire clearance while also deflecting mud and water away from the rider.

Step 4. Cut the Zip Tie Tails
The last step is to cut the extra tails of the zip ties as close as possible to the locking head. Leaving them on is not only an aesthetic problem, but they can scratch your legs or interfere with the wheel.