
How to Choose the Proper Mountain Bike Saddle Height
The mountain bike saddle is one of the most important components of the mountain bike. The comfort, and essentially the enjoyment, of a ride depends on this very important component. To get the very best from mountain bike saddles, a very important factor must be taken into consideration which is the mountain bike saddle height. The mountain bike saddle height simply refers to the distance between the center of the bottom bracket and the top of your bike saddle. But, how can one determine and choose the proper mountain bike saddle height?
To choose the proper mountain bike saddle height, first, position the bike stem so that the top of the saddle is one inch above the top of the handlebar. Then bend the knees at the bottom of the pedal stroke while ensuring the hips do not rock on the saddle. If the saddle height is correct, the heel should rub the pedal lightly at the bottom of the pedal stroke.
Why is Proper Mountain Bike Saddle Height Important?
The adjustment of the saddles is one of the most important adjustments that can be made on bikes. Though some cyclists still downplay the importance of this adjustment, properly adjusting the saddle height of mountain a bike can do the rider a lot of good.
Proper saddle height should be maintained on mountain bikes in order to prevent discomfort, increase riding performance, and prevent injury.
It Prevents Discomfort
A poorly positioned mountain bike saddle will often make cycling stressful and uncomfortable. When saddle height is poorly positioned, the rider’s buttock may rub excessively against the bike seat, causing riding discomfort. Riding may also become difficult as more effort will be needed by the rider during pedaling. This strained cycling could lead to an increase in the pressure of the calf muscles, subsequently causing pain and discomfort for the rider. But when the saddle height is properly positioned, the chances of a rider experiencing discomfort because of a wrongly positioned saddle is alleviated.
Similarly, our related articles on how to fix a mountain bike seat that's too hard and how to reduce mountain bike saddle pain will provide you with a lot of additional information. Be sure to check them out.
It Increases Riding Performance
The mountain bike is able to move because of the power output coming from the rider. This power output is also known as the ‘‘pedaling power,’’ and it’s very much dependent on how much force the rider pushes the pedal. If the pedaling power is greater, the riding performance will be greater, and the cyclist will cover more distance at a higher speed.
But a poorly positioned mountain bike saddle height will often make it difficult for the cyclist to generate enough pedaling power, making riding slower, and inefficient. And to make up for these limitations, the cyclist will often need to put more effort into pedaling in order to generate enough pedaling power. This is stressful and amounts to a waste of energy. With properly positioned saddle height, riding will be enjoyable, stress-free, and efficient.
It Helps to Prevent Injury
Riding a bike with a poorly positioned saddle height for an extended period may cause problems to certain parts of your body like the knee, the lower back, and the hamstring. A common injury caused by a poorly positioned saddle is the biker’s knee or patellofemoral pain syndrome (PFPS) as explained in this article by OrthoInfo, which is caused by a low bike saddle. Poorly positioned saddles can also cause saddle sores as discussed in this article by Health Line, which usually form around the rider’s inner thighs or crotch area and can sometimes be painful. With a properly positioned bike saddle, these injuries will surely be avoided.
Similarly, you may want to learn if you need to position your mountain bike seat higher than the handlebars or how to choose the right mountain bike saddle materials for your needs. If so, be sure to read through our related articles as well as our mountain bike saddle price guide for additional information, tips, and tricks.
Tips for Choosing How High a Bike Saddle Should Be
How well the mountain bike saddle height is adjusted will go a long way in determining whether cycling will be pleasant or stressful. Having seen the importance of a properly positioned mountain bike saddle height, it can sometimes be difficult to choose the best height for your mountain bike saddle. Here are helpful tips you need to consider when choosing the height of your bike saddle.
To choose mountain bike saddle height, add 13 cm (5 inches) to the length of the trouser leg’s inner seam. This should be the distance from the center of the top of the saddle to the center of the top of the pedal.
Whether you are just starting out on your mountain bike journey or you are ready for an upgrade it may be beneficial for you to read through our guide on what mountain bike you should buy. And be sure to get advice from your preferred bike shop so that you have minimal sizing issues after you have made your purchase.
Here are our tips for choosing how high a bike saddle should be:
Tip 1. Start By Adding 13 Cm (5 Inches) To The Length Of The Trouser Leg’s Inseam
The first step in choosing the correct saddle height is having a clear idea of the type of racing discipline your bike is built for. The saddle height requirement for mountain bikes will differ from those of road bikes. For mountain bikes, the saddle height should be set in a way that makes riding very efficient and comfortable. The correct saddle height for your mountain bike is usually the length of your trouser leg’s inner seam with an extra 13cm (5 inches) distance from the center of the top of the saddle to the center of the top of the pedal.
To be practically sure you’re getting it correctly, sit comfortably on the saddle with the cranks in a straight position. If your feet touch the top of the lower pedal with your leg straight, it means the saddle height for your bike is correct. But if you find yourself slightly bending to one side of the saddle, then your saddle is too high. Not only will you bend if the saddle is too high, but your hips will also rock from side to side when you’re pedaling. If the saddle is too low, riding will be inefficient as your muscles will not produce enough power output.
With road bikes, you will most likely be involved in road racing. As the name implies, they are specially designed for paved surfaces. The saddle height for road bikes should be set in a way that provides enough power output, efficiency, and aerodynamics for the rider. A practical way of determining the right saddle height for your road bike is by placing your legs on the pedal and pedaling backward, allowing your leg to reach the 6 o’clock position. If your knee is completely straight at the 6 o’clock position, then the saddle height is accurately placed. But if your knee is bent, it means the saddle is too low, raise it up a little. If you however notice your feet consistently losing contact with the pedal during pedaling, lower the saddle height a bit, it’s a sign that the saddle is too high.
Tip 2. Use a Lower Saddle Height for Downhill Riding and Higher Saddle for Adding Power While Biking Uphill
Another very important factor you need to consider when deciding how high or low your mountain bike saddle will be is the nature of the terrain you will be riding your bike on. For downhill mountain bike riding, a low saddle position will do. This is because gravity has a significant influence on downhill riding. As a result, the rider will want to make sure he has more control of the bike, otherwise he will topple. With the saddle being in a lowered position, there will be greater control of the bike. This is the main reason most downhill bikes have low saddles. So, if the terrain you are riding is downhill, lower the saddle of your mountain bike. You can also find out all you need to know about how to choose downhill mountain bike armor from our tips and tricks. Conversely, a high bike saddle will be suitable for uphill terrain as it provides more power output which is usually needed for uphill riding.
Tip 3. Tweak the Height of the Saddle to Maximize Balance and Reduce the Chance of Injuries
When choosing the optimal height for your mountain bike saddle, you want to be sure that whatever height you choose will be one that will allow you to properly position and balance your body on the bike during riding. Proper body balancing is important as it enables you to take full control of the bike and also helps makes it easy for you to easily adjust your body, most especially when you are riding through difficult terrain. While taking into account your body’s position, you also want to make sure that the saddle isn’t too low or too high as this could lead to injuries and discomfort as outlined in this article from the Sports Medine Journal.
How to Determine Saddle Height on a Mountain Bike?
We have talked extensively about the benefits of choosing the right mountain bike saddle height, and also discussed practical tips that can help you choose the correct saddle height for your bike. Let us now focus on the crux of this subject; practical ways of determining the correct saddle height for your mountain bike.
To determine saddle height on a mountain bike, there are four methods that can be used: the heel method, the Holmes method, inseam measurement, or the use of a mountain bike saddle height calculator.
Accurately determining the correct saddle height for your mountain bike can be a bit of a challenge, but it’s not rocket science and we are here to help. In fact, choosing the size of your mountain bike is very important, and getting this right from the beginning can save you a lot of discomfort in the future so check out our mountain bike sizing chart with tips and tricks.
Let us now discuss three practical methods that can be used to determine the correct saddle height for your mountain bikes.
How to Determine Saddle Height Using the Heel method?
The heel method is a quick and easy way of finding the right saddle height for your mountain bike. Though it may not produce perfectly accurate results like you would when you make use of other methods, it is still reliable to a large extent, and a technique that is popular among cyclists today.
Determining the saddle height of mountain bikes using the heel method often begins with raising the saddle to hip level, this serves as a starting base height. The next steps involve climbing the bike and pedaling till the legs are fully extended at the 6 o’clock position making sure there are close contacts between the heels and pedals.
Step 1. Raise the Bike Saddle to the Level of Your Hip
Standing next to your bike, raise the saddle up to the top of your hip bone. The accuracy of this method can be altered if you wear the wrong shoes. So, you want to make sure you’re wearing your normal biking shoes.

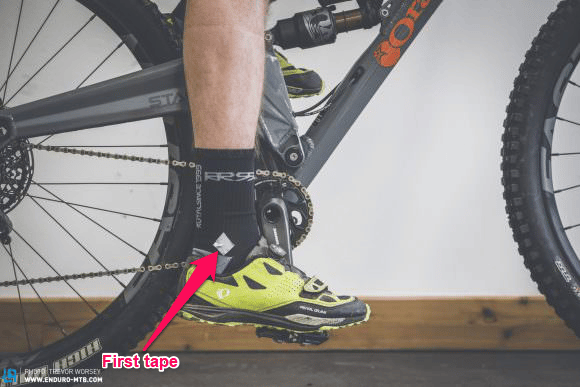
Step 2. Place your Heels on the Pedals
Hop on your bike, sit down comfortably, and place your heels on the pedals. Ensuring that the crank arm which transfers power is positioned downward and is aligned with the seat tube, turn the pedals a couple of turns backward. You want to make sure that your leg is fully extended on the pedal when it is at the 6 o’clock position, and that your heel isn’t losing contact with the pedals at this position.

Step 3. Check for Extension of Your Leg at the 6 O’Clock Position
If you observe your leg is fully extended while you are pedaling at the 6 o’clock position and that your heels aren’t losing contact with the pedals, it’s a good sign that the saddle height of your bike is correct. One more thing, make sure that the lower part of your back isn’t moving when you’re riding. If it moves while riding, it means you need to adjust the saddle height. Once you get all this done, it’s time for you to have a pleasurable and comfortable ride.

How to Use the Holmes Method to Determine the Saddle Height of a Mountain Bike
The holmes method remains one of the most accurate and effective methods of calculating the saddle height of your mountain bike. Unlike the heel method which does not require the use of any tool or equipment, the holmes method requires quite a number of tools. The tools used for this method include a goniometer which is used to measure angles, sticky tape used as body markers, and a turbo trainer which allows you to ride the bike while it’s stationary.
To use the holmes method to determine the saddle height of mountain bikes, first set up the mountain bike on a turbo trainer, and pedal until the leg is fully extended at the 6 o’clock position. Placing three pieces of sticky tape at different parts of the rider’s body, use a goniometer to measure the angle at the knee joint.
These are the steps to calculate your mountain bike saddle height using the Holmes method:
Step 1. Set up Your Bike on a Turbo Trainer
Set your bike up on the turbo trainer and ride on it for some time. Finish this riding session with one of your feet placed downward in the 6 o’clock position.

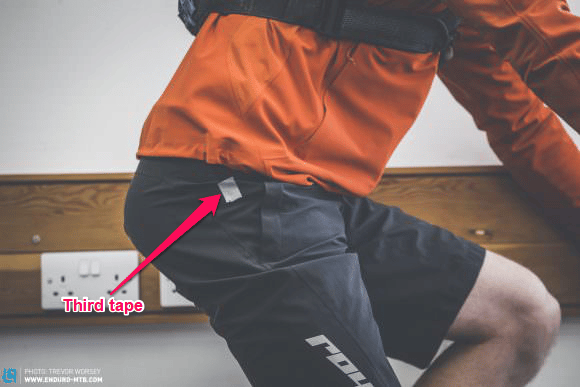
Step 2. Place Sticky Dots to Mark Specific Areas of Your Body
While you have one foot in the 6 o’clock position, place sticky tape like this in three marked areas of your body.
The first tape should be placed on the bony lump outside of your ankle.
The second tape is placed on the outer part of your knee that protrudes the most.

The third piece of tape should be placed at the point where the lump at the top of the femur meets the pelvis
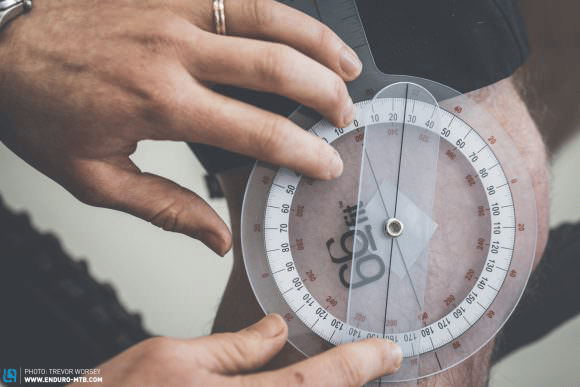
Step 3. Extend Your Leg on the Pedal and Take the Goniometer Reading
Place the goniometer like this on your knee joint and allow the arm of the goniometer to be aligned with the sticky tapes placed on your hip and ankle. With your leg fully extended, take the goniometer reading. For optimum performance and accurate saddle height positioning, the goniometer reading should be between 25 and 35 degrees. If the reading is more than 35 degrees, raise the saddle. If it is less than 25 degrees, lower the saddle a little.
How to Determine Saddle Height Using Inseam Measurement?
The length of the inseam can be used to determine the height of your mountain bike saddle. Once you get the length of the inseam, you can mathematically apply two methods to get the saddle height.
To determine the saddle height using the inseam measurement process, first place a thick block or book in between the legs, taking a marking of the point where the book touches the wall. Next, measure the distance from the marked point to the floor, this gives the inseam length.
The first of the two methods is called the Lemond formula method while the second method is called the 109% formula method. They both involve the use of formulas which we will talk about in a moment. But, what does the term inseam length mean? Inseam length is simply the distance of your crotch to the floor.
Step 1. Firmly Hold a Thick Book Between Your Legs.
With your shoes off, stand upright against a wall with a thick book fixed firmly between your legs.

Step 2. Mark the Spot Where the Top of the Book Touches the Wall
Get someone to help you mark the top of the book on the wall. This marking is the top of your inseam.

Step 3. Calculate the Measurement With a Tape Measure
Once the top of the inseam has been marked on the wall, get a tape measure like this and measure the distance from the marking to the floor. This distance in millimeters is your inseam length.

Once you have the length of your inseam, you can calculate the height of your mountain bike saddle using two different formulas:
The Lemond Formula
The Lemond formula is named after the three-time Tour-de-France winner Greg LeMond. It simply involves multiplying the inseam length by 0.883. Whatever resulting value you get is the saddle height.
Saddle height = inseam length × 0.883
Though the Lemond method is quite an easy and fast way of determining the saddle height of a mountain bike, its result is not always accurate and reliable.
The Hamley Formula or 109% Rule
Just as with the Lemond formula, we also make use of the inseam length when using the Hamley formula. The only difference here is that we multiply the inseam length by 109% or 1.09. So, we have:
Saddle height = inseam length × 1.09
Though these formulas are quick and very easy to use, they have certain drawbacks. They do not take into consideration certain details like the flexibility of the rider, muscle tension, and movement. Because of this, the rider may often need to adjust the saddle height a little for maximum comfort. Nevertheless, these two formulas are still good starting points for determining the saddle height of mountain bikes. When calculating saddle height for optimal comfort it is also important to consider reach as explained in our mountain bike reach calculator guide with tips to alter reach.
How to Use the Saddle Height Calculator to Determine the Saddle Height of a Mountain Bike?
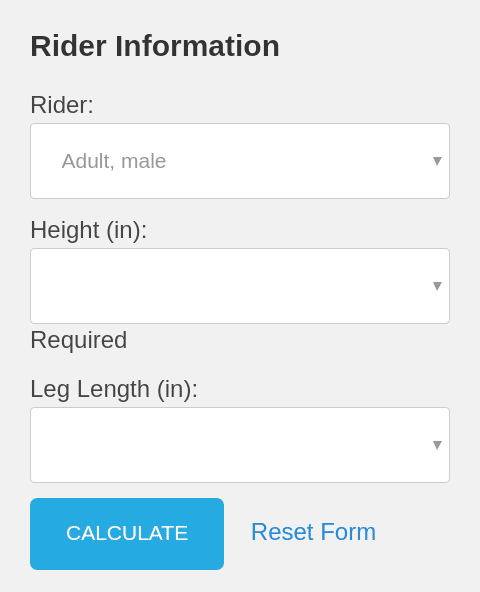
Another useful tool that can be used to calculate the saddle height of mountain bikes is the saddle height calculator provided by ebicycles.com. An interestingly unique feature of the saddle height calculator is the fact that it makes it possible for one to calculate the saddle height of different types of bikes. So, the saddle height for road bikes, mountain bikes, BMX, and even kid bikes can be conveniently calculated.
To use the saddle height calculator, the rider will need to fill in some relevant personal information like gender, height, and leg length both in inches.
Even after working out the saddle height for your bike, the saddle height calculator still goes further to be much more accurate and can help you adjust the saddle height of your mountain bike, using simple, relevant, and graphic illustrations. So, it makes it very easy for the rider to understand this technical stuff easily. This article by Ebicycles provides saddle height calculators for most types of bikes for your convenience.
How To Adjust a Mountain Bike Saddle Height
Setting and properly adjusting mountain bike saddle height is one of the most important adjustments that is usually done on bikes. The amount of comfort and fun a rider will have during a ride often depends on whether the saddle height is properly set.
To properly set the saddle height of a mountain bike, first find a base height that will serve as a starting point. Next, hop on the bike, pedaling for some time until a perfect leg position is identified. Finally, adjust the saddle until it is at the perfect height.
Check out our guide on how to fit a mountain bike saddle, and adjust angle and height for more information about saddle position.
Here is a summary of the tools that you will need to adjust your mountain bike saddle:
Tools Needed to Adjust Mountain Bike Saddle Height
| Tools | Function | Example | Price |
| Allen Key | It is used to adjust screws that have hexagonal sockets | Mulwark 17pcs folding Allen wrench set | ~$20 |
| Plumb bob | It is used for setting vertical references | Swanson brass plumb bob | ~$15 |
| Measuring tape | It used to measure distance | Komelon 25-foot power tape | ~$10 |
| Goniometer | It is used to measure angles | 360 degrees, 12-inch goniometer | ~$10 |
| Turbo trainer | It allows you to ride your bike indoors while remaining stationary | Saris magnetic indoor bike trainer | ~$200 |
Step 1. Find a Base Height
The first step in setting the saddle height of your mountain bike is finding a base height which you will work from. Getting a base height isn’t difficult. The height of your hip is a good base height you can use. So, check if the saddle reaches your hip level. If it doesn’t, loosen the seat clamp of your bike with an Allen wrench and raise the saddle to your hip height. Once this is done, tighten the seat clamp back up.
Step 2. Identify a Perfect Leg Position
Once the base height has been attained, hop on your bike, pedaling backward until your leg reaches the 6 o’clock position on the pedal. In this position, your leg needs to be straight and your knee needs to be fully locked. If you don’t find any of these things happening, adjust the height of the saddle, and repeat the whole process till you get a straight leg and fully locked knee at the 6 o’clock position.
Step 3. Adjust the Saddle Until you Get the Right Height
While you are making sure your leg is straight at the 6 o’clock position and your knee is fully locked, you also want to ensure that your heel has contact with the pedal. These are the three main features of a perfect saddle height: a fully extended leg, a fully locked knee, and a heel having close contact with the pedals. Till these three features are achieved, keep adjusting the saddle height of your mountain bike.