
How to Stop a Mountain Bike Chain Rubbing the Front Derailleur
A mountain bike has several interdependent components that rely on each other to provide a pleasant riding experience. One such component is the front derailleur. A derailleur is a bike mechanism that moves the chain from one chainring to another on bikes with more than one gear selection. Bikes come fitted with front and back derailleurs and very often the chain of your bike may touch the derailleurs, and we explain how to stop a bike chain from rubbing on the front derailleur.
To fix a mountain bike chain rubbing the front derailleur, check for cross chaining, derailleur height, derailleur alignment, limit screw tightness, and indexing issues. These are the common causes of a chain rubbing on the front derailleur.
In this article, we will discuss what a derailleur is, the various types of derailleurs, the reasons why your bike chain is rubbing the front derailleur, and quick ways to fix your chain rubbing your front derailleur. Our easy fixes for a mountain bike chain hitting the frame has several handy tips to fix similar chain issues.
What is a Derailleur?
To understand why your bike chain is rubbing on your front derailleur, we first need to understand what a derailleur is, the type of derailleurs that exist, and how each one works.
A derailleur is a bike component that moves the chain from one sprocket to another. The gearing system of a bike consists of a chain, multiple sprockets of different sizes, and a mechanism to move the chain from one sprocket to another. This device is called the derailleur.
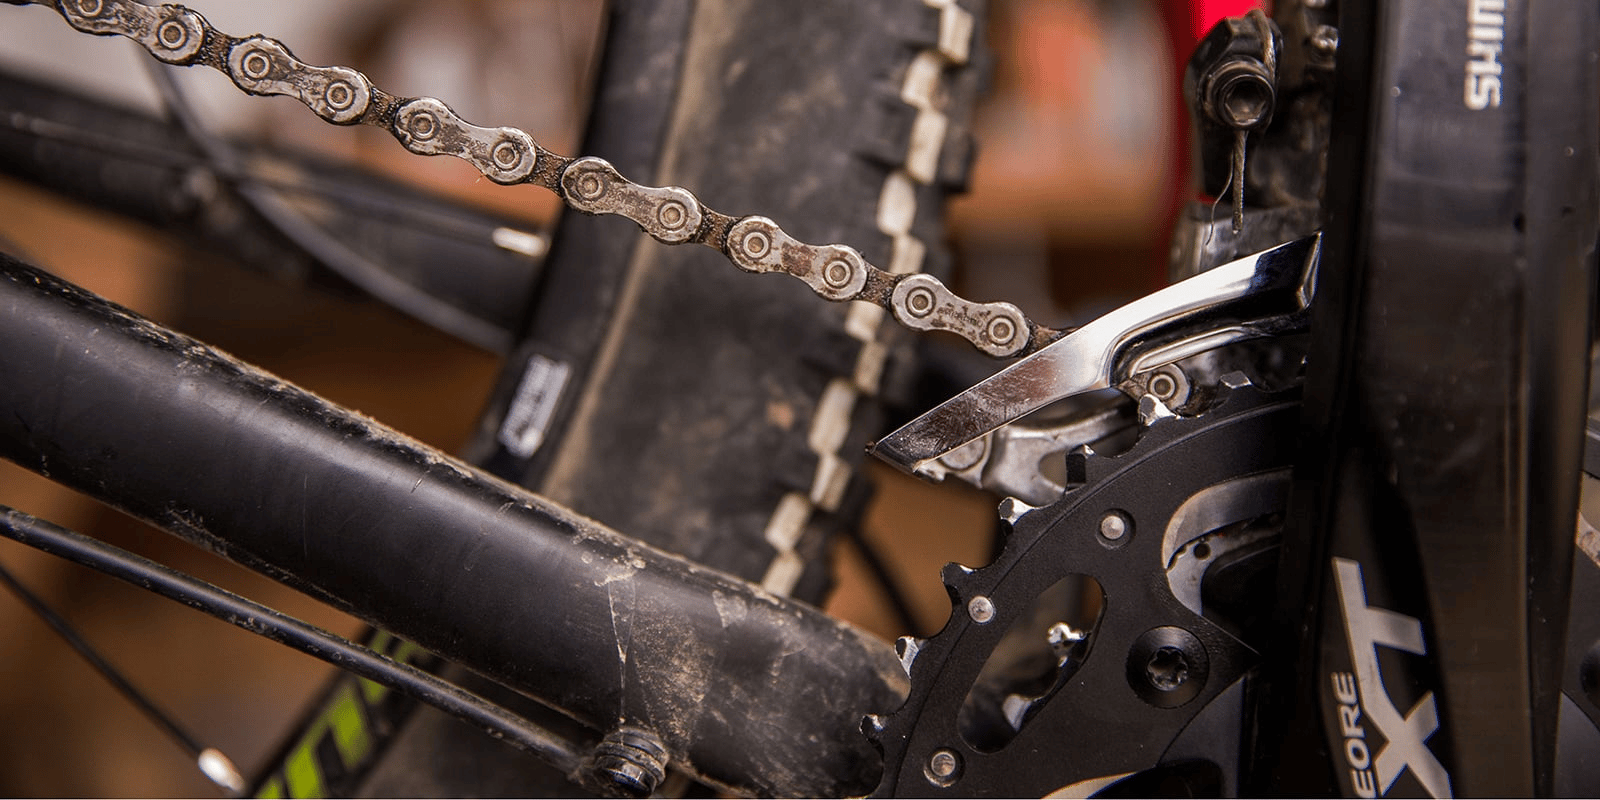
There are two types of derailleurs—one at the front known as the front derailleur like this, and another at the rear known as the rear derailleur like this. The front derailleur is located directly above the largest front sprocket. The front derailleur makes it possible for the chains to shift from chainring to chainring, thus allowing you to switch gears quickly and easily. The rear derailleur is located below the rear cassette and is attached to the bike by a bracket. It performs two main functions—keeping the chain taut and switching the gears. This article by cyclingtipshq.com gives more detailed differences between the front and rear derailleurs.
How a Front Derailleur Works
Front and back derailleurs perform the same function—shifting the chain from one sprocket to another. The front derailleur moves the chain from one chain ring to another while the back derailleur shifts the chain from one gear to another and maintains the chain’s tension during gear shifts.
The front derailleur works via a process of inward and outward shifting. For inward shifting, the cage pushes the chain from behind, from where it is engaged on the ring until the chain begins to move off the larger chain ring. The chain is flexed to the right by the cage for outward shifting. The chain rises from the pedaling action and latches on to the large chain ring.
The front derailleur like this is made up of two parts—the cage and the linkage system. The cage forms a box around the chain. The linkage system is called the parallelogram and it controls the movement of the box. For mechanical-type derailleurs, the linkage is held and moved by a cable. A small motor controls the cage on an electric derailleur. Shifting in the front gear only occurs when the rider is pedaling.
The chain is flexed by the box to the right when shifting outward and begins to rise from the pedaling action. The chainrings like these are designed with features to help pick up the chain as it moves outward. For inward shifting, the cage pushes the chain from behind, where it is engaged on the ring. The cage moves inward until the chain begins to move off the larger ring. The smaller ring catches and engages the chain. This video tutorial by Park Tool explains how a front derailleur works in detail and you can figure out why your mountain bike chain is rubbing the front derailleur.
Make sure to take a look at our tips and tricks for front chainring size options. Also, you may find interest in learning how to choose the number of links in a mountain bike chain. Be sure to read our related article to find out more.
Is It Normal For My Chain to Rub the Front Derailleur?
A bike is manufactured to be ridden with little or no interference between its components. When one component interferes with the other, the overall riding experience becomes less enjoyable. One of the easiest ways to know when your bike components are interfering with each other is by any distracting noise your bike makes as you ride.
Chain rubbing is often first noticed by the distracting noise of the chain rubbing the sides of the derailleur cage. If ignored, the chain rubbing the front derailleur can lead to jamming, chain breakage, and derailleur damage.
Once you notice the consistent noise of your chain rubbing against your front derailleur, immediately assess the problem and solve whatever the cause of the problem is as soon as possible. Our article about what to do when a chain is grinding and noisy has tips for troubleshooting common bike chain problems. Additionally, our tips and tricks can help you choose between a mountain bike and road bike chains for your bike.
Effects of Chain Rubbing on the Front Derailleur
When your bike chain keeps rubbing the front derailleur of your bike it can lead to several issues, especially if the rubbing is not promptly dealt with.
Some of the significant effects of the chain rubbing the front derailleur are the distracting noise from the bike crankset, chain wear and damage because of friction, derailleur damage, chain jamming, and damage to the entire front gear system.
A chain that is left to rub on any other part of the bike will eventually break due to wear and tear. Our article that explains how to fix a mountain bike chain that keeps breaking will walk you through the ways you can prevent breaking chains.
Why is My Chain Rubbing the Front Derailleur?
You might notice that your mountain bike chain is rubbing the front derailleur as you pedal by the irritating scraping sound. It is common for the chain on your bike to rub against the front derailleur if it is not aligned correctly. The derailleur and the chain are moving components of your bike's front gear system, therefore, contact between them is common but should not be left.
A mountain bike chain can rub the front derailleur due to cross chaining, derailleur height, derailleur alignment, limit screw tightness, indexing issues, or a bent or damaged derailleur hanger
According to other mountain bikers who commented on this thread on BikeRadar, common causes for the chain rubbing against the derailleur could be that the gear cable needs tightening, that the derailleur cage is not sitting parallel to the chainrings, or that the barrel adjuster is either too tight or too loose. Now we will discuss why your chain rubs against the front derailleur in more detail.
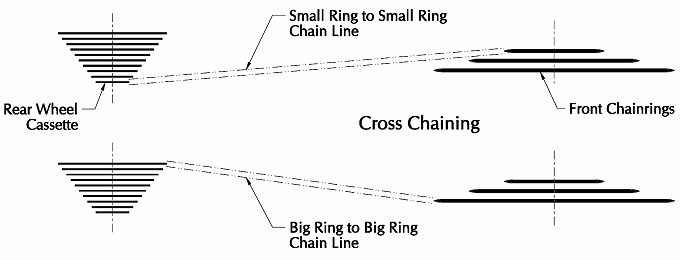
Reason 1. Cross Chaining
Cross chaining is when you ride your bike with the chains on the small chainring of your front gear and the small cassette of the rear gear. Cross chaining is also when you ride with the chain on the large chain ring of your front gear and the large cassette on the rear gear.
Cross chaining, therefore, stretches your chain diagonally to its limits. The cages of the front derailleur and the rear derailleur are designed to accommodate a more horizontal alignment of the chains. Cross chaining, however, bends the chain to the end of the cage leading to the chain rubbing the derailleur internally.
Reason 2. Derailleur Height
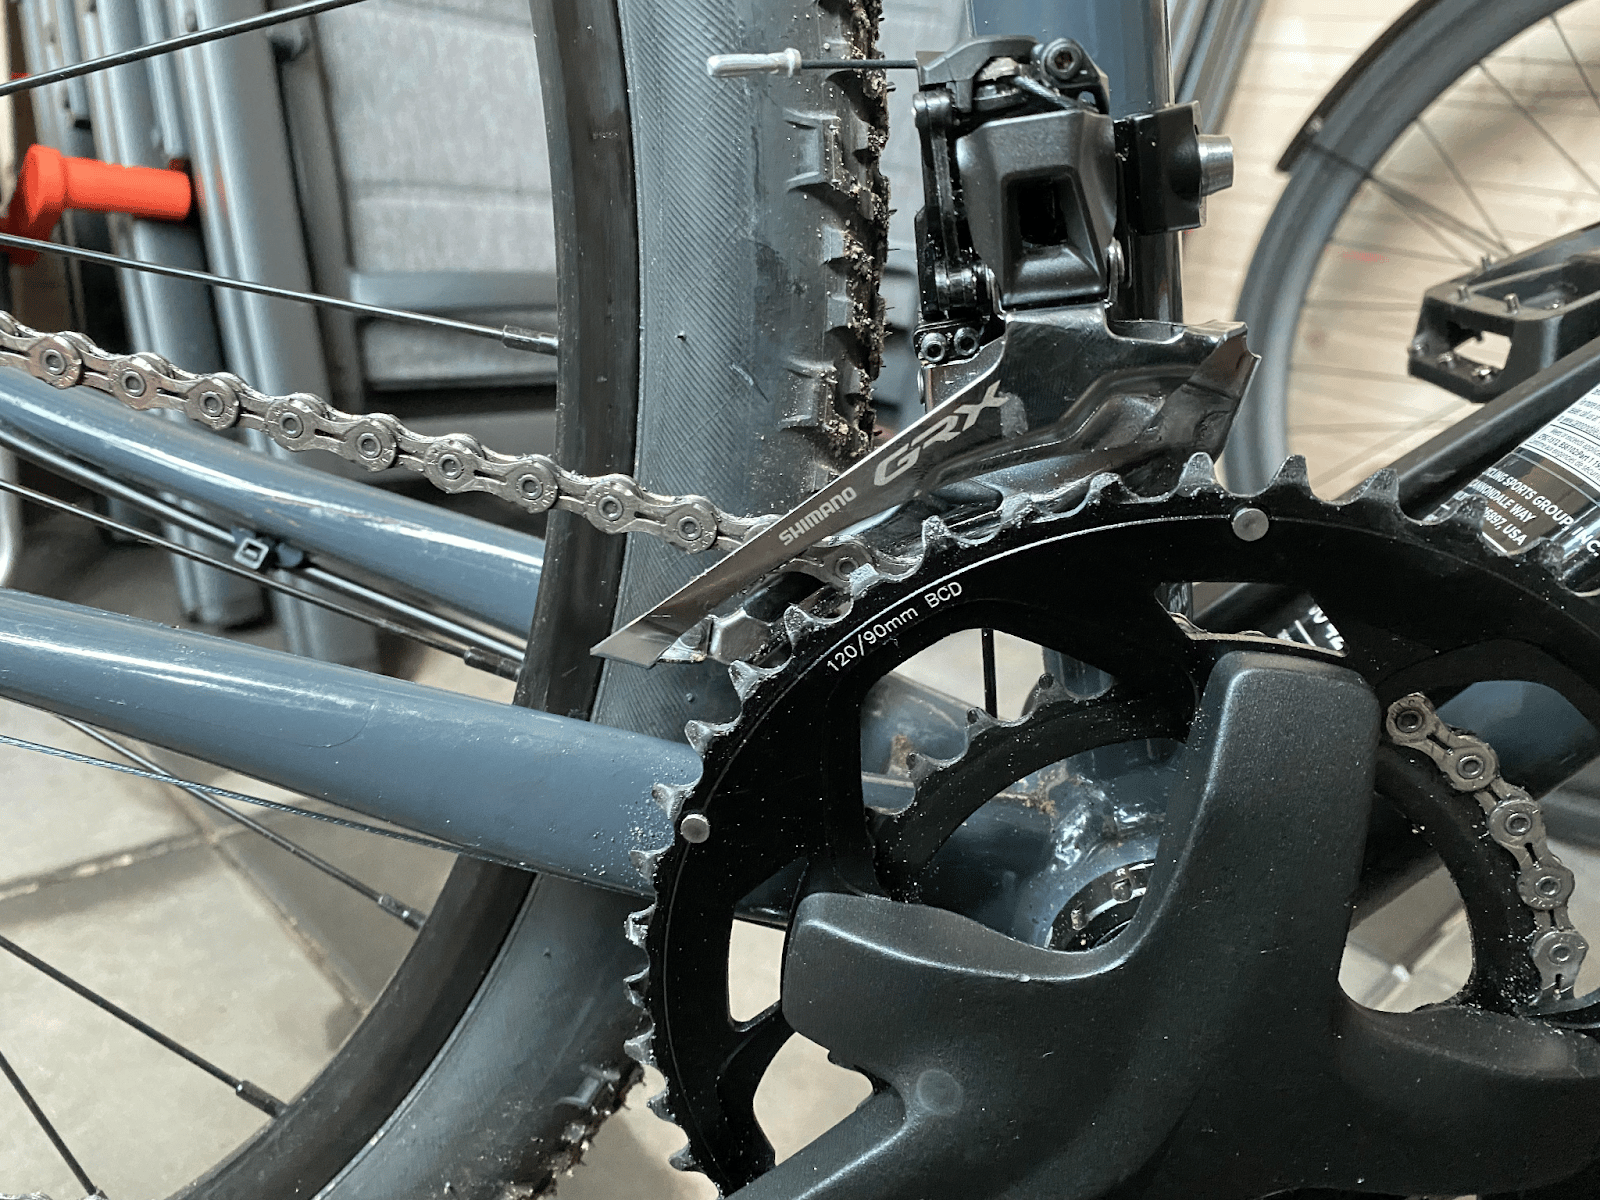
The positioning of your front derailleur can interfere with your bike's chains. Properly adjusting the height of your derailleur is important. According to this article by REI, the cage of the derailleur should be approximately 2mm above the teeth of the chainring.
If the derailleur cage is too far above the large chainring, the edge of the cage is more likely to be in contact with the chain. A high derailleur is also more likely to shift poorly. If the front derailleur is too low, the chain within its cage would inevitably make contact with the inside. This can also lead to the derailleur scraping the chainrings or jamming the chain when shifting.
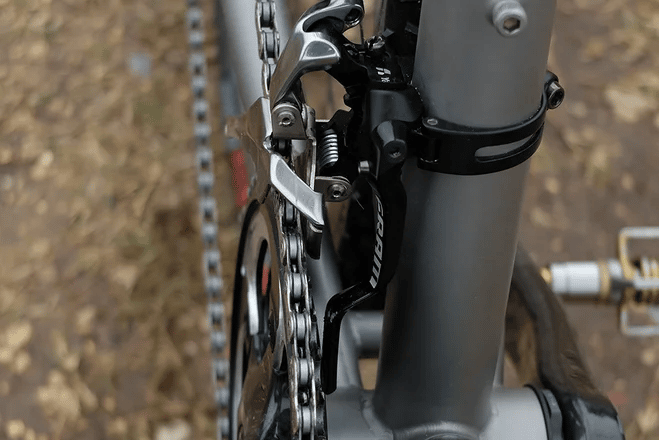
Reason 3. Derailleur Alignment
When your front derailleur is not properly aligned, there will certainly be issues like chain jamming and chain rubbing. Properly aligning your derailleur prevents chain rub. Your front derailleur should be attached so that the cage is parallel to the chain. If the derailleur is rotated at an angle, the chain will scrape against the inside of the derailleur cage.
Reason 4. Limit Screw Tightness
The front derailleur has limit screws marked 'H' and 'L'. These screws are used to limit the movement of the derailleur cage. When the end of the limit screw strikes the linkage it stops cage travel. When the screws are tightened too much, it puts a strain on the movement of the cage. And the cage—unable to move freely—hinders the direction of movement of the chain, causing it to grind on the cage.
When the screws are too loose, the cage swings without restraint, and the unbridled movement of the cage will cause it to rub against the chain and the chainrings. When the screws are too tight, the cage is unable to move properly, and the derailleur struggles to shift the chains, which can lead to the chain getting jammed in the gear.
Reason 5. Indexing Issues
Indexing describes how effective the shifters on your bike handlebars are at controlling the derailleurs. If the gears on your bike are properly indexed, every click of the shifter will cause a single shift up or down the gears, on the front or rear. One of the major ways you’ll know to adjust your bike’s indexing is if your bike keeps skipping a gear or the shifting keeps getting stuck. Our article about how to fix a mountain chain that keeps jumping gears or skipping describes how to diagnose the problem and fix it. Furthermore, we've put together some tips to quickly fix a mountain bike chain that is skipping. So be sure to take a look at that article as well.
Your derailleur cage will keep hindering your chain when your bike is poorly indexed. Furthermore, a poorly indexed bike does not only lead to the chain not moving to the next chain ring, but it can also lead to the chain being put on the wrong chainring. In extreme cases, poorly indexed bikes suffer from chain slipping and dropping.
Reason 6. A Bent or Damaged Derailleur Hanger
A bent derailleur hanger can result from the rider tampering with the derailleur or a mechanical error when the derailleur was installed. A bent or damaged derailleur hanger can also result from the bike falling or a blunt force being applied to the derailleur. A bent derailleur hanger is easily identified, and fixed using a tool like this, because it is not fixed at the right angle on the bicycle's frame.
Irrespective of how a derailleur hanger got bent, it cannot function properly. A bent derailleur hanger affects the alignment of the derailleur cage in relation to the chain. It can also affect the indexing of the derailleur. Once a front derailleur’s indexing is affected or altered, it automatically affects the derailleur itself, often leading to chain rubbing.
Tools Needed To Fix Mountain Bike Chain Rubbing the Front Derailleur
| Tool | Use | Amazon Example | Price |
| Screw Driver | Tighten Limiting Screws | Dywhishkey 1220 Assortment Kit with Hex Wrenches | ~$30 |
| Lubricant | Lubricating Mountain Bike Chain | WD-40 Specialist Bike Chain Lube | ~$20 |
| Cable Stretcher | Pulls cables tighter | Park Tool Fourth Hand Cable Stretcher - with locking ratchet - BT-2 | ~$50 |
| Hex Keys | Turning bolts and screws which have hexagonal sockets | ARES 70497 - 9-Piece Metric Impact Hex Driver Set | ~$30 |
You might also be interested in learning the difference between mountain bike wax and chain lube. Be sure to read our related article to find out more.
How To Stop A Bike Chain Rubbing the Front Derailleur Quickly By Fixing Cross Chaining
There are multiple reasons why your bike chain could rub on the front derailleur. Cross-chaining is one of the major causes. Apart from the risk of your chain getting weak from cross chaining, there is also the distracting noise of the chain rubbing on the bike frame. It is therefore essential to fix a cross chaining when it happens.
To fix cross chaining first, assess the chainring and cog to confirm that you have a cross-chain. Once confirmed, simply switch the gears of your bike to realign the chain in the right gear combination.
Step 1. Assess Chainrings and Cogs
Cross chaining is when a bike is being ridden on a small chain ring and small cassette or a large chainring and large cassette. According to Yellow Jersey, most bikes built in the last few years have between 8 and 11 cogs in the cassette like this, while most cranksets have either two (called a double or 2x) or three (named a triple or 3x) chainrings like this. The largest cogs are closest to the wheel, and the gears are numbered from the inside out.
The rule of thumb is that when on the big chain ring, only use the smaller two-thirds of the cassette, and when on the inner (or middle) chain ring, only use the inner two-thirds of the cassette. When on the smallest chainring, limit yourself to the largest two or three cogs. However, when you are riding and you notice that you have a little chainring/little cassette or big chainring/big cassette combination, then you have a cross-chain.
When you cross-chain consistently, your chainrings and cassette teeth are prone to wear and tear, because your chain is constantly grinding on the teeth of the cogs and the chain is not moving smoothly from one gear to the other. The friction caused by your chain grinding on the teeth of your cogs will wear out both the chain and the cogs.
Step 2. Switch Gears
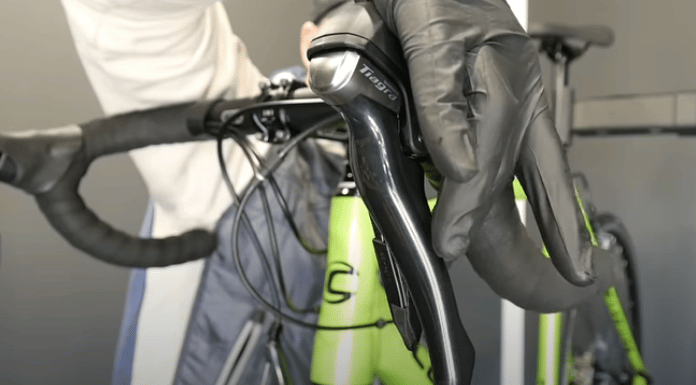
When you find out you have a cross-chain, the best thing is to switch gears. Your handlebars come with two shifters like these. The right one is for the rear derailleur, and the left is for your front derailleur. Each shifter comes with a thumb and index trigger—the trigger releases to a smaller ring, and the thumb push to the bigger ring.
If you have an eight-gear bike, they are numbered from the inside out, which means the largest gear is 1 and the smallest gear is 8. If your bike runs on a 3x chainring, the smallest chain ring is closest to the frame, because they are numbered outward. This means the smallest chain ring is 1, and the largest is 3. A cross-chain occurs when chain ring 1 is connected to the 8th cog (the smallest cassette). Likewise, when chain ring 3 is connected to the first cog (the largest), then you are riding with a cross-chain.
To solve this, you need to pedal (remember shifting only occurs when you pedal) and adjust the right and left shifters. If you are on number 3 on the left shifter, you should be on 8 on the right shifter. Alternatively, if you are on number 1 on the left shifter, you should be on the first cog. This video tutorial by Sports Shack explains in detail how to properly shift gears on a mountain bike.
Stopping Mountain Bike Chain Rubbing by Trimming the Derailleur
As you ride your bike, you might accidentally shift gears and cause a cross-chain. In cases like these, you can trim the derailleur without stopping the bike. This is possible by a feature called trimming. Trimming is the process of shifting your front derailleur inches away from a chain when you notice the chain is rubbing the derailleur. This is often done as you ride your bike.
To stop a mountain bike chain from rubbing the front derailleur while riding by trimming, simply tap the trimming feature next to the front shifters. Note that this only shifts the derailleur but not the chain to another gear.
Trimming is an added function on the shifters of most bikes. It acts as a micro-shift that moves your derailleur slightly without moving the chains, allowing your chain to run smoothly without hitting the derailleur's cage when a cross-chain occurs. Watch this video tutorial by SickBiker for more information on trimming.
How to Make a Front Derailleur Adjustment — Long-Term Fixes
Your bike's derailleurs are an important component of your bike. Without them, you cannot shift gears. A permanent solution to your mountain bike chain rubbing the front derailleur is to adjust your derailleur.
To make a front derailleur adjustment, assess the derailleur height and alignment, adjust the limit screws and indexing, and make the necessary adjustments to ensure the derailleur works efficiently.
Our article about how to tighten a derailleur has in-depth step-by-step instructions to help you adjust your derailleur so that your gears shift smoother.
We shall discuss how to assess and adjust your front derailleur properly. The methods are the same for when you want to mount a derailleur on your mountain bike and when you need to fix a chain that is rubbing on the derailleur.
Step 1. Assess Derailleur Height
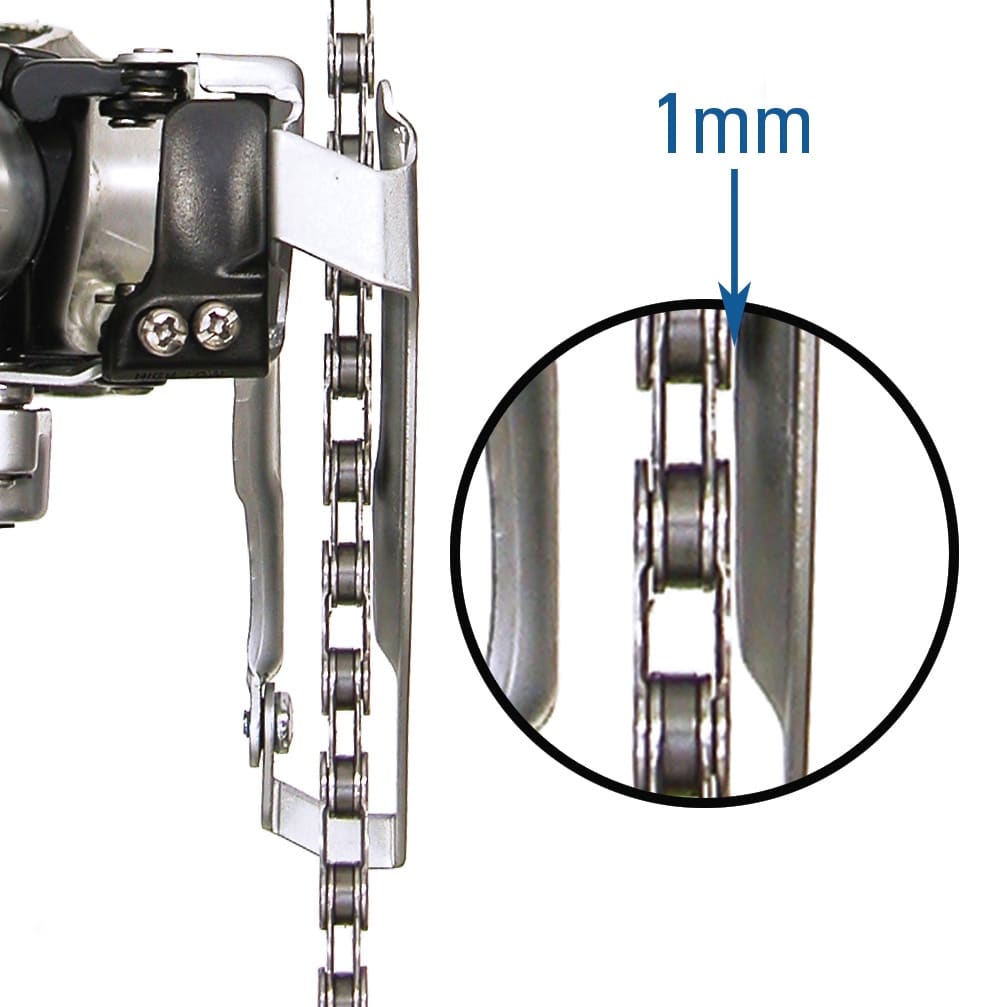
The height of your front derailleur determines how efficiently it shifts the chain between chainrings. But more importantly, if set correctly, it can prevent your bike chain from rubbing. The appropriate height for the front derailleur is determined by the distance between the outer cage's lower edge and the outer chainring's teeth. The acceptable height is between 1 to 2mm.
If the height between the cage's lower edge and the outer chainring's teeth is less than 1-2 mm, you must increase the height. To do this:
- Pull the exposed front derailleur inner wire until the outer cage plate is directly over the outer chainring teeth at the right distance.
- Note this position.
- Loosen the mounting bolt of the derailleur and reattach the derailleur at the correct height.
If the height between the cage's lower edge and the outer chainring's teeth is above 1-2 mm, you must decrease the height. To do this:
- Release the inner wire tension completely by shifting to the innermost chainring. Do this until you get the right height
- Note this position.
- Loosen the mounting bolt of the derailleur and reattach the derailleur at the correct height.
The clamp on your front derailleur leaves a mark on your bike's frame. This mark can be used as a reference when you want to change the height of your derailleur.
Step 2. Assess Derailleur Alignment
Keeping your front derailleur well aligned reduces the risk of the chain jumping and rubbing on the inner cage of the derailleur. If the cage is not parallel, there will be a relatively large gap at either the back or the front end of the cage, and the chain may over shift.
View the chain from directly above the chainrings to determine if your derailleur is aligned properly. A well-aligned derailleur should have its outer cage plate parallel to the chain. If the outer cage plate is not parallel to the chain, you must fix this.
To reallign your front derailleur,
- Note the derailleur's height by marking its position on the bike's frame.
- Release the inner wire tension of the derailleur by shifting to the innermost chainring.
- Loosen the derailleur clamp bolt and rotate it slightly in the correct direction until the outer cage plate of the derailleur is parallel to the chain, then tighten the derailleur clamp bolt.
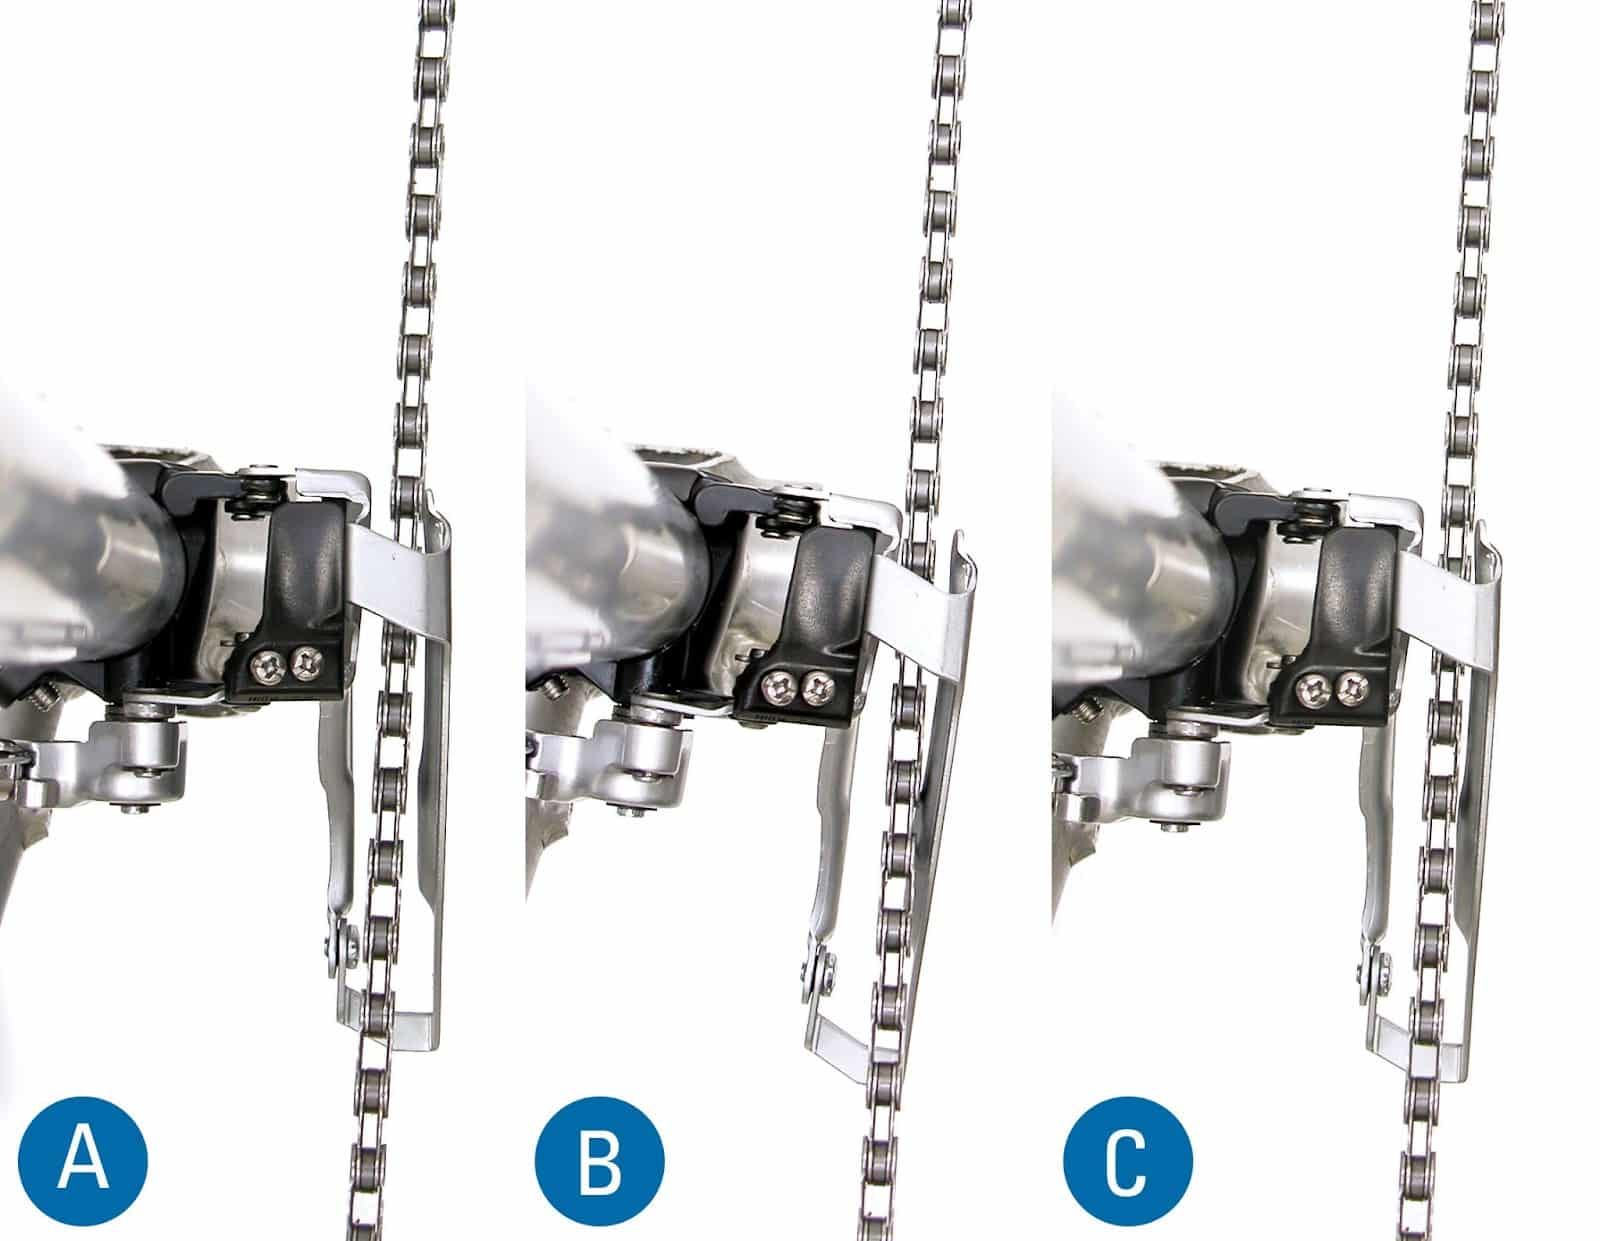
Step 3. Assess Limit Screws
Your derailleurs either move inward or outward as they shift the chain from one chainring to the other, so the movement of your derailleur cage has to be limited to prevent extreme inward or outward movements. Limit screws marked "L" and "H" on the derailleur are used to stop the inward and outward travel of the front derailleur cage. The L-screw stops the motion of the derailleur toward the smallest chainring. The H-screw stops the motion of the derailleur toward the largest chainring.
L-Screws
To locate the L-Screw, shift the chain to the innermost rear cassette and innermost front chainring. Inspect the derailleur for the marking indicating the "L" screw. However, if your bike does not have the mark, relax the barrel adjuster to release cable tension—the L-screw will move.
To adjust the L-screw,
- Loosen the tension of the inner wire. Do this by turning the barrel adjuster clockwise into the housing and loosening the inner wire pinch bolt. This will slacken the inner wire. Then re-tighten the bolt.
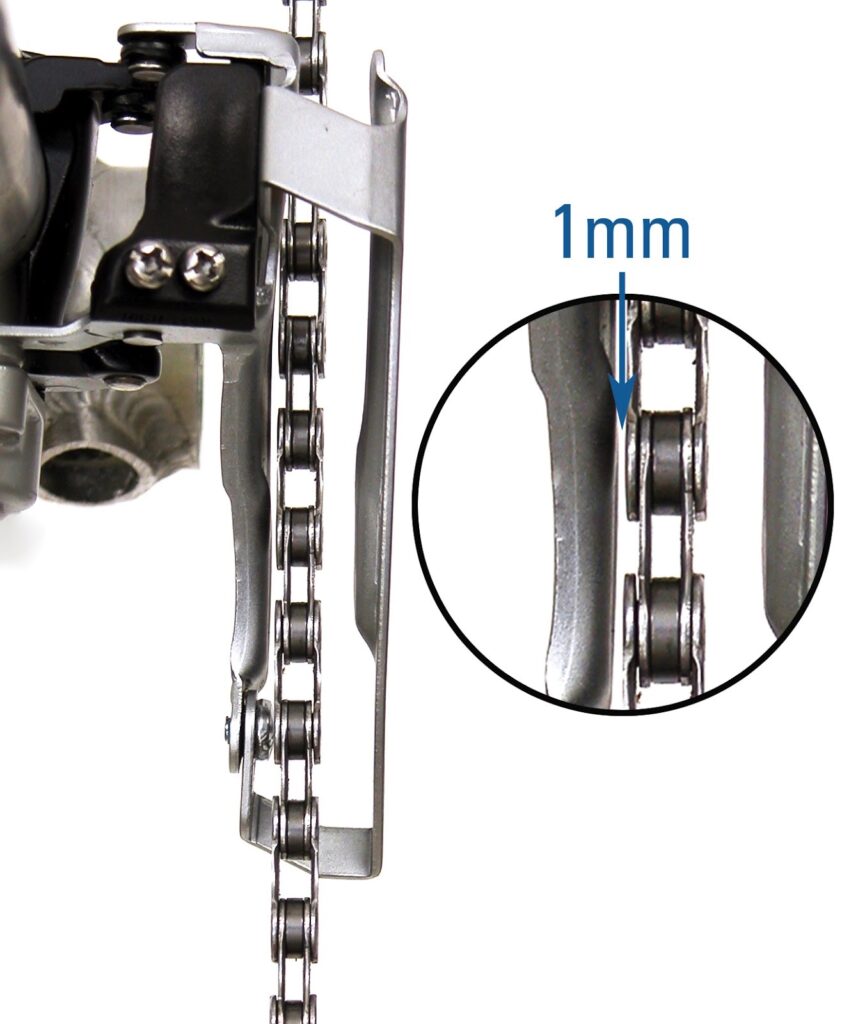
- Locate the gap between the inner chain plate and the inner cage plate. This gap must not exceed 1mm.
- Pedal the bike slowly and continue to observe the gap. While rotating the pedals, watch to make sure the chain is not rubbing against the derailleur cage as the chainrings turn. If there is no gap, the chain will rub against the cage. In this case, loosen the L-limit screw. If the gap appears larger than 1mm at its widest point, tighten the L-screw. Keep pedaling and adjusting the L-screw till you get a gap of 1mm.
- Pull on the inner wire to shift the derailleur. Test the shift by moving the chain to the next chainring and then back to the innermost ring. If the chain shifts quickly, the limit screw setting is adequate.
H-Screws
Once the L-crew is located, the screw that remains is the H screw. To adjust the H-screw:
- Pull the inner wire with your hand to increase the tension and to ensure that the derailleur is against the H-screw.
- Only a small gap of 1mm should be visible. Pedal the bike slowly and continue to observe the gap. If the chain is rubbing the cage, loosen the H-screw by 1/8 turn and pull on the inner wire. Ensure you manually pull the inner wire for efficiency. Check the gap again. If the chain is not rubbing, tighten H-screw until the chain is 1mm away.
- Test the shifting on the large chain ring.
Step 4. Assess Indexing
A properly indexed gear ensures each click of the shifter causes a single shift up or down the gears. You need to adjust your indexing if you're skipping a gear or your shifting is getting stuck. Our article about what to do when your grip shifter is stuck has more tips to help you fix incorrect gear shifting.
To assess indexing on a 2-chainring bike, first, you must check to make sure your indexing is properly set. The index setting is adequate if the outer cage plate clears the chain. To figure this out, shift your chain to the outer chain ring in the front and outermost rear cassette, and observe the gap between the outer cage plate and chain. If the indexing is incorrect, increase the inner wire tension. Do this by turning the adjusting barrel counter-clockwise. Go ahead and check it again.
If the barrel adjuster is turned completely in or out, an adjustment will be impossible. You must reset the barrel by shifting to the innermost chainring and loosening the inner wire pinch bolt. Pull the wire gently with a fourth-hand cable puller like this and tighten the pinch bolt. Turn the barrel fully clockwise and back out about two full turns. Then check the indexing by selecting each gear on the shifter and making sure the selection corresponds with the correct gear.
To assess indexing on a 3-chainring bike first, shift the chain to the middle chainring in the front and innermost rear sprocket, then observe the gap between the inner cage plate and chain. The gap should be as small as possible without rubbing the chain.
To reduce the gap, increase the inner wire tension by turning the barrel adjuster counter-clockwise and recheck the gap. However, if the chain is rubbing the cage, turn the barrel adjuster clockwise or inward toward the shifter body.
If the barrel adjuster is turned completely in or out, do not bother with the adjustment of the derailleur. In such cases, reset the barrel. To do this, shift to the innermost chainring and loosen the inner wire pinch bolt. Next, turn the barrel clockwise and back out about two full turns. Pull the wire gently with a fourth-hand tool and tighten the pinch bolt. You can begin adjusting the inner wire after this.
It is essential to test shifting on the front derailleur with all three front chainrings after all adjustments. If the derailleur still rubs on the largest front chainring, double check the H-limit screw and inner wire tension, which may be too loose. But, if the chain slowly shifts to the smallest chainring, double check the L-limit screw and inner wire tension, which may be too tight. For more ideas on what tools you may need to make adjustments on your mountain bike check out our ultimate list of tools needed for mountain bike maintenance.