
How to Install Mudguards on a Mountain Bike with Easy Tips and Tricks
Although a mudguard does not always look cool on a mountain bike, it offers plenty of benefits that definitely outweigh its visual appearance. By equipping your MTB with mudguards, you will protect your clothes and equipment from permanent stains, making it more enjoyable to ride your bike even in rain or on a muddy trail. However, knowing how to choose and install mudguards on a mountain bike is key to enhancing your overall experience.
To install mudguards on a mountain bike, first, choose a mudguard compatible with the bike tires, prepare zip ties, align the mudguard with the tire and fork crown, and fasten the zip ties firmly.
But before we get started, you need to make sure you need mountain bike mudguards or not. Our related article will help you decide for certain. And if you're still unsure, make sure to read our separate article answering the simple question, "do you need mudguards on a mountain bike?" Furthermore, if you want to work on your mountain bike yourself and tackle more difficult tasks, like mountain bike chain installation, you will need to set up a work area with all the necessary gadgets and instruments as explained in our ultimate list of tools needed for mountain bike maintenance.
Which Mudguard Design to Install on Mountain Bike
When it comes to preventing your bike wheels from flinging mud, water, or other particles, you can choose one of several mudguard options. While the purpose of all mudguards is the same, they feature different designs and attachment systems. Depending on the mountain bike you ride and what your personal preferences are, you can opt for one of the following mudguard designs.
Attach clip-on mudguards on a mountain bike without eyelets or enough brake clearance. Attach full-length mudguards on other bikes which have eyelets or locations to bolt-on mudguards.
The common mudguard designs for a mountain bike are:
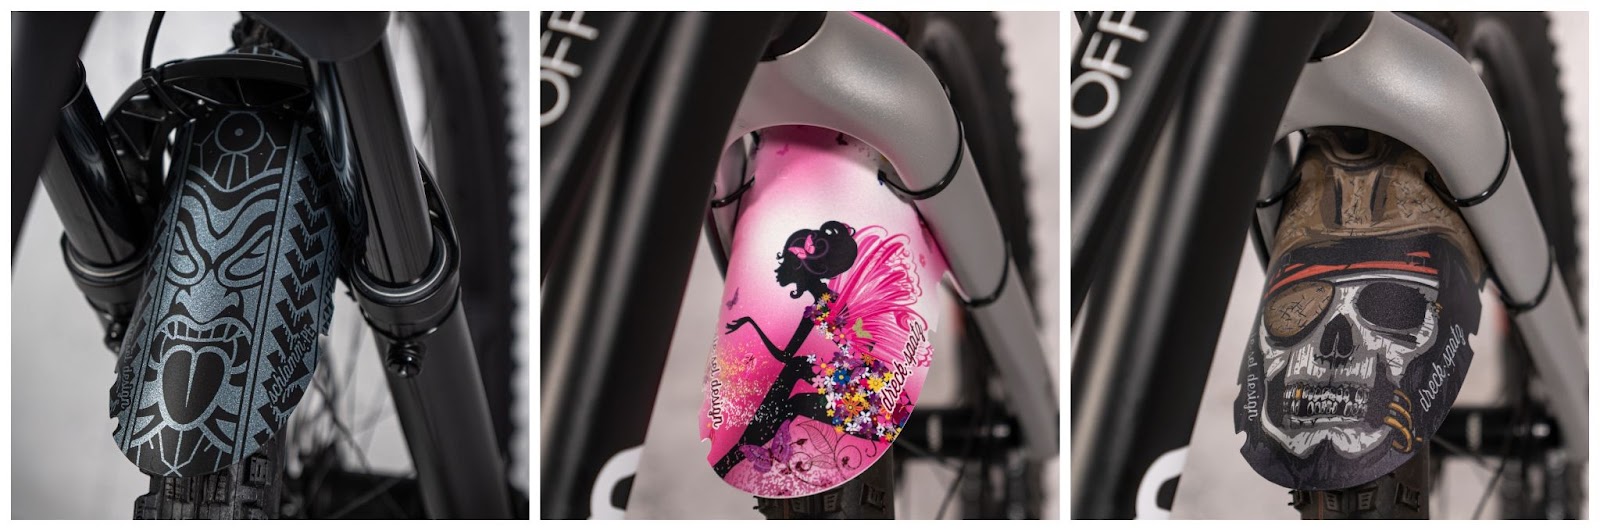
1. Riesel Design
While some bikers prefer custom branded mudguards, others opt for mudguards with colorful designs and unique prints. Have a look at this thread on StackExchange to see what cyclists look for in mudguards. If a colored MTB mudguard is something you are looking for, then consider purchasing these Riesel Design mudguards that come in a wide range of colors and prints.
Riesel Design mudguards not only protect you from mud and debris but also enhance the overall aesthetic of your mountain bike. Depending on your style preferences, you can select solid-colored or colorful clip-on mudguards by Riesel Design.
Another cool thing about Riesel mudguards is that the company offers mudguards for kids’ bikes as well. Whether your children are fond of pirates or adore fairies, you can easily find a design that suits their desires.
2. Clip-On Design
In the past, most bike frames and forks had holes and wheels that come with eyelets, allowing you to attach mudguards or racks. However, modern mountain bike wheels do not always feature eyelets. So, how do you protect yourself from mud or rain? Very easily - just use clip-on mudguards like these that do not require eyelets. A clip-on mudguard design allows you to easily attach the mudguards to your mountain bike frame by means of mounting brackets, Velcro straps, zip ties, or rubber bands.
Although clip-on mudguards do not provide full protection, they still keep most of the water and mud away. The level of coverage depends on the clip-on mudguard brand and model of your choice.
Besides that, clip-on designs are much lighter than other mudguard designs and you will not even feel that something is attached to your bike.
The main drawback of clip-on mudguards is that they do not always offer sufficient clearance. Still, if you choose a clip-on design based on your MTB tire size, you should not face any problems during the ride.

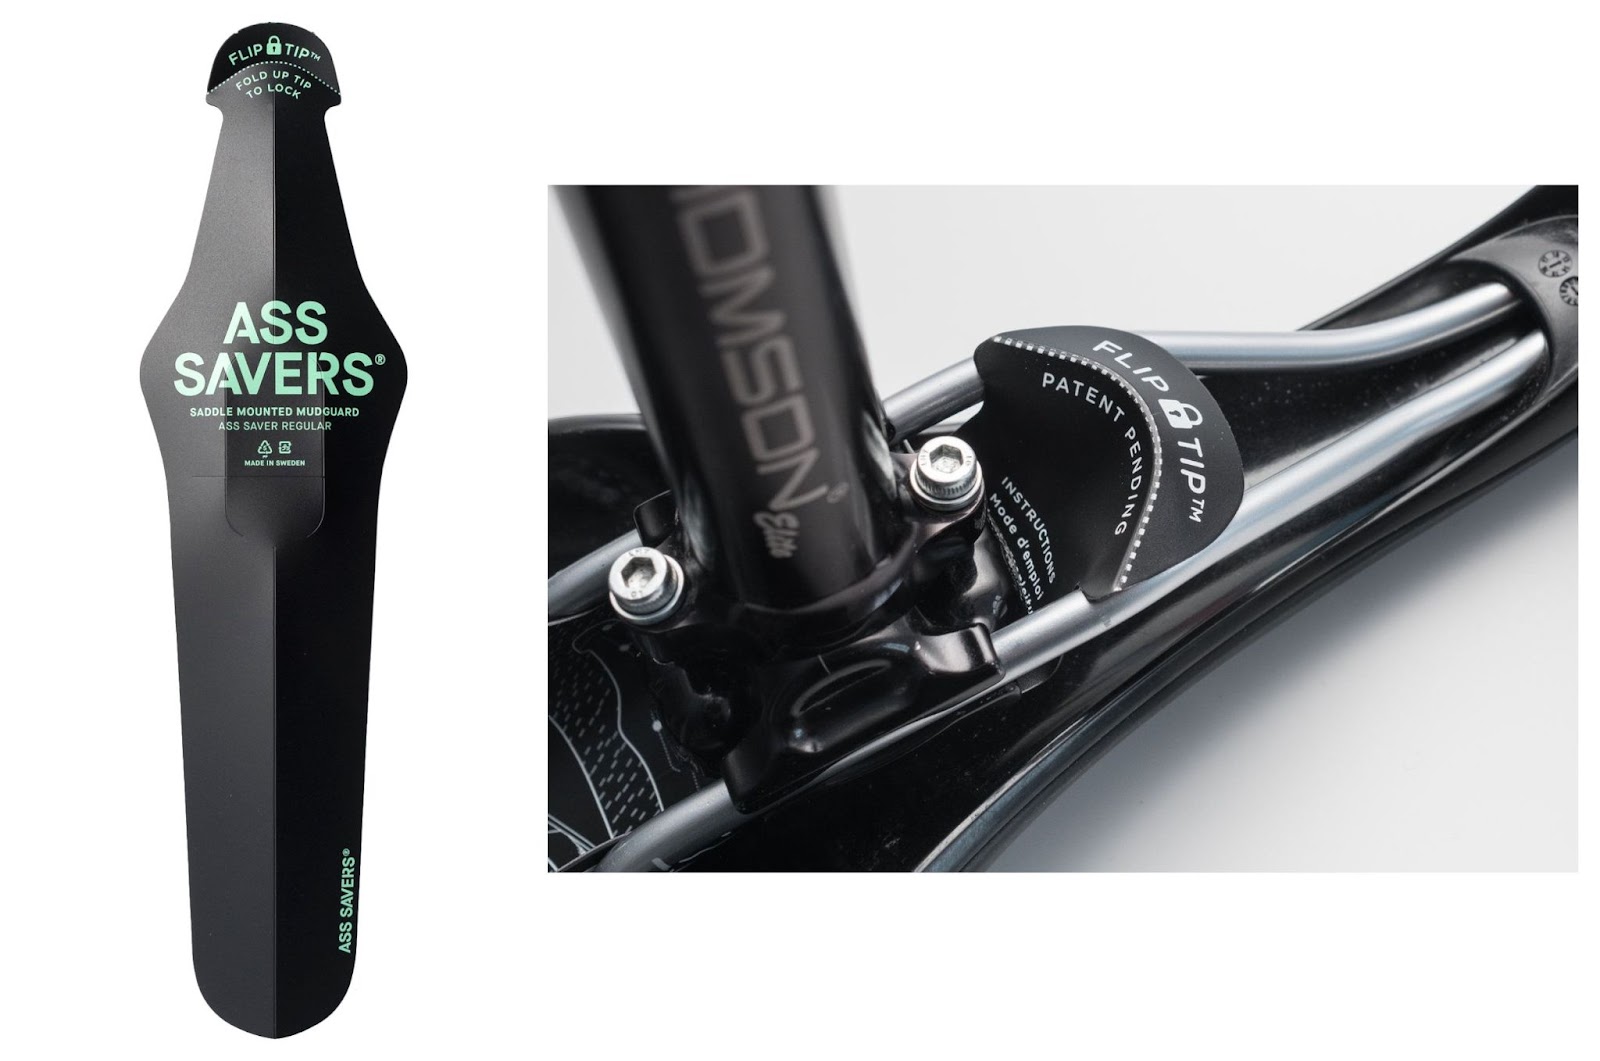
3. Wiggle Design
Wiggle-design mudguards like these come in a variety of size and style options, enabling you to find the perfect fit for your mountain bike. While most mudguards are suitable for road bikes, people often find it a bit challenging to find mudguards for mountain bikes with wider tires. Thanks to the broad array of mudguards offered by Wiggle, you can easily get suitable ones for wide tires.
Another factor that makes Wiggle design mudguards so popular among mountain bikers is the Flip-Tip attachment system that is compatible with all saddle rail types. The FLIP-TIP technology is based on origami principles, enabling you to securely attach the mudguard to the saddle by simply flipping the tip.
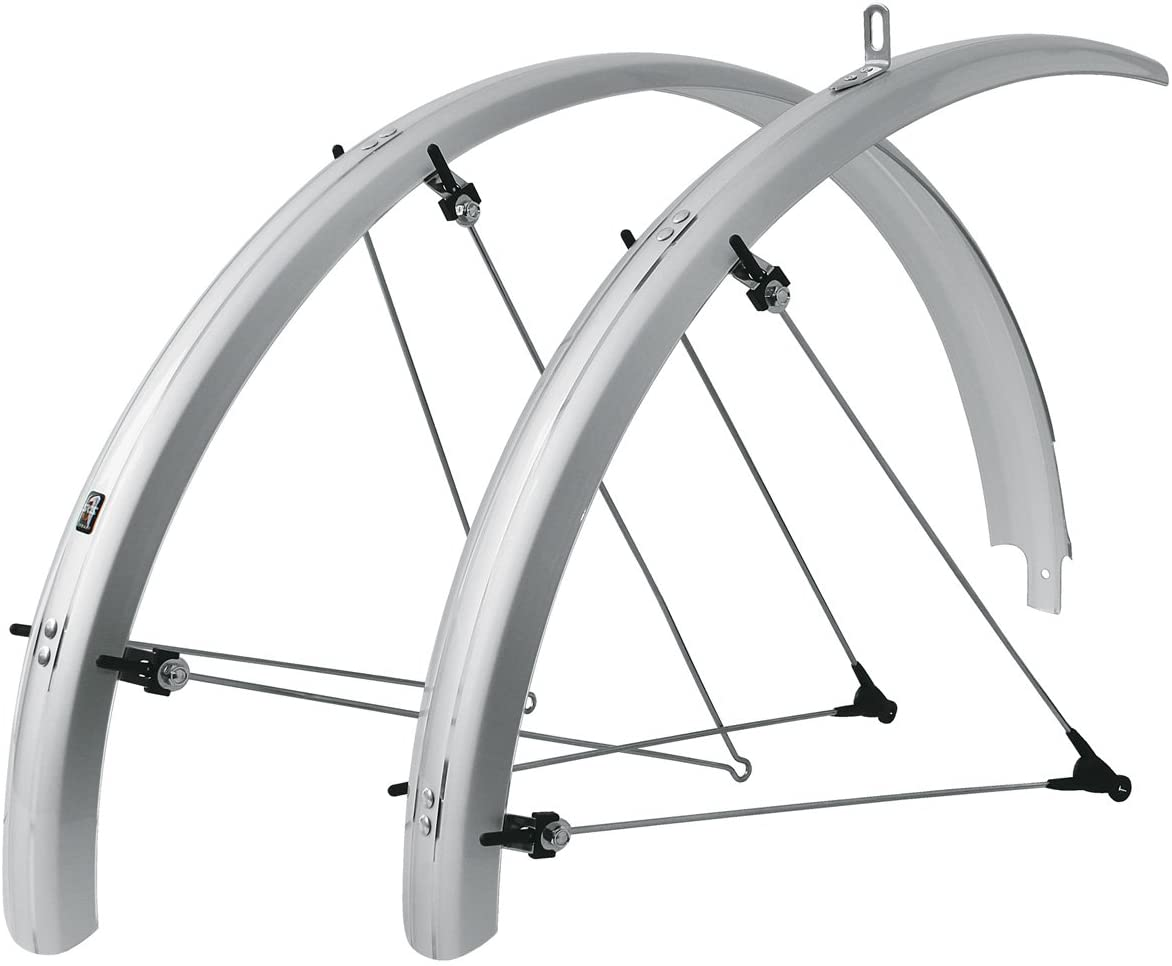
4. 700c Silver Design
If your mountain bike has 700c wheels (29-inch MTB wheels), you will need 700c mudguards like these to protect yourself from mud, rain, and debris.
Many mountain bikers opt for metallic 700c mudguards that offer sufficient protection and clearance when riding on a muddy trail.
While heavy-duty plastic mudguards are pretty long-lasting, metallic ones are usually more durable.
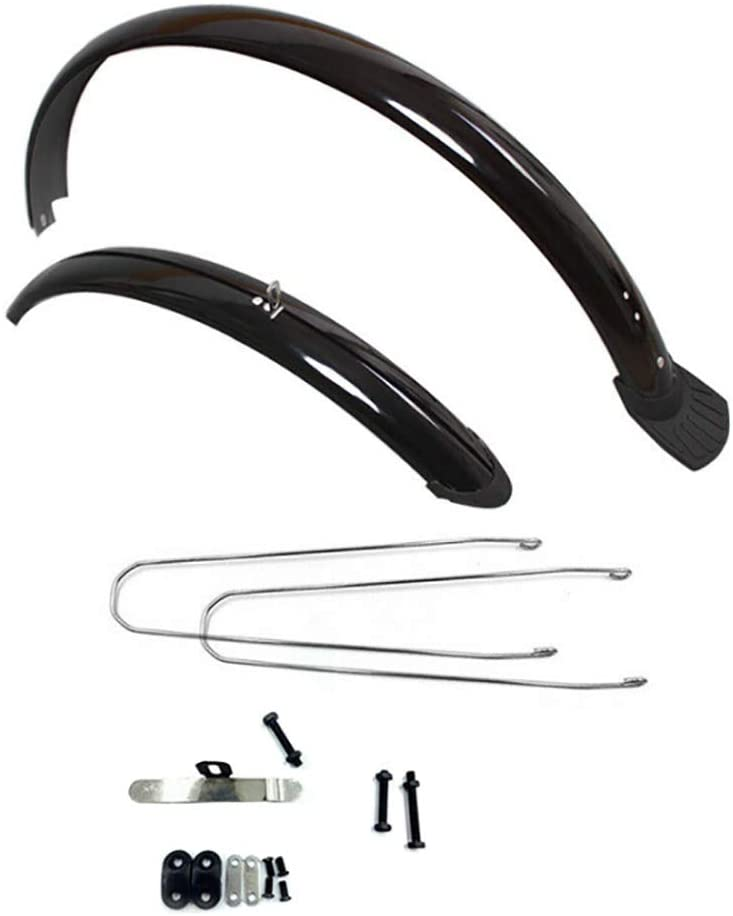
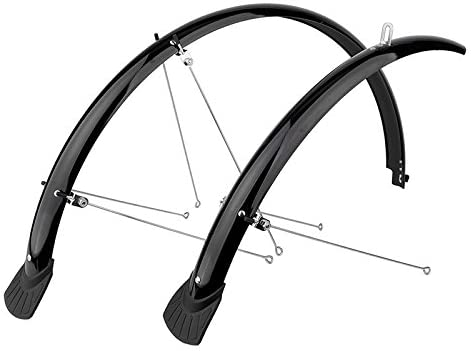
5. Full-Length Design
Traditional, also referred to as full-length mudguards, like these, offer maximum coverage and excellent protection. Along with protecting you, a full-length design also prevents the riders behind you from getting muddy or wet.
Since full-length mudguards offer less clearance than the options mentioned above, they are not that popular among mountain bikers. Besides that, these mudguards might not always suit your MTB wheels, especially if you ride with wider tires.
Still, if you value coverage and protection over clearance, you should definitely go for full-length mountain bike mudguards.

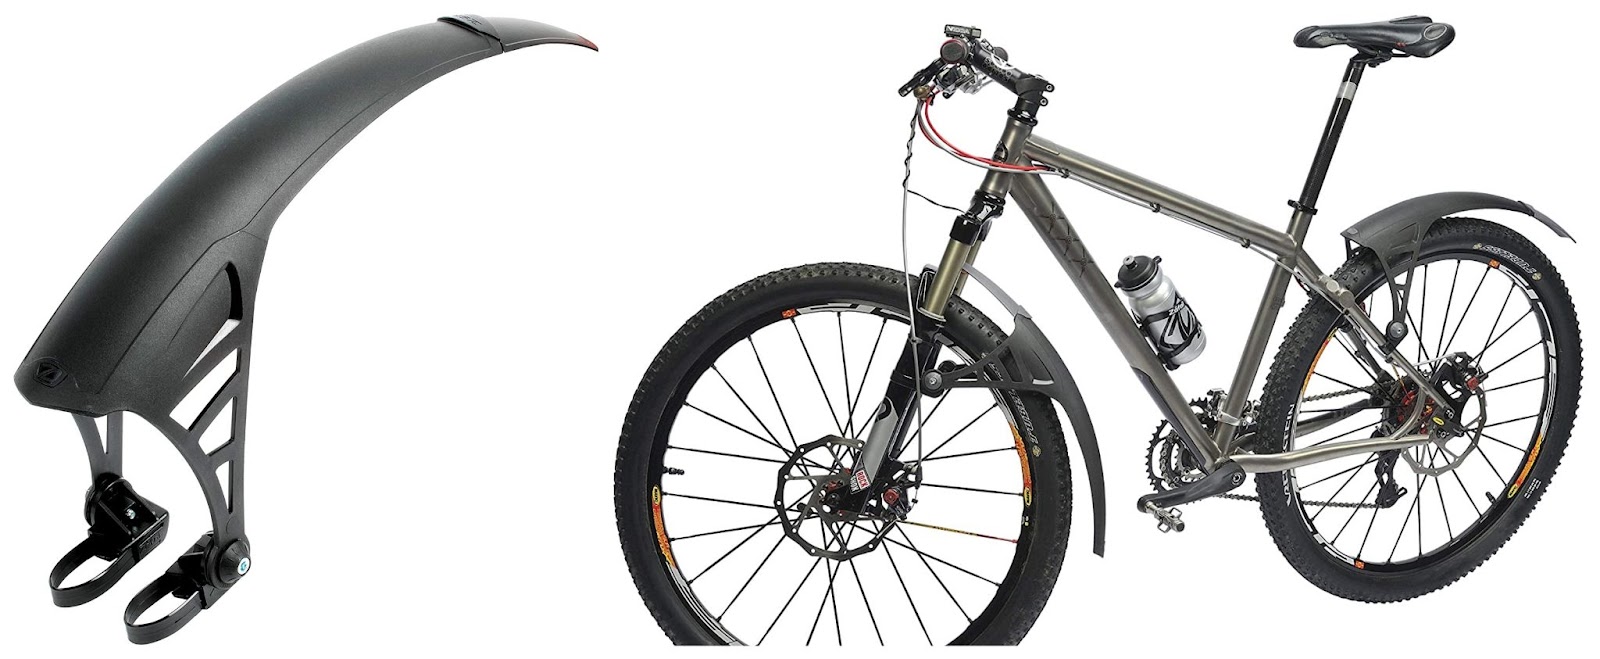
6. Mountain Bike Style Mudguard Design
If you are looking for mudguards that would make your bike look even cooler then MTB-style mudguards are definitely for you. These mudguards are suitable for rear and front wheels and can be clipped onto the seat post or the down tube of your bike.
What makes MTB-style mudguards so popular is that they offer plenty of clearance regardless of how muddy the trail is. Also, such mudguards are compatible with literally every kind of MTB, no matter how wide the tires are or what the frame design of your bike is.
While keeping large amounts of spray off, MTB-style mudguards are not as protective as other options. In addition, you should avoid riding your bike right in front of another biker, or mud, water, and debris will end up on whoever is riding behind you.
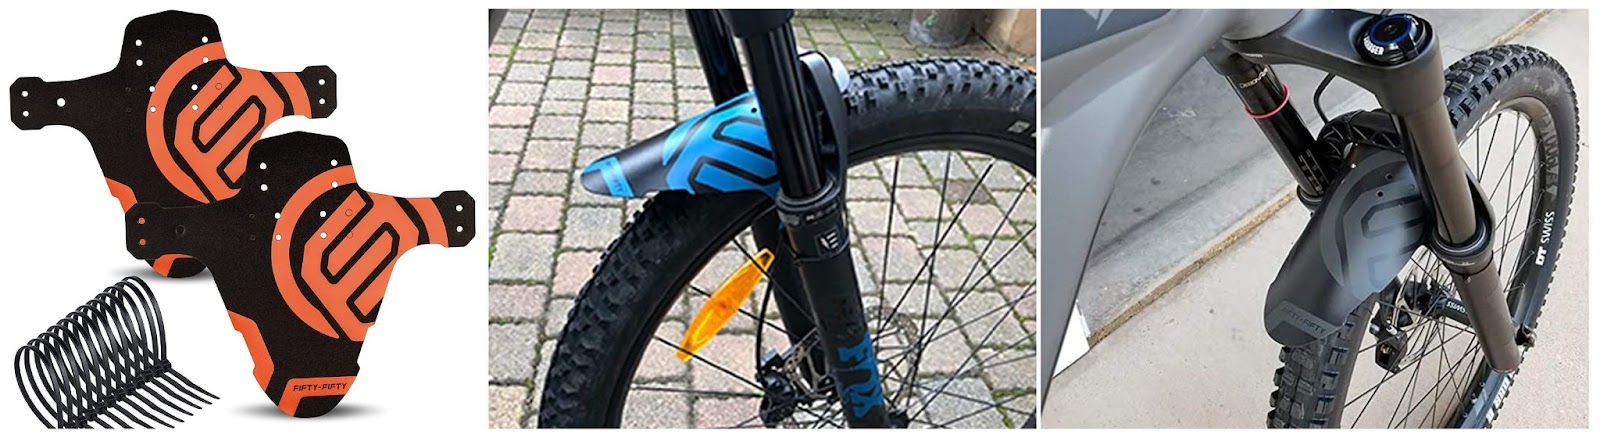
7. Micro Guard Design
If you want to get some protection against mud and rain but do not want to attach bulky mudguards to your bike, micro guards like these are your next best bet. Since micro guards are more affordable than other mudguard options, they are ideal for those shopping for mudguards on a budget.
Moreover, micro guards are pretty minimalistic, and oftentimes, they cannot even be noticed from a distance. They also come in various colors and prints, allowing you to choose one based on your bike design and personal preferences. Check out our guide on how to make a DIY mountain bike rear fender for more tips on how to style your guards.
As micro guards do not offer complete protection against mud and water, they are suitable for people living in relatively dry regions. If it does not rain a lot in your area, using budget-friendly front and rear micro guards would be enough.
Common Mountain Bike Mudguard Designs
Here we list various mountain bike mudguard designs and their features so that you can decide what would be best for you:
| Mudguard Design | Material | Attachment Method | Best for Front or Rear? | Product Example | Approximate Price |
| 700c Silver Mudguard | Aluminum | Struts | Used on both front and rear tires | Sks Bluemels Mountain Mudguard Set | ~£45 |
| Riesel Design | Extra-Thick Polypropylene | Zip Ties | Used on both front and rear tires | Riesel Design Stickerbomb Mudguard | ~€10 |
| Clip-On Design | Plastic | Clip-On System | Used on both front and rear tires | Sksae Racceblade Pro XL Bicycle Fender Set | ~$75 |
| Wiggle Design | Plastic | Flip-Tip Lock | Used on both front and rear tires | Ass Savers Smartass Bicycle Rain Fender | ~$15 |
| Full-Length Design | Plastic and Metal Mix | Clip-On System | Used on both front and rear tires | M Part Primo Full-Length Mudguards | ~$50 |
| MTB-Style Mudguard Design | Technopolymer Resin | Universal Mounting System with Double Adjustment | Used on both front and rear tires | Zefal No-Mud Universal Front or Rear Mudguard | ~$25 |
| Micro Guard Design | Polypropylene | Heavy-Duty Zip Ties | Used on both front and rear tires | Fifty-Fifty Mountain Bike Front and Rear Compatible Fender | ~$15 |
You might also be interested in learning how to make your own mudguards. If so, be sure to take a look at our related article that will explain how to make a mountain bike mudguard for more details. Additionally, our article explaining mountain bike rear mudguard installation might also be of interest to you as well.
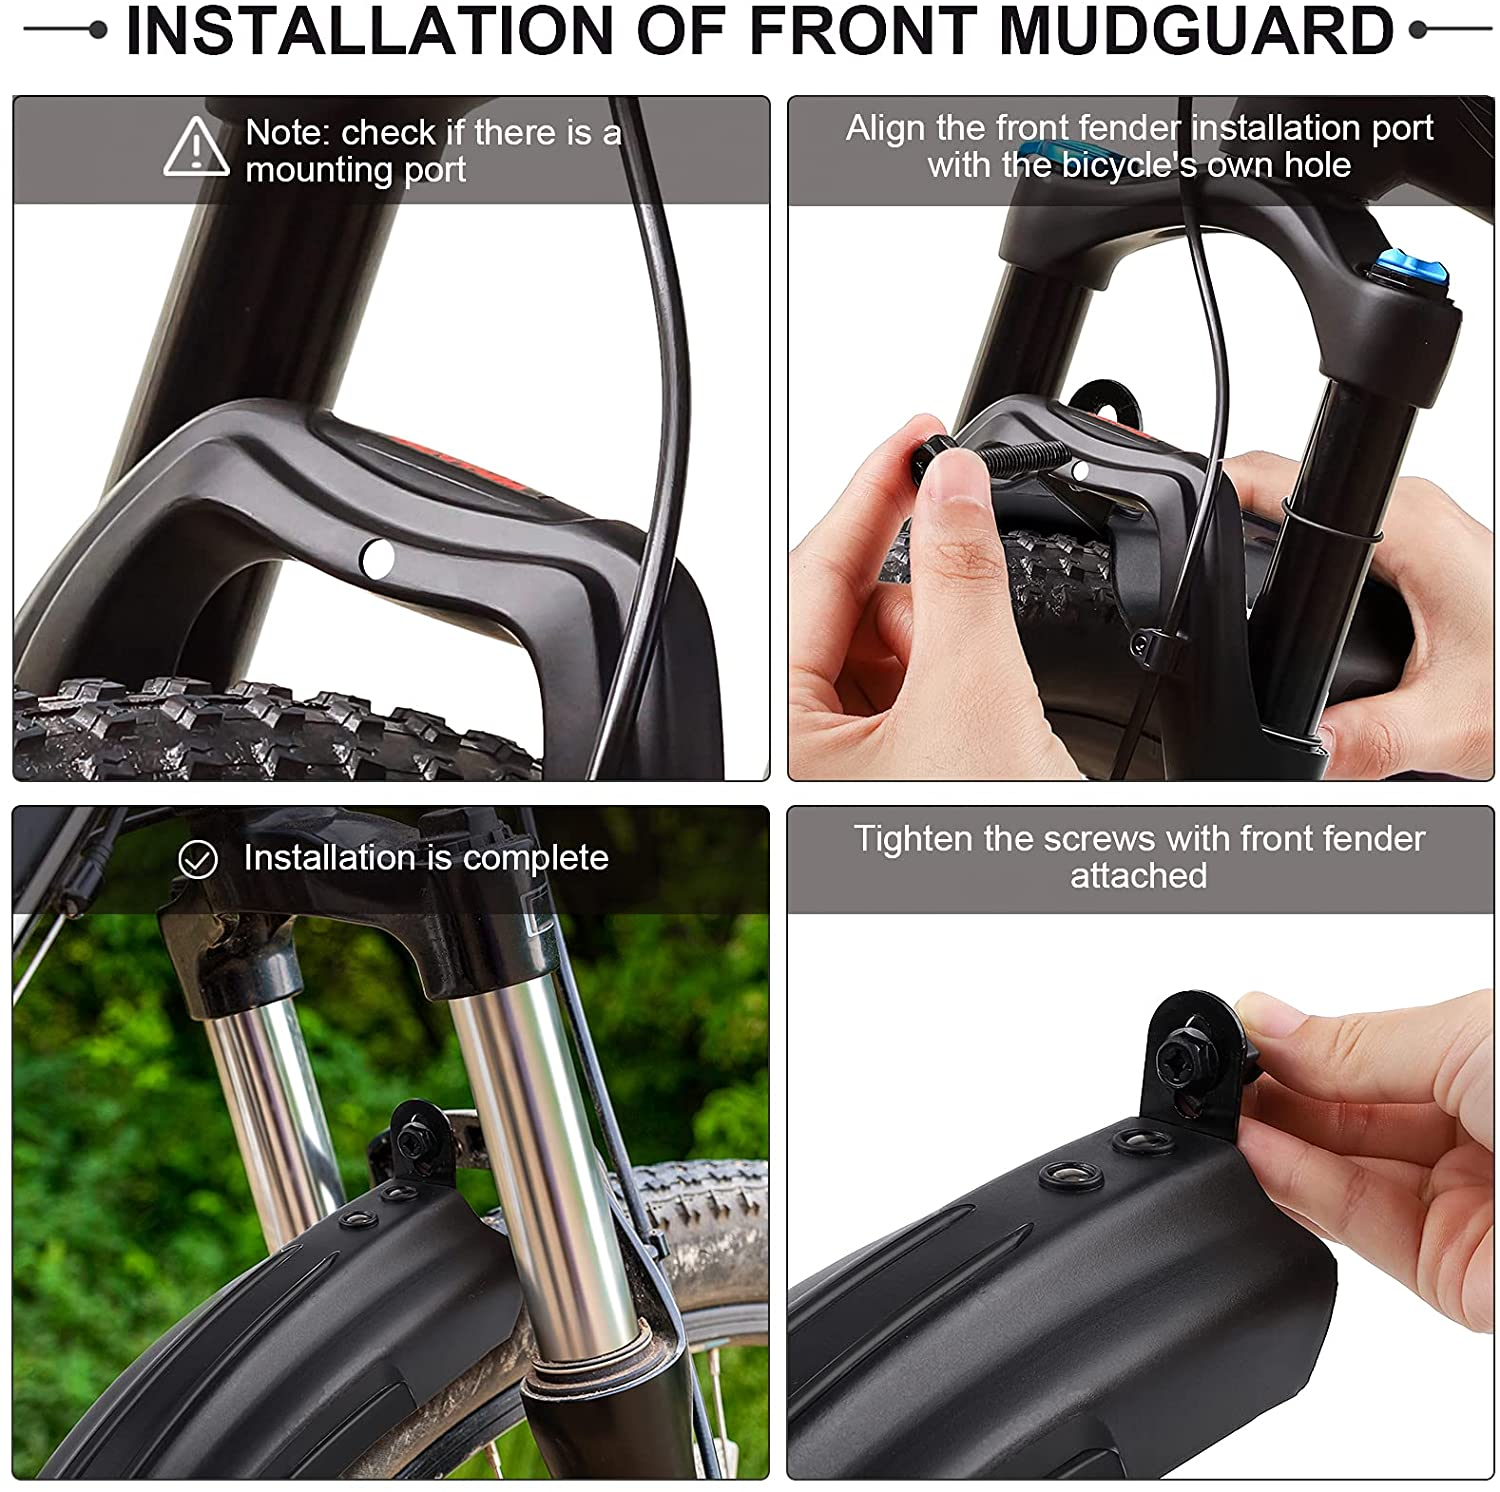
How to Put a Mudguard on a Mountain Bike with Zip Ties
Putting mudguards on your mountain bike can be a game-changer when riding on a muddy trail. Here, we’ll describe how to install mudguards on a mountain bike. Similar steps can be followed with fenders that have an identical attachment method.
To put a mudguard on a mountain bike, first, choose mudguards compatible with the mountain bike. Then, check the mudguard mounting system and prepare the tools needed for installation. Next, position the mudguards so that they are aligned with the tires and frame of the mountain bike. Finally, attach the mudguards securely to the mountain bike.
Mountain bike rear and front mudguard installation require attachment parts and accessories. The essential units are:
| MTB Attachment Part | Uses | Product Example | Approximate Price |
| Mudguard Stay Kit | Securely attaches mudguards to the bike and keeps them in place throughout the ride. | U-Stays Kit Velo65 Mountain Spare Part | ~£10 |
| A Bracket Set | Can be attached to the bike frame or forks and act as an extender for the “O” hole. Used for adjusting full-length mudguards. | Just Junmin Front and Rear Wheel Mudguard Brackets | ~$25 |
| Zip Ties | Used for fastening Riesel Design or micro guards to the bike. | 100pcs Heavy-Duty Cable Ties | ~$10 |
| Hex Keys | To loosen or tighten bolts during mudguard installation. | Amazon Basics Allen Wrench Set with Ball End | ~$15 |
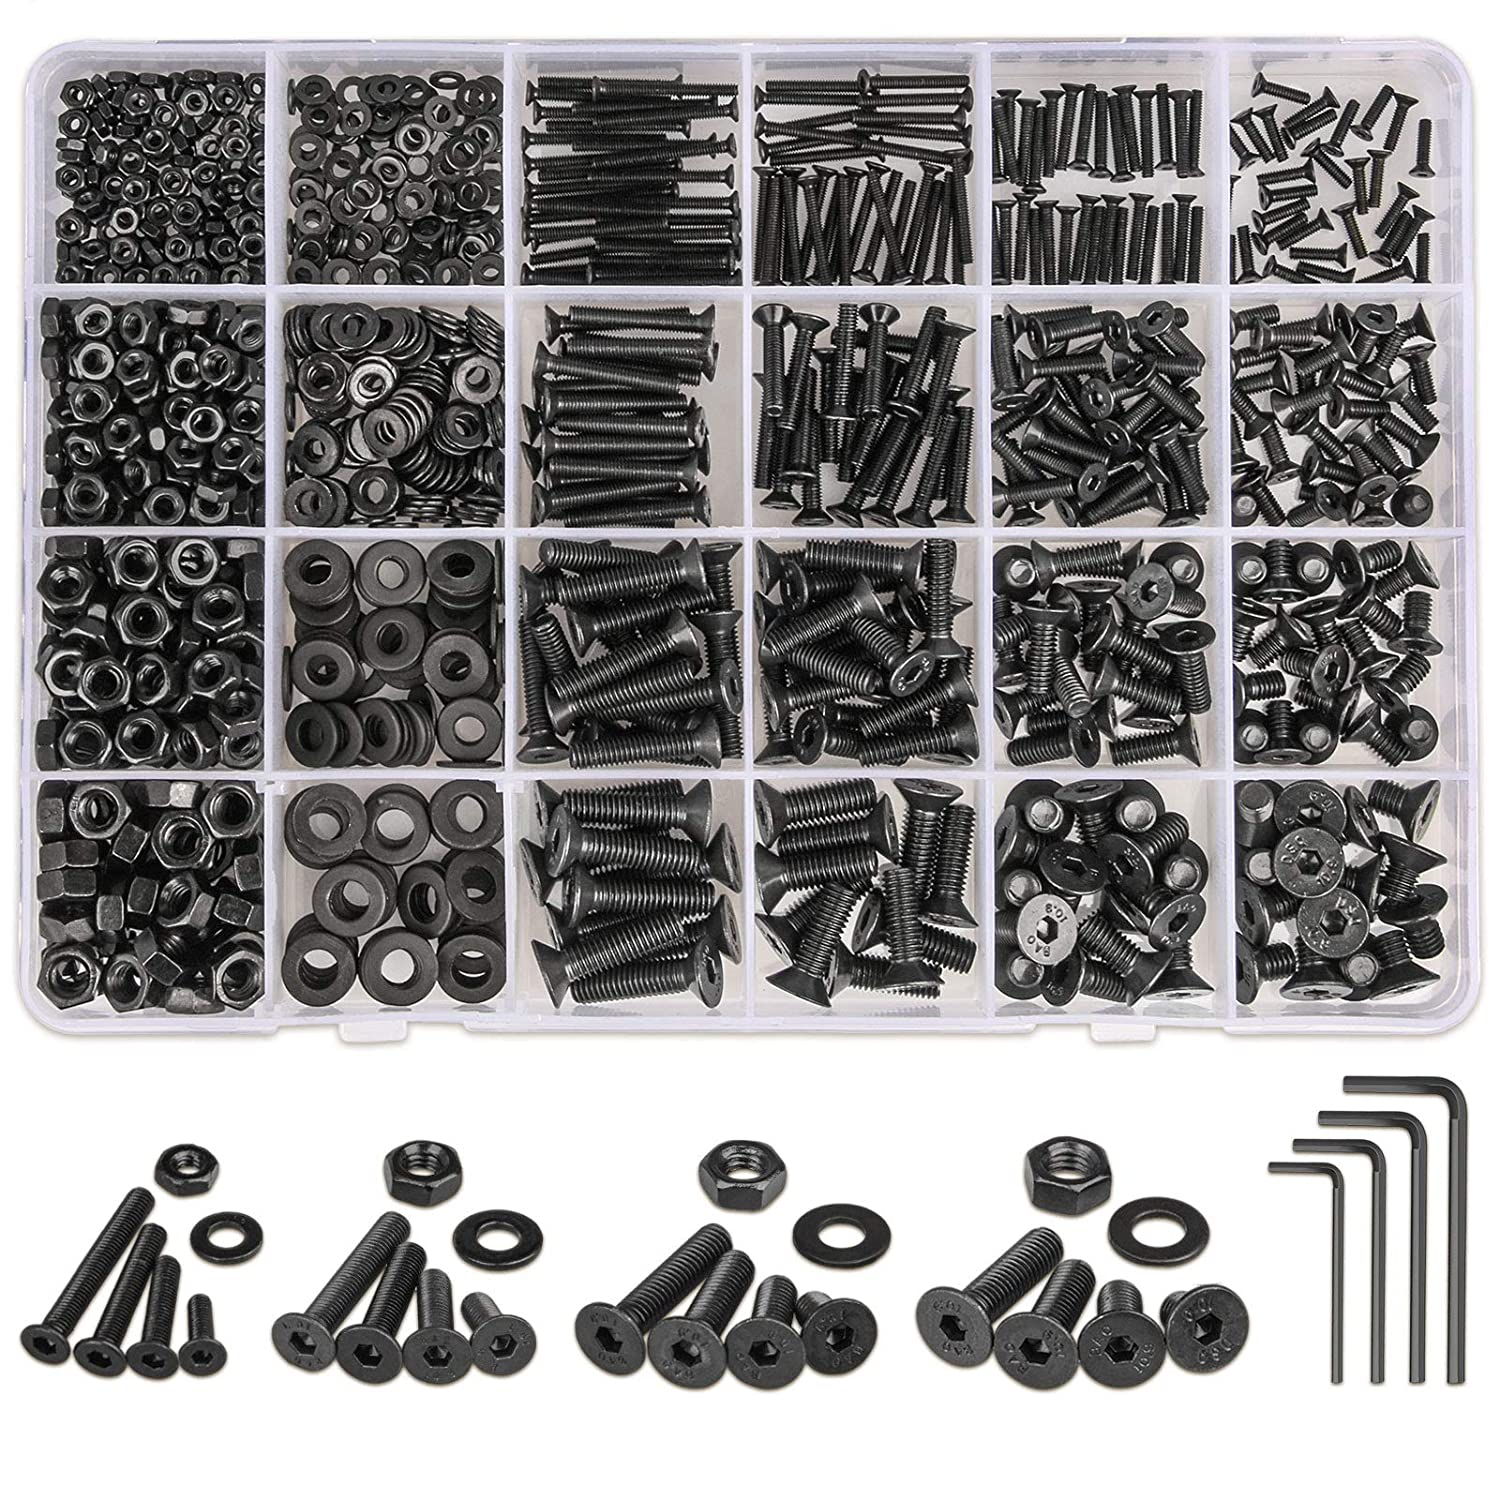
| Bolts, Nuts, and Washers | To attach support rods or mudguard brackets to the bike. | Screws, Nuts, Washers, and Bolts Assortment | ~$25 |
Step 1. Choose Mudguards That are Compatible with Your MTB
Before we even start the installation process, it is crucial to ensure that the mudguards are compatible with your mountain bike. When shopping for mudguards, take into account the size and style of your MTB as well as the width and height of your tires and wheels. Incidentally, if you would like to know more about tires check out our article that explains how to choose mountain bike tires for maximum grip.
Luckily, some mountain bike mudguards are pretty much universal and can be attached to almost every type of MTB. This is because they often come with adjustable mounting systems, allowing you to regulate how high or low they sit above the tires.

Step 2. Check the Mudguard Attachment System
To determine what tools you will need during the installation process, you should always check the mudguard mounting system.
Full-length mudguards typically come with support rods and brackets like these that securely attach the mudguards to the bike. Such mudguards will require installation that we will discuss shortly.
On the other hand, micro guards, Riesel Design mudguards, and MTB-style mudguards can easily be mounted onto the bike by means of zip ties or adjustable plastic straps.
Step 3. Prepare the Tools You Might Need
To make the installation process straightforward, you should prepare the tools you might need beforehand. You probably have all the tools already, but we recommend you check out our article about mountain bike tool kit essentials to find out more about all the tools you will need for repairing or adjusting parts of your mountain bike. If you would like to know more about common repairs such as fixing a flat tire, make sure to check out our step-by-step guide on how to change a mountain bike tire.
In the case of micro guards, Riesel design mudguards, and mountain bike-style mudguards, you will only need a few zip ties. Putting full-length mudguards on your mountain bike will require some additional tools, such as hex keys, bolts, nuts, and washers. If your mudguards do not include support rods like these, you will need to purchase them separately.
Step 4. Position the Mudguards so that They Are Aligned with the Tires and Bike Frame
After preparing the tools you need for installation, align the mudguards with the tires and the frame. This is key to protecting yourself from mud while ensuring that the wheels spin properly as you ride the bike so check out our article about how to adjust mountain bike fender offset to find out more. Also, this thread from Road.cc discussed mudguard clearance so have a look at what other riders have to say.
Step 5. Attach the Mudguards Securely to the MTB
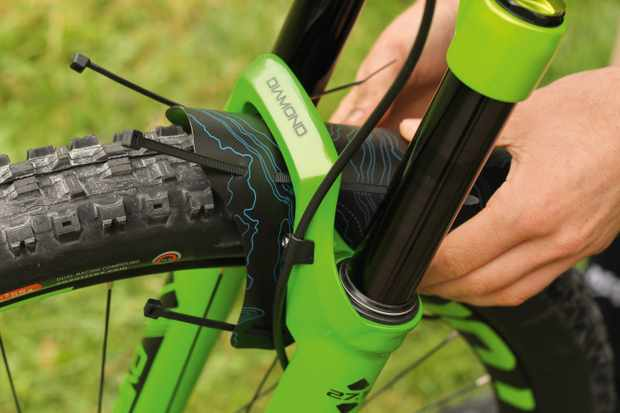
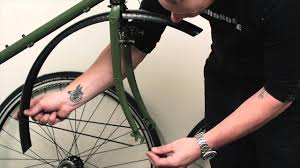
The last step is to mount the mudguards on the mountain bike frame. In the case of clip-on mudguards, the installation process is pretty straightforward. You just use simple fastenings, such as zip ties or rubber bands, to install mudguards on the mountain bike frame.
First, insert the zip ties through the holes so that the heads are inside the mudguard. Then, slide the mudguard above the tire in a way that the zip ties can go over the crown. Next, pull the zip tie over the crown and push it through the corresponding hole. Finally, lock the zip tie so that it is nice and tight. Repeat this for the remaining three cables and you are ready to go.
This 4-minute YouTube video by Charlie Rides MTB demonstrates how to install a front MTB mudguard.
Similarly, you may find interest in learning how to fix mountain bike mudguards that wiggle. If so, be sure to take a look at our related article.
How to Install Mudguards on a Mountain Bike with Support Rods
When it comes to attaching mudguards with support rods, you will need to follow the additional installation steps provided below. These instructions are based on the video tutorial by cjhoyle.
Step 1. Prepare the Mudguards
Before you install full-length mudguards on your MTB, you should prepare them. Oftentimes, mudguards are packed so that they can be fitted into smaller boxes. If this is the case, you will need to reposition the support rods.
To do so, simply remove the rubber cap off the end and thread the rod through the hole. Repeat the step for all the remaining rods.
Some modern mudguards come with fixed rods, so you might not need to complete this step.
Step 2. Attach the Front Mudguard to the MTB
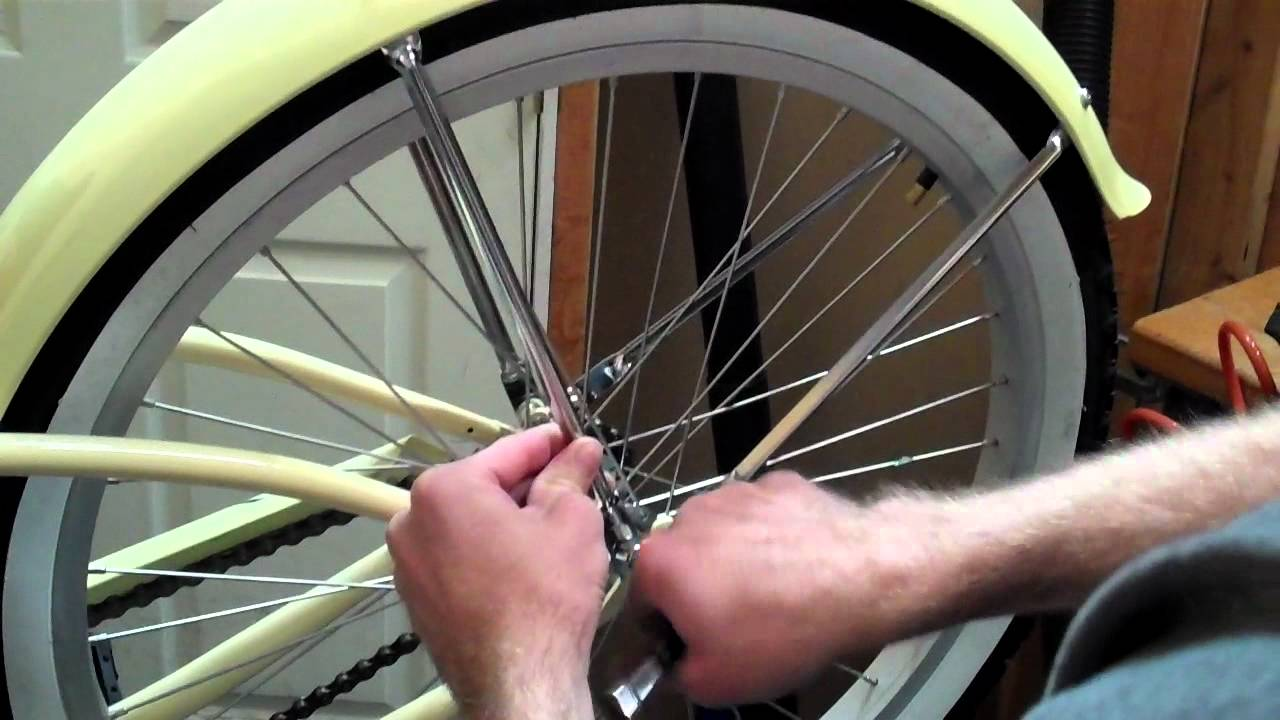
To attach the front mudguard to your bike, you will first need to position the mudguard above the front wheel. Next, align the metal bracket of the mudguard with the hole in your bike fork. Then, insert the bolt through the hole and secure it with a nut. Do not forget to adjust the mudguard by moving it up or down along the metal tab slot.
After that, attach the support rods to the eyelet of the bike wheel. You should thread the bolt through the eyelet and use a nut to secure it from the other side. If you have trouble tightening the bolt, consider removing the wheel to have some extra space around the eyelet.
Finally, tighten the bolts that attach the rods to the mudguard. This allows you to adjust how close the mudguard is to the tire. Make sure the bolts are not overtightened; otherwise, you will damage the brackets.
To check if you have attached the front mudguard correctly, spin the wheel and see if it touches the mudguard. If not, you have successfully completed the task.
Step 3. Attach the Rear Mudguard to the MTB
The last step is to attach the rear mudguard to your mountain bike. While the overall process is pretty similar to what we have discussed above, there are some differences you should take into account.
The primary difference is that rear mudguards feature two sets of support rods. Sometimes, these rods are connected to each other and are more like continuous metal pieces. However, some mudguards come with two separate support rods that you should simply overlap before securing them to the bike.
To install the rear mudguard, position it above the tire and secure the middle bracket to the hole in the seat stay of your bike. You should use a bolt and a nut, just as described in the previous step.
Next, attach the support rods to the eyelets on the rear wheel of the bike. If your mudguard features individual support rods, do not forget to overlap them. Use bolts and secure them with nuts.
When working on the rear side of the mountain bike, you should ensure that the bolts that hold the support rods in place are not too close to the chain. Simply shift through the speeds to confirm that the bolts do not interfere with the chain.
Then, secure the last mudguard bracket to the hole in the chain stay of your mountain bike. Thread a bolt through the hole and secure it with a nut from the other side. Again, if you have trouble tightening the bolts or the nuts, consider removing the wheel.
Finally, adjust the length of the support rods and check how close the mudguard is to the rear tire. Give the rear wheel a final spin and you are all set.
Mudguard Sizes versus Mountain Bike Tire Sizes
To benefit fully from your MTB fenders, you should select the mudguard size according to the size of your mountain bike tires.
Different mudguards will be suitable for different mountain bike tire sizes. Choose wide MTB mudguards for wider tires like the 700c tires, and choose smaller mudguards to fit tires that have a smaller diameter like 26 inches.
Here is a summary of common MTB tire sizes and compatible mudguard sizes:
| Mudguard Size | MTB Tire Size | Product Example |
| 35 mm | 700c x 20-28 mm | Ass Savers Bicycle Saddle Mudguard |
| 42 mm | 700c x 25-35 mm | Sks Bluemels Shiny Mudguard Set |
| 45 mm | 700c x 28-38 mm | Resistant Bike Full Cover Front and Rear Fit Fenders |
| 65 mm | 26" x 41-54 mm | Planet Bike Cascadia Bike Fenders |
Mountain Bike Mudguard Installation Cost Template
The cost of installing your MTB mudguards will depend on the style and design of the mudguards that you have chosen, what the attachment parts are, and the cost of the labor to install them if you have them installed professionally.
Installing the Zefal Deflector M60 MTB front and rear mudguard set which comes with all attachment parts and will cost approximately $60, assuming it takes a technician 30 minutes to install.
MTB Mudguard Average Installation Cost Template
| Items Paid For | Quantity | Cost |
| MTB mudguard (Zefal Deflector M60 MTB) | 1 | ~ $25 |
| Labor | 30 minutes | ~ $20 |
| Total Mudguard Installation Cost | ~ $45 |