Mountain Bike Chain Installation – Step by Step
Knowing how to install mountain bike chains properly is an essential skill for any rider. The mountain bike chain is the most important component of the drivetrain, which takes the bulk of the stress and is responsible for power transmission on your bike. Due to the constant pressure and stress the chain goes through during rides, you may need to replace it frequently. Mountain bike chain installation needs to be done before it gets too worn out.
To install a mountain bike chain, first check for chain compatibility, chain growth, and the make of the drivetrain. Also, check for the condition of the other drivetrain components. Then purchase a good quality chain and determine the right chain length. Afterward, fit and route the new chain on your bike. Finally, test and oil your new chain.
It is usually recommended to install a new chain on competitive bikes before each mountain bike race. And if you are a competitive rider and feel that your mountain bike may be ready for an upgrade then check out our article that could help you decide on what mountain bike you should buy?
You may also need to install new chains for custom-built bikes. To help you with this process, we detail the tools, types, and sizes of the chain, and other necessary information for proper mountain bike chain installation. You may want to check out our ultimate list of tools needed for mountain bike maintenance.
Mountain Bike Chain Components
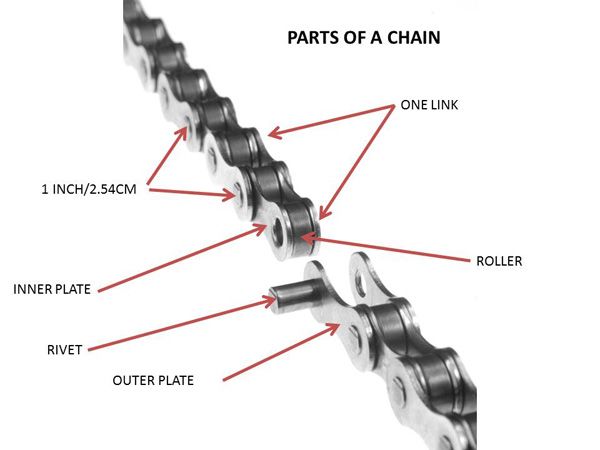
A mountain bike chain consists of 4 important parts: the outer plates, inner plates, rollers, and a rivet or pin. Each pair of outer plates is connected by a rivet, while a roller separates each pair of inner plates. The rivet is responsible for the pivoting of the individual chain link.
Before thinking about installing an MTB chain, you must be familiar with chain measurements. For standard chains like these, each pair of outer plates constitutes a link. Same as each pair of inner plates. In addition, the measurement between adjacent rivets (1 outer link and 1 inner link) is nominally 1 inch. So, a chain with 120 links has 60 outer and 60 inner links. The chain would also measure 60 inches long. Another measurement is the chain speed. The chain speed depends on the number of sprockets on the rear cassette. A 9-speed chain like this is made for a cassette with 9 sprockets. And as the speed of the transmission increases, the width between the sprockets and rivets decreases.
Now that we have the measurements down, let’s consider what size and type of chain you should get for your bike.
What Size Mountain Bike Chain Do I Need?
Before purchasing your mountain bike chain, you need to determine what type and size you need for optimal chain compatibility. Chains are typically sold in standard lengths with 96, 98, or 112 links like this. This size usually suffices for most bikes. However, for mountain bikes with an especially long chain stay or large gearing, you might need to get a 126-link chain like this. The standard size of the chain is usually too long, so you will have to shorten it to the right size for your bike transmission before installing the chain.
Use a 46 inch long mountain bike chain for a mountain bike with 26 teeth in the rear cog, 52 teeth in the largest front chainring, and a 12.5 inch chain stay length.
To determine what size mountain bike chain is needed, use this formula: bike chain length = 2 x Chainstay length + Number of teeth on the largest front chainring/4 + Number of teeth on the largest rear cog/4 + 1. Or in simple representation: L = 2 x C + F/4 + R/4 + 1. Where C stands for the chainstay length, F is the number of teeth on the largest front chainring, and R represents the number of teeth on the largest rear cog.
When calculating the bike chain length, convert your chain stay length to decimals for easier calculation if it is in fractions. For example, convert a chain stay length of 13-3/4 inches to 13.75 inches. Also, ensure you use the largest chainring if you have multiple front chainrings. If your final value for the chain length is decimal, then round to the nearest 0.5 inches. For instance, a chain length of 45.5 inches should be rounded up to 46 inches.
Failing to get the right size will lead to problems later on. A chain that’s too short will decrease your bike performance and cause your expensive bike components like the cassette and chainrings to wear out quickly. A short chain also limits the number of gears you can shift to and severely damage your derailleur and chainrings during rides. On the other hand, a mountain bike chain is too long will not fit well on the cassette and therefore come off frequently. This can be quite dangerous. For these reasons, it is important to determine the exact size of the chain you need before installing it.
MTB Chain Length Calculator
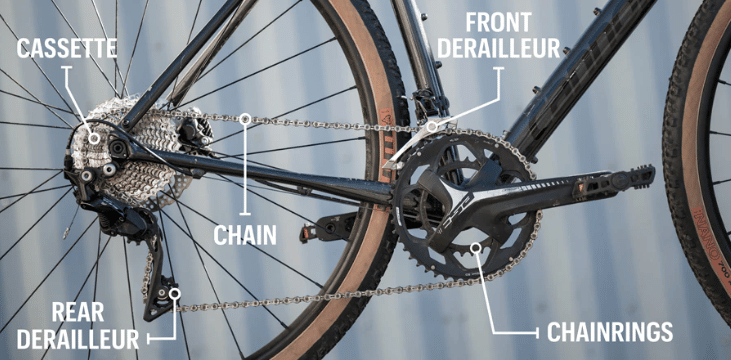
Just as the model of chain and type of connector you need will differ according to the bike, so also will the length vary. Using the formula above, you can easily calculate the exact length of chain you need for your bike. The chain stay length is the distance between the rear wheel axle and the center of the pedal bearings; the front chainring or crankset refers to the forward ring to which the pedals and chain are attached; the rear cog is the set of teeth through which the chain attaches to the drivetrain.
Let’s take a look at several common combinations of these bike components and the corresponding proper chain length for the bikes.
| # Of Teeth on The Largest Rear Cog | # Of Teeth on The Largest Front Chainring | Chain Stay Length (inches) | Bike Chain Length (inches) |
| 26 | 52 | 12.5 | 46 |
| 26 | 52 | 13.75 | 48 |
| 26 | 52 | 16.375 | 53 |
| 26 | 48 | 12.5 | 45 |
| 26 | 48 | 13.75 | 47 |
| 26 | 48 | 16.375 | 52 |
| 26 | 50 | 12.5 | 45 |
| 26 | 50 | 13.75 | 48 |
| 26 | 50 | 16.375 | 53 |
| 32 | 52 | 12.5 | 47 |
| 32 | 52 | 13.75 | 50 |
| 32 | 52 | 16.375 | 55 |
| 32 | 48 | 12.5 | 46 |
| 32 | 48 | 13.75 | 49 |
| 32 | 48 | 16.375 | 54 |
| 32 | 50 | 12.5 | 47 |
| 32 | 50 | 13.75 | 49 |
| 32 | 50 | 16.375 | 54 |
| 28 | 52 | 12.5 | 46 |
| 28 | 52 | 13.75 | 49 |
| 28 | 52 | 16.375 | 54 |
| 28 | 48 | 12.5 | 45 |
| 28 | 48 | 13.75 | 48 |
| 28 | 48 | 16.375 | 53 |
| 28 | 50 | 12.5 | 46 |
| 28 | 50 | 13.75 | 48 |
| 28 | 50 | 16.375 | 53 |
If your components’ measurements are not available on the table, you can use the formula above to find the correct bike chain length.
Do I Need A Mountain Bike Chain Tool to Install a New Chain?
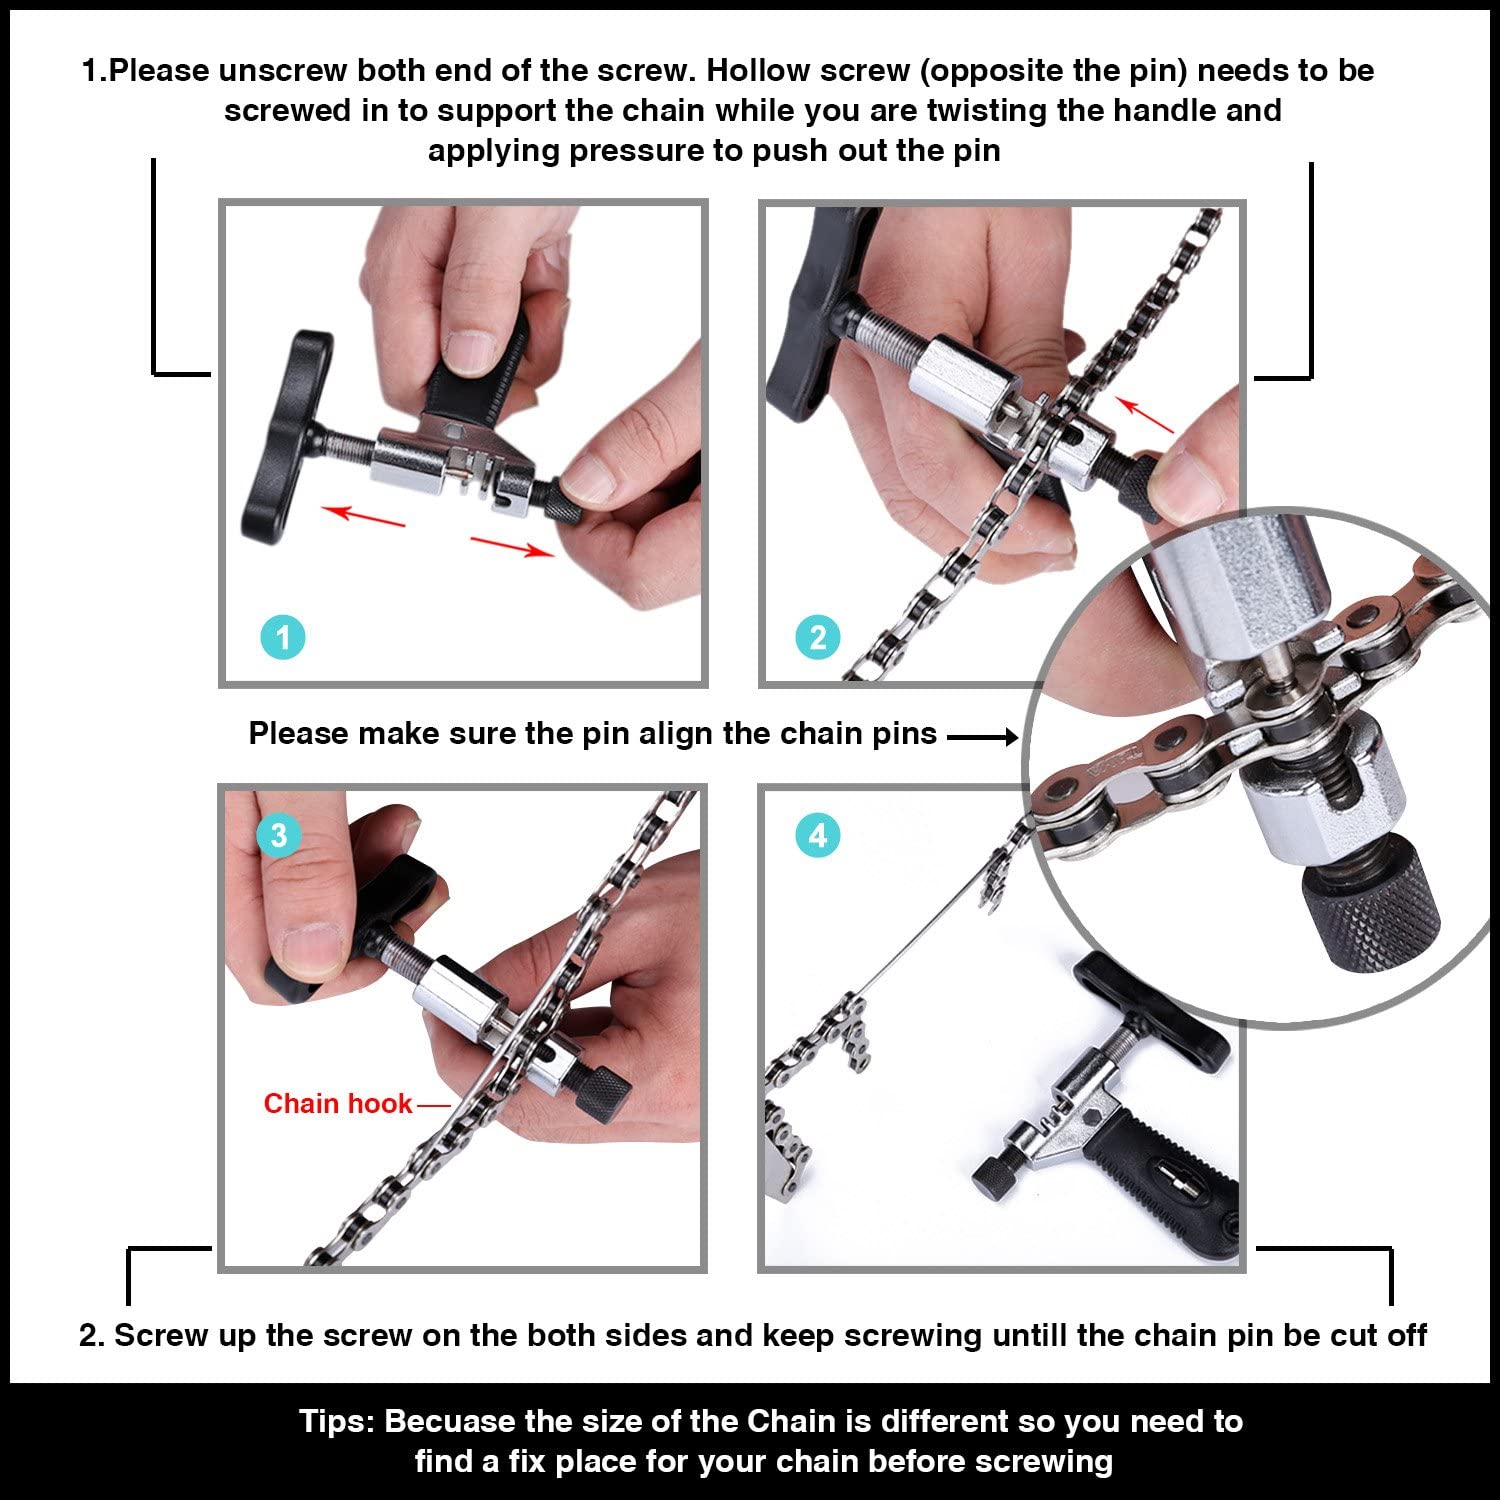
A mountain bike chain splitter or breaker tool is an essential tool to keep nearby when installing or repairing your bike chain. It allows you to disconnect, shorten and join chains that are comprised of connection pins rather than a master link. The tool functions by driving the pin out of the connecting link to split the chain or driving in a new pin to reconnect the chain. There are 2 slots on the chain tool to place a chain: the outer slot is used for detaching and reattaching the chain, while the inner slot is used for loosening stiff chain links.
A mountain bike chain tool is not necessary for chain installation. Use a mountain bike chain tool for resizing a chain that is too long.
New chains usually range between 96 to 126 links which are too long for most bikes. As a result, you’ll have to shorten the chain length to avoid any issues. This process of disconnecting and shortening a chain might require a chain tool like this or not, depending on the type of chain. For example, for chains with master links, a chain tool is not necessary for installation. However, a chain with connection pins will usually require a chain tool for disconnecting and reconnecting the chains. Therefore, to use the chain tool, check if the chain you have uses a master link system or a connection pin system.
When disconnecting your old chain with a chain tool, first turn the handle of the tool counterclockwise until the chain tool pin is backed out of the outer slot. Next, place the chain in the outer slot and tighten the tool clockwise until the chain tool pin connects with the connection pin of the bike chain. As you tighten the chain tool, the connection pin gets pushed out to the other side. Take care not to push out the pin completely – it should get about halfway through the first two outer chain plates. This way, you can still disconnect it and reconnect the chain.
To reinstall the chain, push the chain links together till the pin clicks back into place. Place the chain in the outer slot of the chain tool again. Position the connecting pin, so it faces inward toward the chain tool pin. Tighten the chain tool clockwise to push the pin back through the link. If the links become stiff in the process of reconnecting them, place the links in the inner slot of the tool and tighten the chain tool pin. This usually loosens up the chain link plates.
What Tools Do I Need for Mountain Bike Chain Installation?
Bicycles are one of the most energy-efficient means of human transportation. And one of the components responsible for the bike's performance is the chain drive.
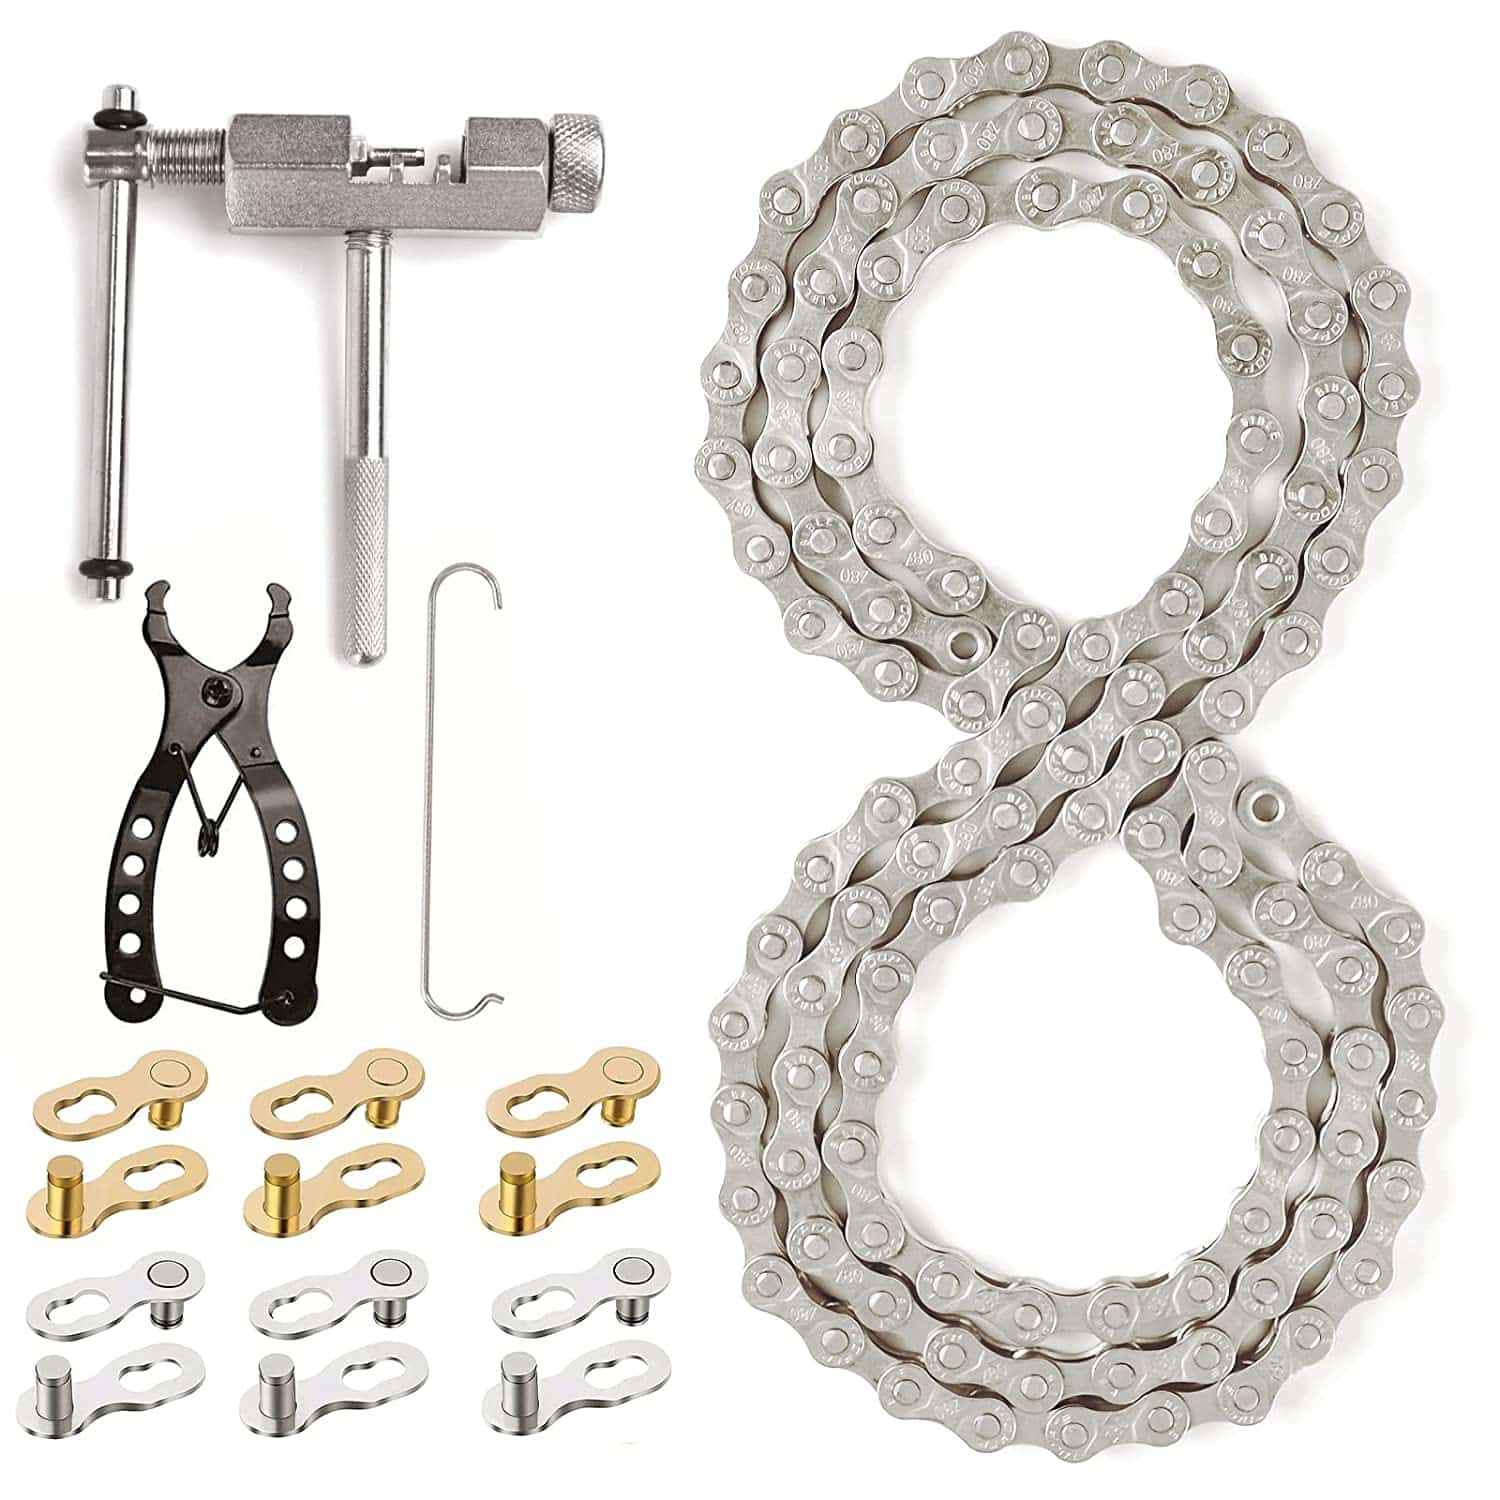
For mountain bike chain installation, the following tools will be needed: a chain splitter tool, pliers, master link pliers, a toe-strap, a Powerlink power lock, bicycle degreaser, chain lube, and a new bike chain.
Bicycles have an energy efficiency score of between 81 to 98 percent, as this study by John Hopkins University shows. This makes bikes much more efficient than walking and even cars in terms of energy used (kcal) per mile, according to this article from the Science of Cycling.
Another determining factor is the pedaling efficiency of the bike. You can check out our article on how to install mountain bike pedal straps and toe clips for more information on increasing this efficiency. Now let’s consider the tools you’ll need for your mountain bike chain installation.
Fortunately, you only need a few handy tools to install a new mountain bike chain. It’s best to have a personal mountain bike chain tool kit like this. You can read our article on mountain bike tool kit essentials for the tools to look out for when putting together your kit. In addition, if you wish to keep the kit close on your rides in case of any emergencies, check out our article on how to fix a heavy mountain bike tool bag. Thankfully the tools required for mountain bike chain installation are few and inexpensive.
Here is a table referencing the necessary tools for mountain bike installation
| Tool | Why it is Needed |
Nautilus II Chain Rivet Tool for Bikes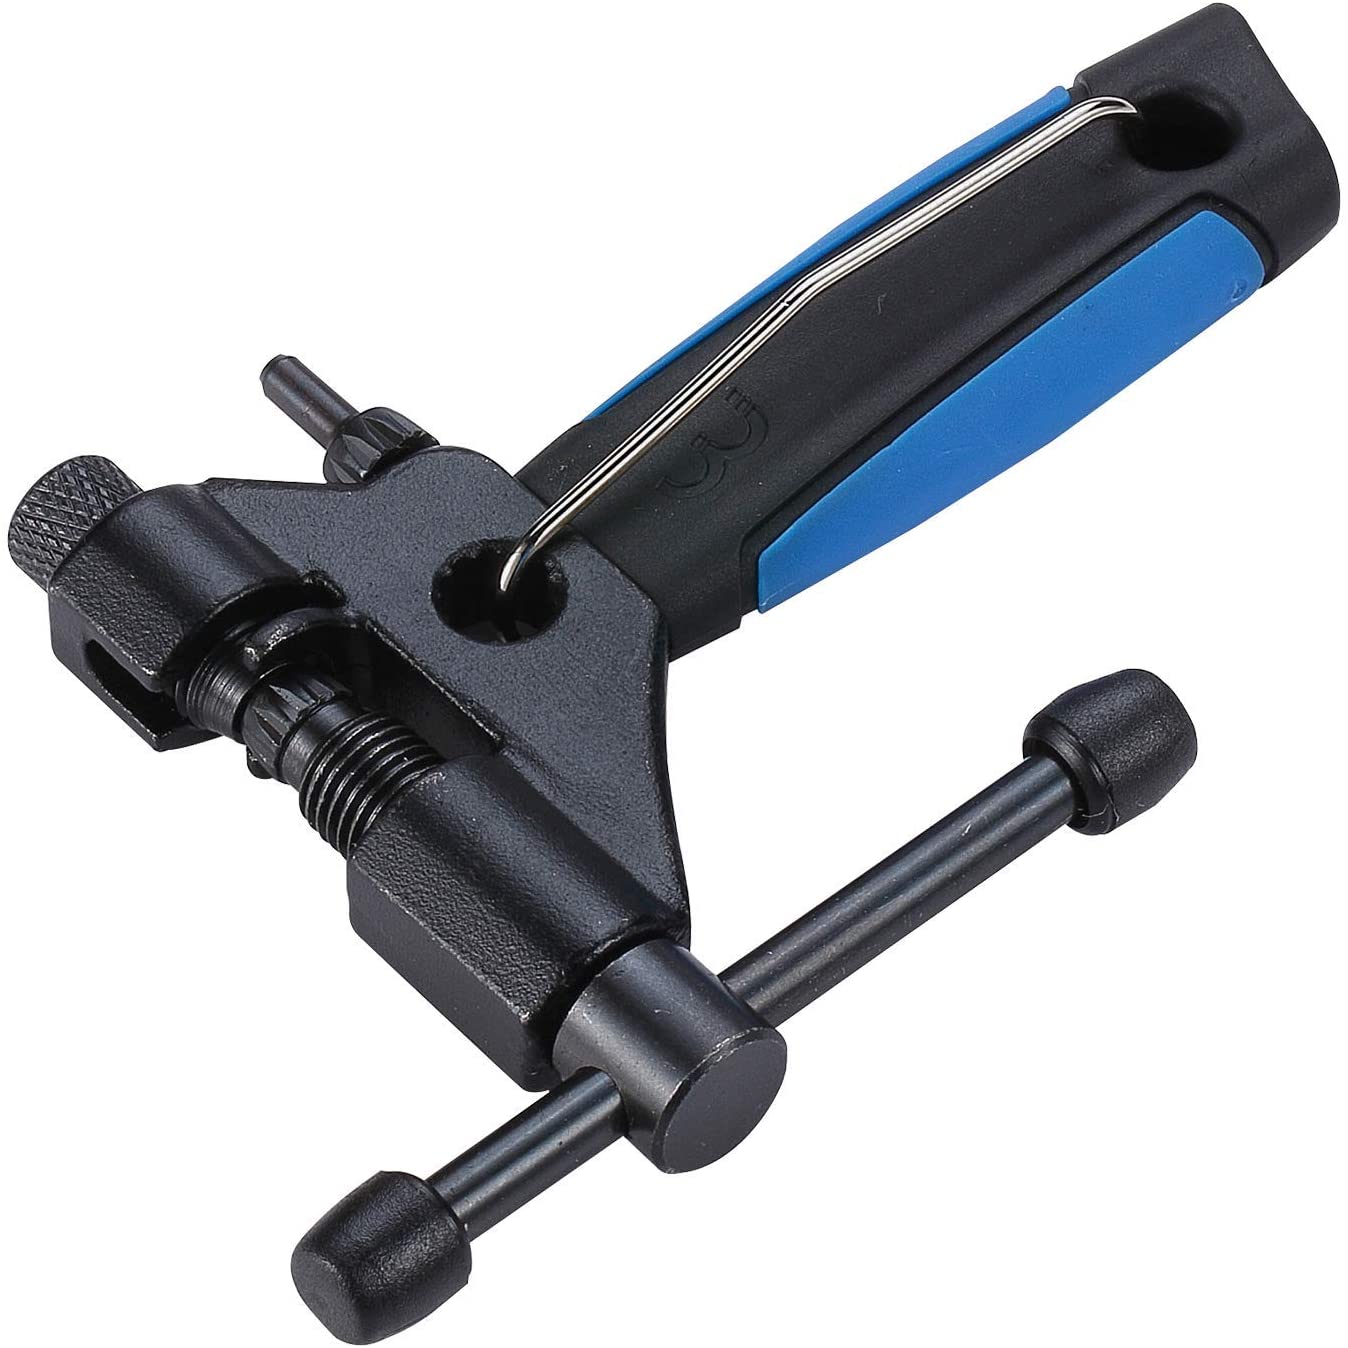
| Is used to split a chain by pushing the chain pin out of chains without a master link. Also used to connect chains by driving in a connection pin. |
Chain hook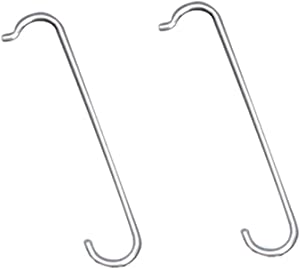
| Is used to release the tension in the chain for easy attachment and removal of a master link. Also makes it easier for the chain tool to connect and disconnect chains. |
Bicycle chain wear indicator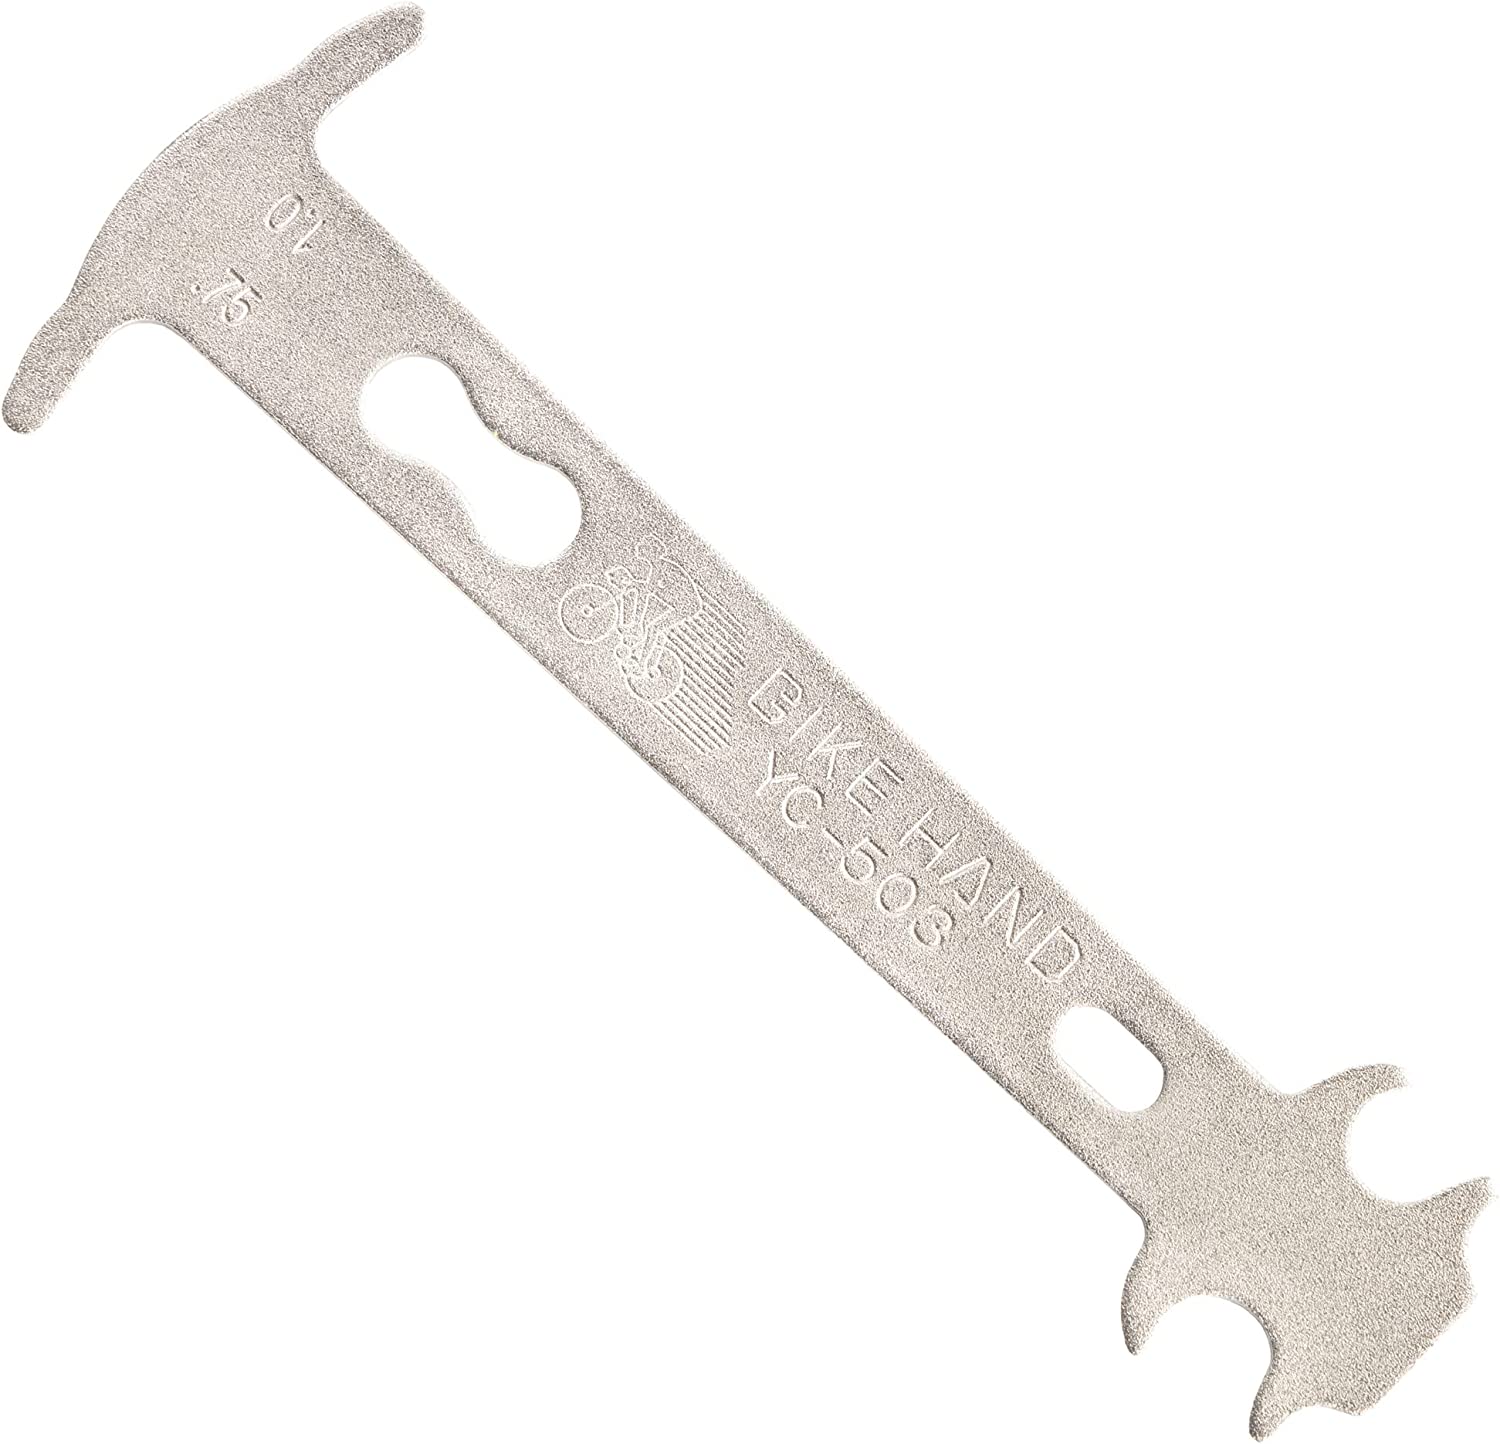
| Is used to check the degree of wear and tear of bike chains. |
Master link pliers
| Are used to disconnect a chain by removing the master link.Also used to reattach a master link to connect chains. |
Master Links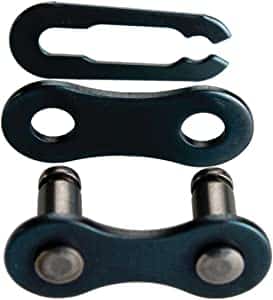
| Act as chain outer links for connecting chains easily and quickly. |
Connecting pins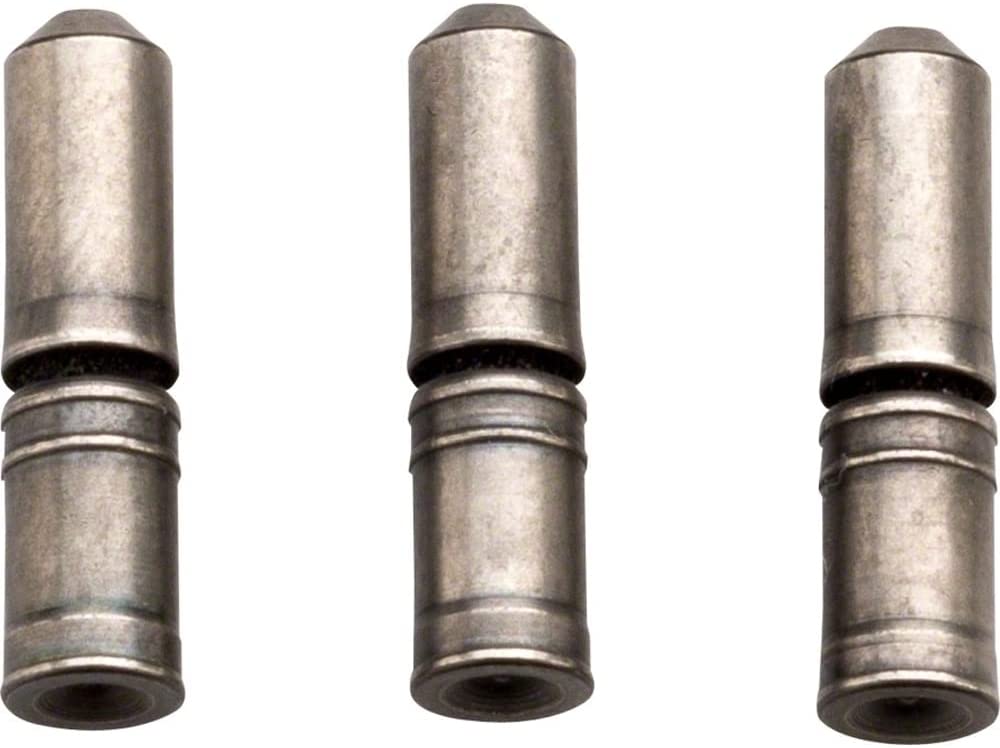
| Are used for chains without a master link system to connect two ends of the chain. |
Bicycle degreaser
| Helps to clean off oil and grease from the bike drivetrain. |
Chain lube
| Helps to lubricate the moving parts of the chain for smooth and efficient performance. Also helps reduce friction between chains and chainrings. |
Sport Bicycle Chain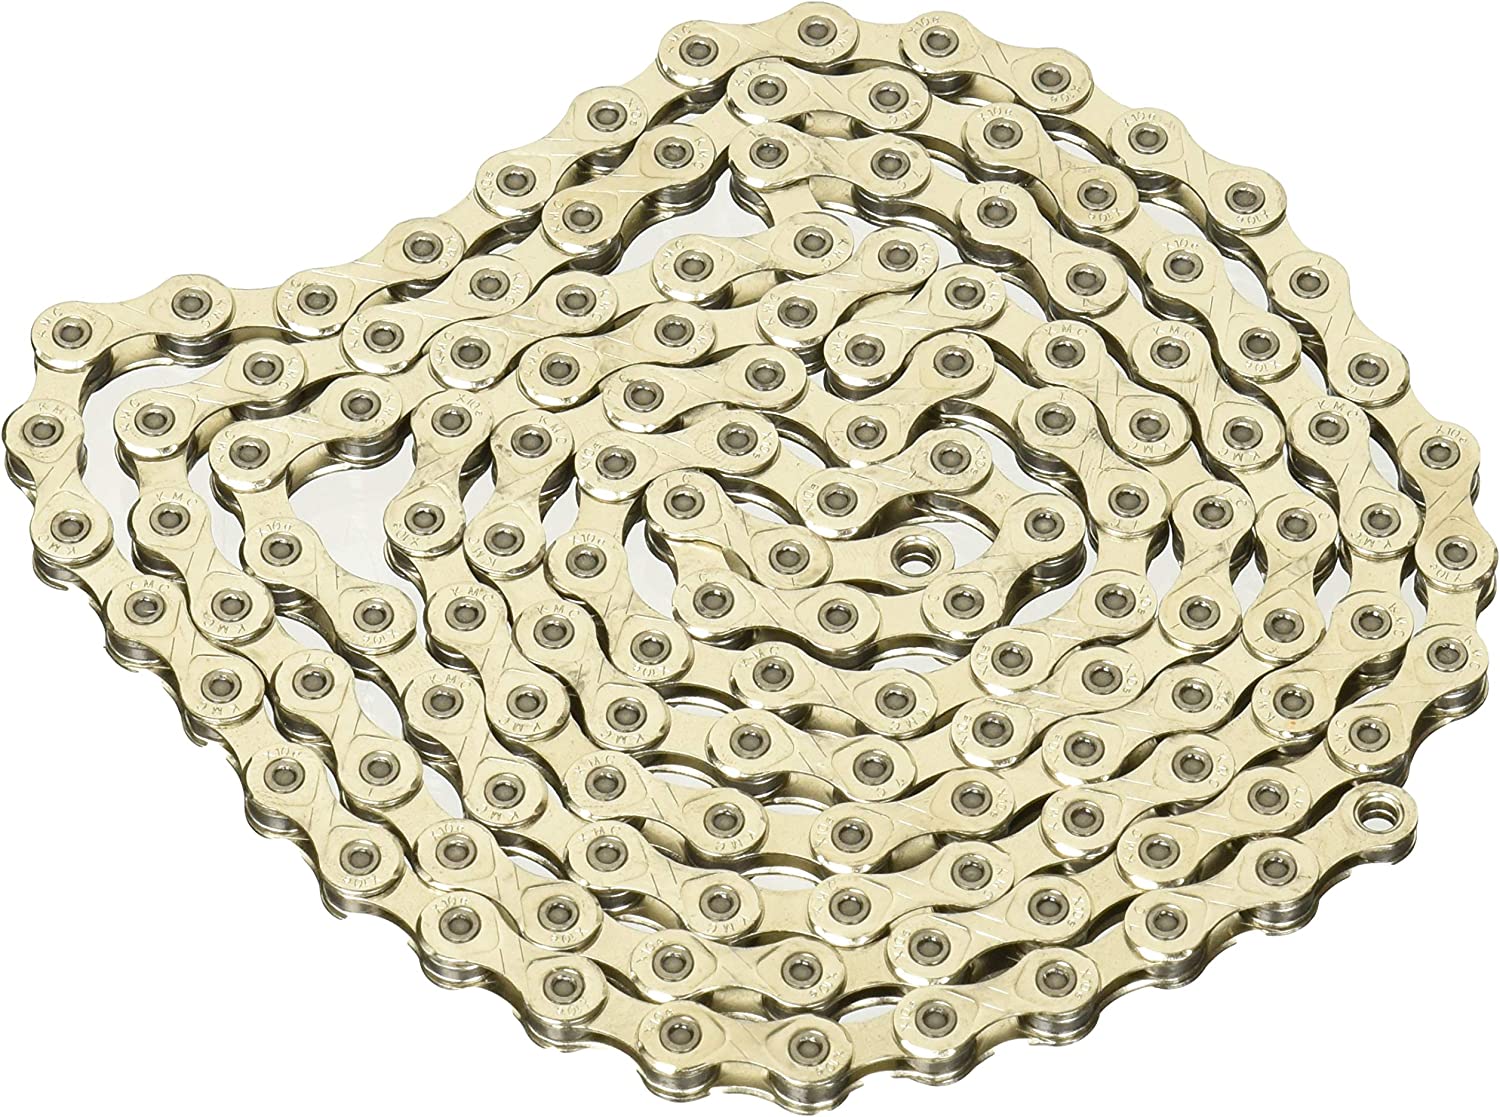
| Useful for effective power transmission from pedal to rear wheel. Helps to propel the bike forward. |
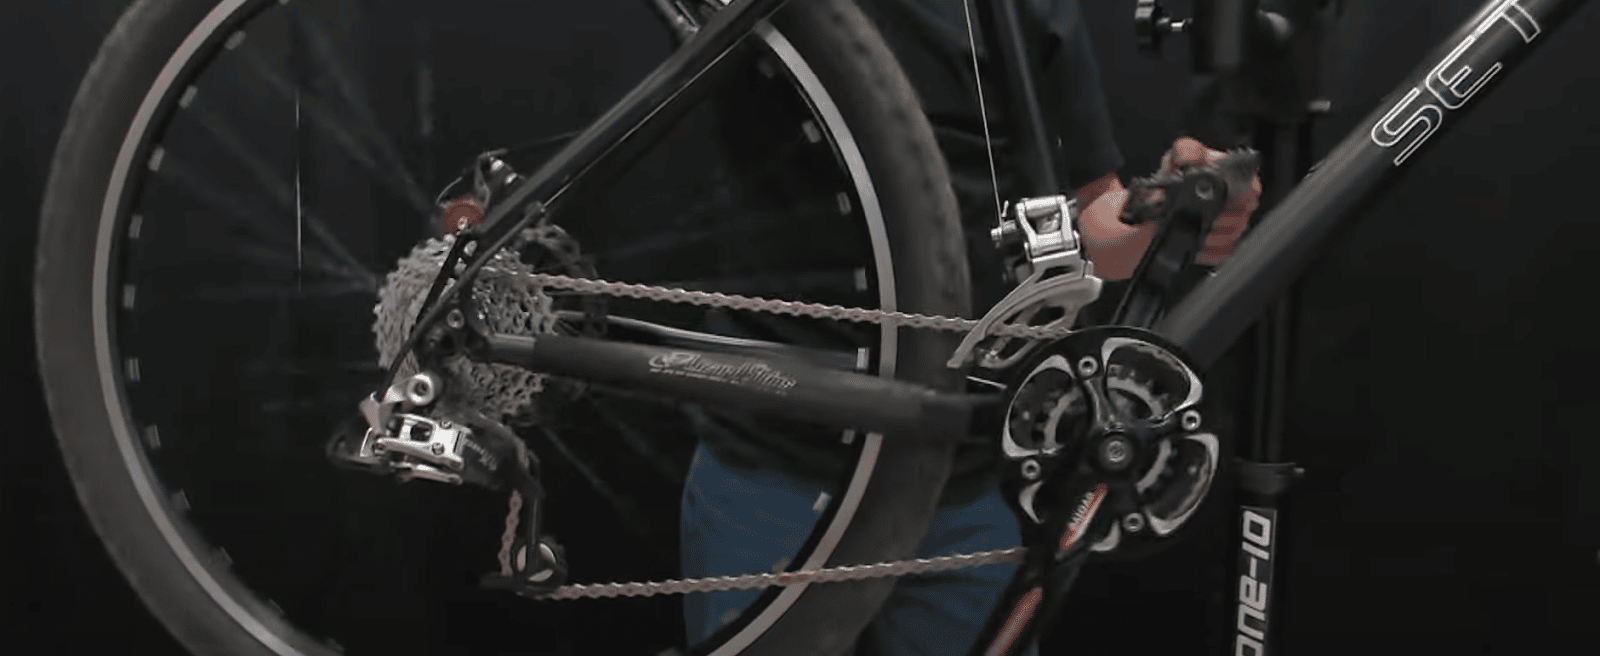
How to Put a Chain on a Mountain Bike
Without a quality chain, your mountain biking experience would be quite frustrating and dangerous. In addition to poor quality or worn chains, improper installation of your bike chain can also lead to serious problems like chain drop and break and difficulty shifting gears. Therefore, it is very crucial to install your bike chain properly. Thankfully the process is quite easy and straightforward. Once you grasp it, you’ll be able to replace a chain on a mountain bike as needed.
To put a chain on a mountain bike, first, get the tools and check the cassette speed, gear combination, chainrings, and rear suspension bridge for compatibility before buying a new chain. Next, check for faulty or worn-out chain and drivetrain components. Take the old chain off and clean the drivetrain properly. Then, determine the correct chain length needed and remove any excess links from the new chain. Install the new chain and test that it works seamlessly. Finally, lubricate the chain.
Mountain bikes are gaining popularity nowadays for being safe, secure, and environmentally friendly modes of transport, as this article by Management Science Letters discusses. Furthermore, they are effective means of exercising, saving and efficiently utilizing energy, controlling air pollution and traffic congestion, and implementing green manufacturing practices. In addition, according to this research paper by the Scandinavian Journal of Medicine and Science in Sports, biking results in numerous health benefits such as cardiovascular and cardiorespiratory fitness, improved bone density, and better well-being in general. For the best biking experience, you must know how to install your mountain bike chain properly.
Here is a detailed step-by-step guide on installing a chain on a mountain bike:
Step 1. Get All Your Tools Ready
Before getting started with the installation, you need to have all the necessary parts and tools for convenience. We’ve provided a general list above for you to check. Note that depending on the brand of bike chain you have, the tools might differ. For instance, SRAM and KMC chains make use of a master link system. As a result of the ease of master links, you might not need any tools. However, you might still find it hard and will require a master link plier like this. On the other hand, Shimano chains have a standard connecting pin system. Therefore, disconnecting the chain might require using a chain splitter tool like this.
You could also keep a bike tool kit like this on hand. The tools you need include a chain wear indicator, master link or connecting pins, master link pliers or chain splitter tool, chain hook, bike degreaser, and chain lube. Note that not all master links are reusable. Check with the manufacturer to be sure. To purchase the right bike chain, you must check for compatibility on several factors.
Step 2. Inspect Your Drivetrain for the Cassette Speed
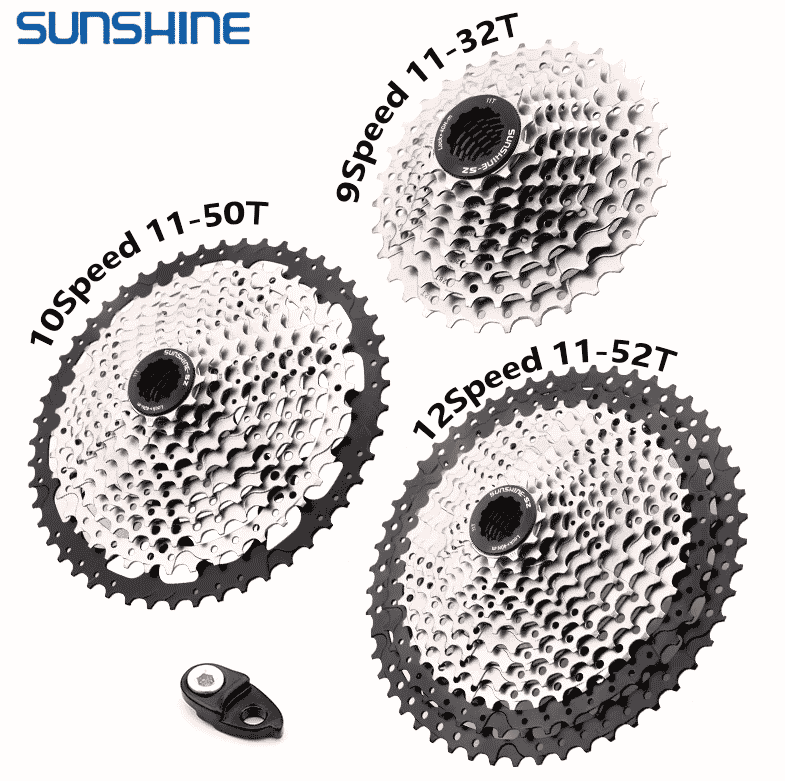
One of the first things to check for when trying to buy a new chain is the drivetrain of your bike. It is crucial you always get a chain speed that matches your cassette speed. First, check for the number of gears, size of sprockets, and gear combinations on the bike. The number of gears or rear cogs is directly proportional to the chain length meaning the higher the number of gears, the longer your chain must be. As a result, a 10-speed transmission will usually require a 10-speed bike chain.
You should note that chains for 6, 7, or 8-speed cassettes are generally compatible with each other. For instance, an 8-speed SRAM chain will be interchangeable with a 6-speed one. They are usually labeled as 6/7/8-Speed chains like these. Also, because of the lower sensitivity of front chain rings to the chain width, you can even use 10-speed chains on 9-speed drivetrains. However, 10 and higher-speed chains will require their specific speeds.
In addition, note that the more cogs you have on your cassette, the thinner the cogs will be and the narrower the width between them. This corresponds to narrower chains. As a result, you must be careful to use the right chain as a narrow chain on a wider cassette/chainring set will not fit properly and will likely fall off frequently.
Step 3. Check for the Gear Combination
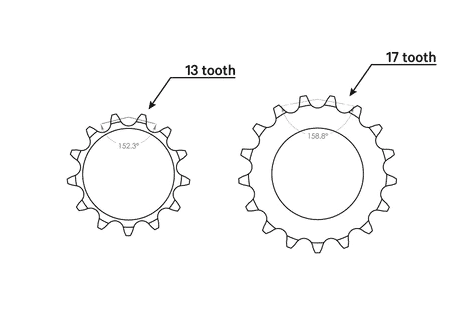
In addition, larger sprockets correlate to longer chains and vice versa. Similarly, larger gear combinations would need longer chains. As this article by Velobike states, a 60 x 17 gear combination needs a 9.95% longer chain length than a 46 x 13 gear combination. It is best to measure the chain length in the large-large gear combo (that is, largest chainring to largest cog). This is to make room for any additional length as it is not uncommon to shift mistakenly into such a gear while riding.
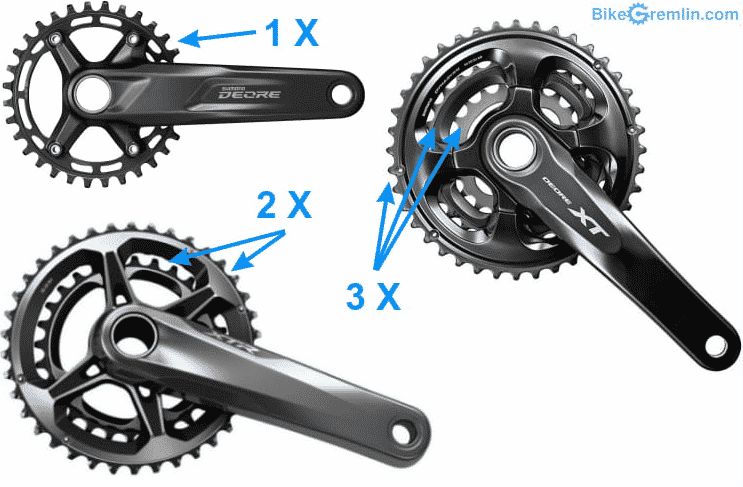
Step 4. Check for the Number of Chainrings
Another drivetrain component to check for is the number of chainrings the bike possesses. Single chainring bikes require less chain than multiple chainring bikes. This is because the chain has to pass around a much bigger outer chain. However, you might have a combination of different components like a single chain ring but with more gears. Such a bike will require a longer bike chain. So, make sure of the drivetrain specifications of your bike before purchasing your chain.
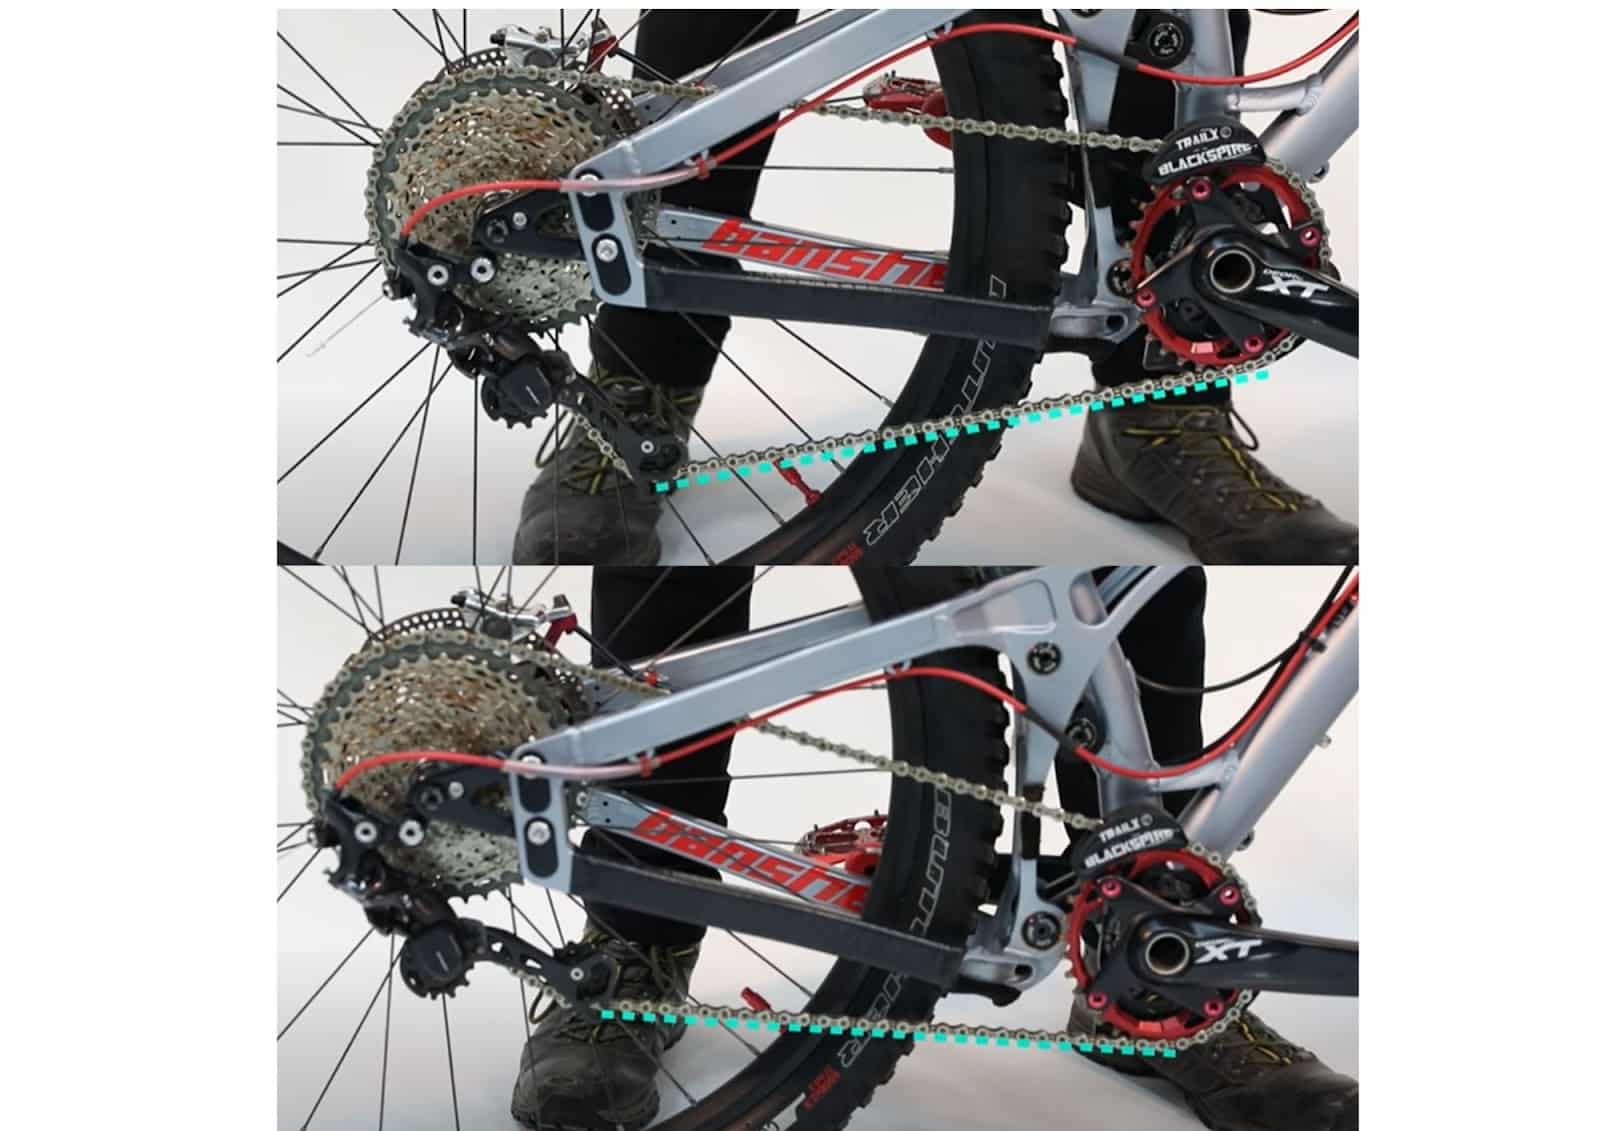
Step 5. Check Rear Suspension Design for Chain Growth
Chain growth refers to the change in distance between the bottom bracket/crankset center and the rear wheel axle during a ride. This occurs as a result of suspension compression, meaning the chain should be long enough to accommodate the motion of the suspension. Therefore, it is best to compensate for this growth by measuring the new chain length while the suspension is compressed. A bike with a lower pivot will require less chain than a bike with a higher pivot. Because the rear wheel axle usually moves backward as the suspension is compressed, the chains grow and stretch in the process. A chain that’s too short or tight would likely damage the derailleurs by forcing them to overstretch as this video tutorial explains.
To check for chain growth, first, fit the bike chain on the largest cog/sprocket (lowest gear) and the largest chainring (if you’re dealing with multiple chainring bikes). Next, place your bike on the ground and fully compress the rear suspension on the saddle using your elbow. You can either remove the shock from the bike and move it, deflate the air shock, or take the spring off the coil shock. Watch the lower derailleur cage as it moves backwards and forwards. If it does not move at all, then there is no chain growth. Little chain growth means the cage moves a little and large chain growth means it moves by a large amount. The amount of chain growth affects the length of the chain you need.
Step 6. Check the Chain Manufacturer’s Recommendations
This is the best way to check for chain compatibility. It is best to buy manufacturer-recommended bike components. Drivetrain manufacturers usually make bike chains as well, and these components are going to be the most compatible with each other. For instance, if you have a 10-speed Shimano cassette, a 10-speed Shimano chain should be your first option for compatibility.
Although most mountain bike chains are compatible with the major cassette brands, there are some exceptions. In particular, this Campagnolo cassette is only compatible with Campagnolo chains like this, as this post on the Campagnolo site recommends. However, a few aftermarket chains from other manufacturers like KMC, labeled “Campagnolo compatible”, can be fitted with Campagnolo cassettes. Unless a non-Campagnolo chain clearly states it is Campy compatible, it is probably not.
Shimano and SRAM compatible chains are usually cross-compatible with either brand of components. This means a Shimano 11-speed drivetrain will work fine with an SRAM 11-speed chain and vice versa. This YouTube video goes into more detail. At the same time, KMC usually makes bike chains that are compatible across multiple brands. For instance, this KMC MTB 12-speed chain is compatible with SRAM, Campagnolo, and Shimano 12-speed mountain drivetrains.
It is also essential to check the manufacturer operating or safety instructions relating to the methods and procedures of installation as some chain manufacturers recommend tools that are especially compatible with their chains, like this manual from SRAM.

Step 7. Check for Faulty or a Worn-out Bike Chain
When deciding whether to replace your old bike chain, you have to check the wear and tear on the chain. A worn chain loses its shape and stretches out, frequently slipping off the bike. It can also damage the other drivetrain components. Also, check for imperfections like stiff, unbalanced, or bent links in the chain and any other abnormalities like skipping or accidental gear shifting. Fix or replace the damaged links as needed. Failure to deal with these problems could lead to serious injury while riding.
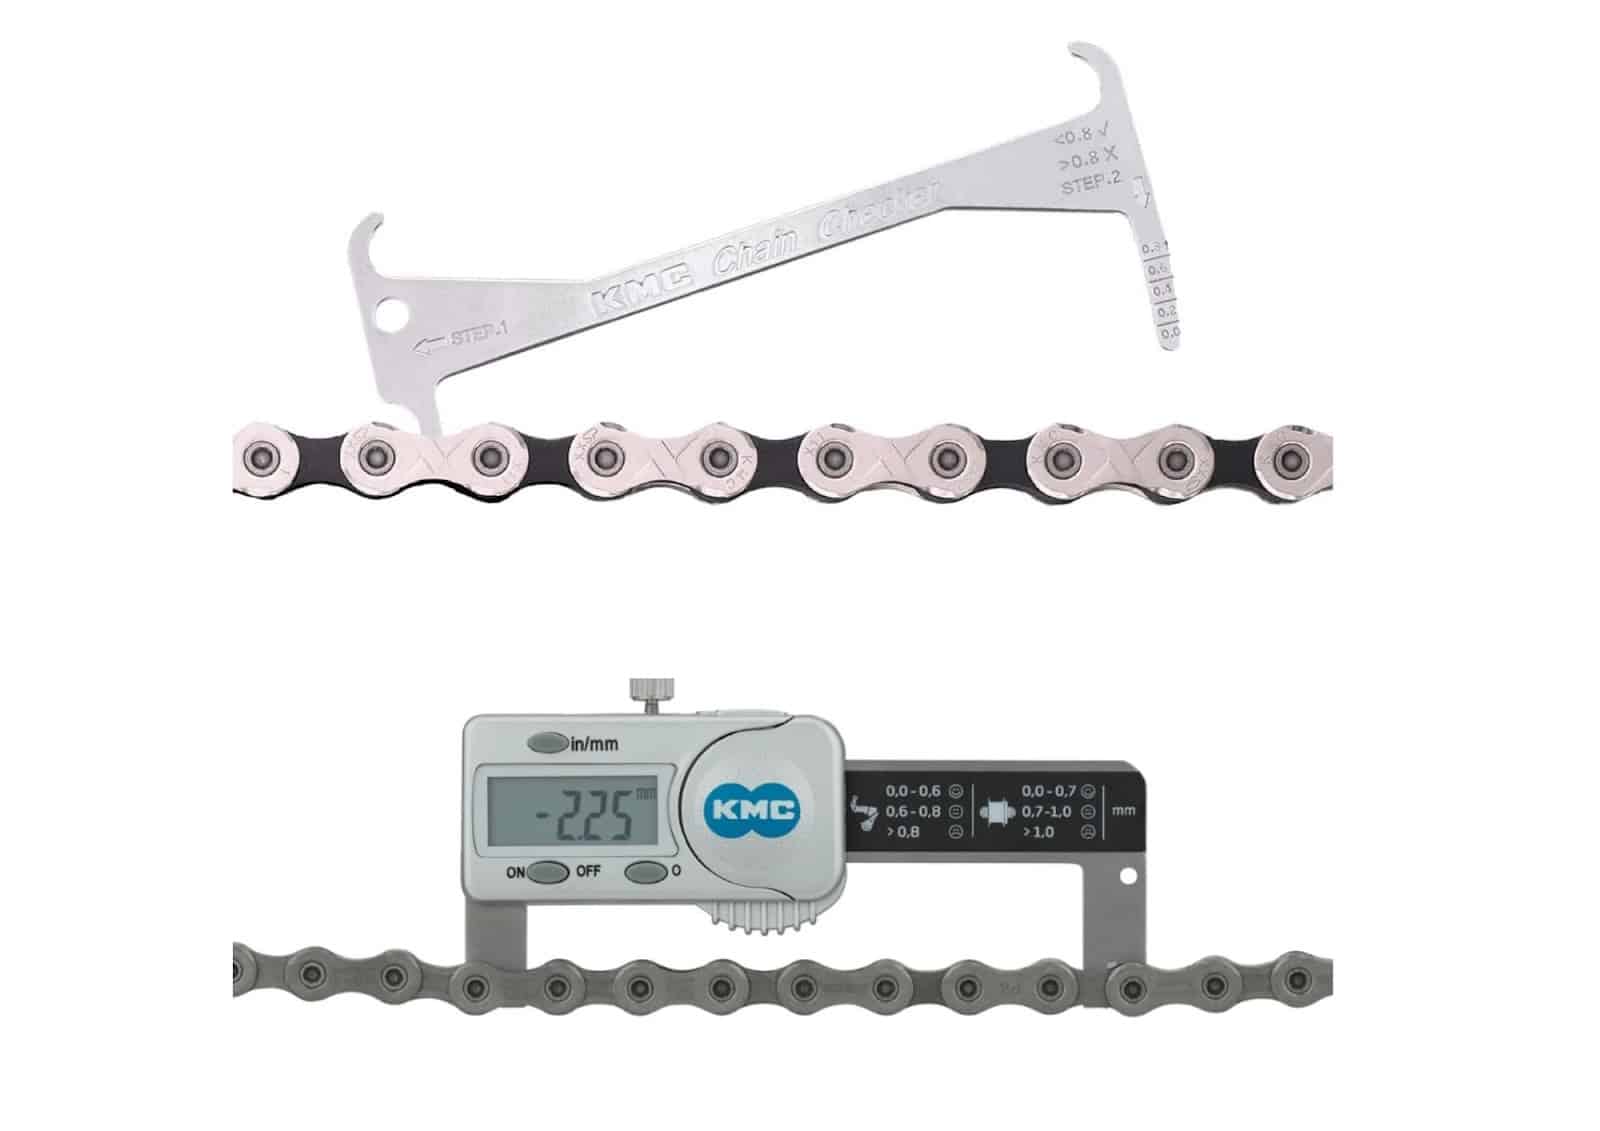
A chain wear indicator tool like this is the most accurate option to check for the degree of wear on the chain. Install the hook end of the indicator into the inner chain links and measure the degree of stretch. If the tool falls into the gap of the next roller with the 0.5%, 0.75%, or 1.0% side, it has stretched more than that corresponding degree. Most manufacturers usually recommend replacing your chain when it falls between 0.5 and 0.75. You can also use a digital chain wear indicator like this.
Alternatively, you can use a ruler to diagnose a worn chain. Simply measure 12 complete links (1 inner link + 1 outer link) from the center of the pin. If the length measures more than 12 1/16 inches (one percent), then you need to replace the chain.
Step 8. Check for Faulty or Worn-out Drivetrain Components
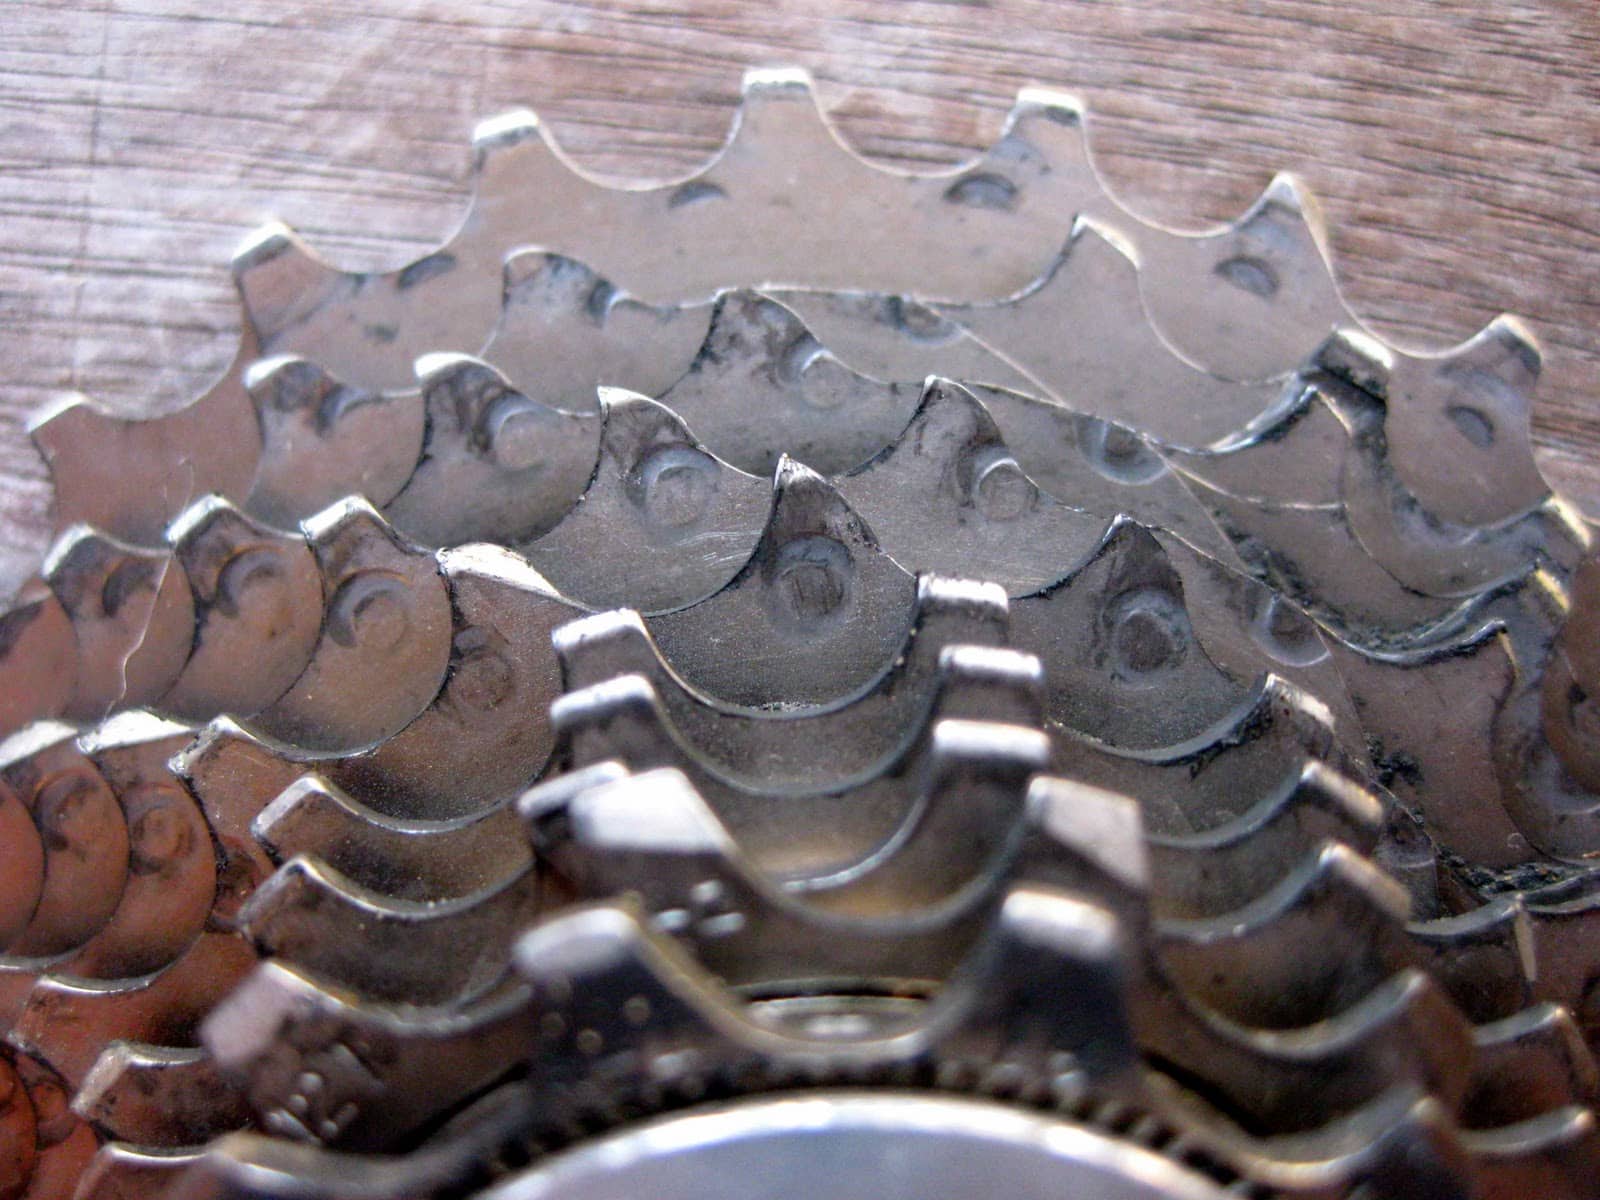
For a chain with wear greater than 0.75, it is highly likely that other components of the drivetrain like the chainrings and cassette are worn. Installing a new chain on worn components will decrease the bike performance, cause the chain to slip frequently, and wear the new chain down faster. To avoid these complications, check for wear on the cassette and chainrings and replace them with quality models if necessary.
In addition, check the gear shifters and shifting cables to ensure they’re working properly. The shifters should be able to maintain chain tension during rides. If they are stuck, our article on what to do when a mountain bike grip shifter is stuck will come in handy. If you decide to replace the shifters, check out our article on how to choose mountain bike grip shifters for useful tips.
Step 9. Remove the Old Chain if Necessary
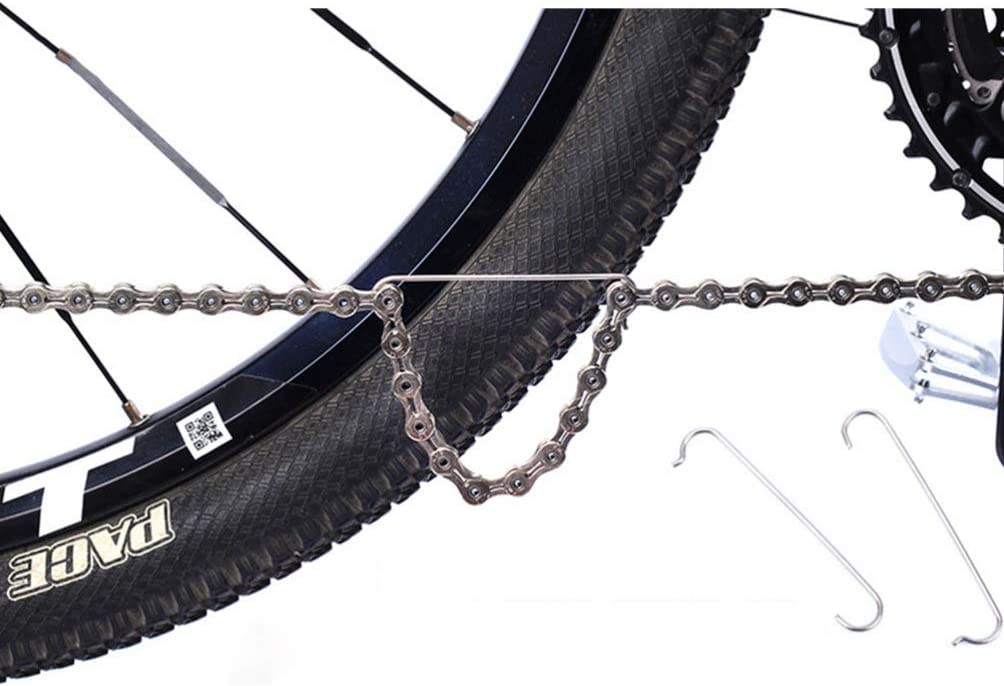
To install a new chain, you have to disconnect and remove the old chain first. Before disconnecting the chain, release the chain tension using a chain hook like this and shift it to the smallest chainring and cog. This makes the process much easier. You may also want to take a picture to cross-check your chain route later when installing the new chain.
Next, check if the chain has a master link system. The master or quick link allows for quick and convenient connection and disconnection of the bike chain. The master link usually appears like regular chain outer plates but is a different color compared to the rest of the chain. Once you find the master link, squeeze the center of the link and push the ends towards each other. The link should come apart easily. If the link proves difficult to disconnect, get a plier or specific master link plier like this. By pushing opposite corners of the master link with the pliers the links should pop off the pins.
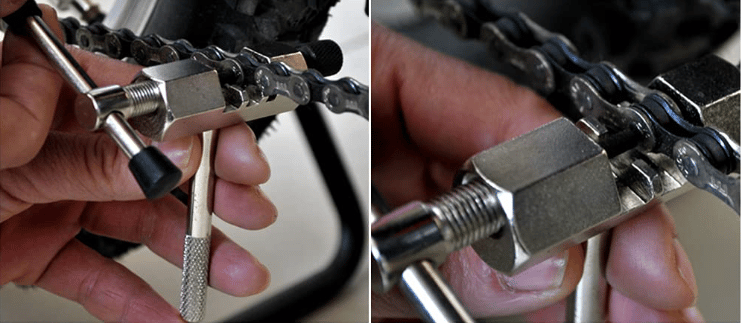
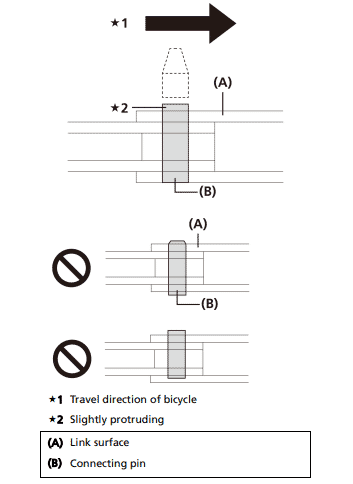
For chains without master links, you can use a chain tool to disconnect them. The chains usually have specially reinforced connecting pins like these. The link with the pin usually protrudes slightly and is darker in color than the other links in the chain. Align the chain tool end-screw perpendicular to the bike chain with the tip above the center of the pin. Turn the handle of the tool counter-clockwise to drive the pin out. Remove the chain tool, making sure not to lose the connecting pins.
After disconnecting the chains, pull the rear derailleur away from the cassette and unthread the chain off the bike. Take care not to let the derailleur snap into the cassette as the chain comes off.
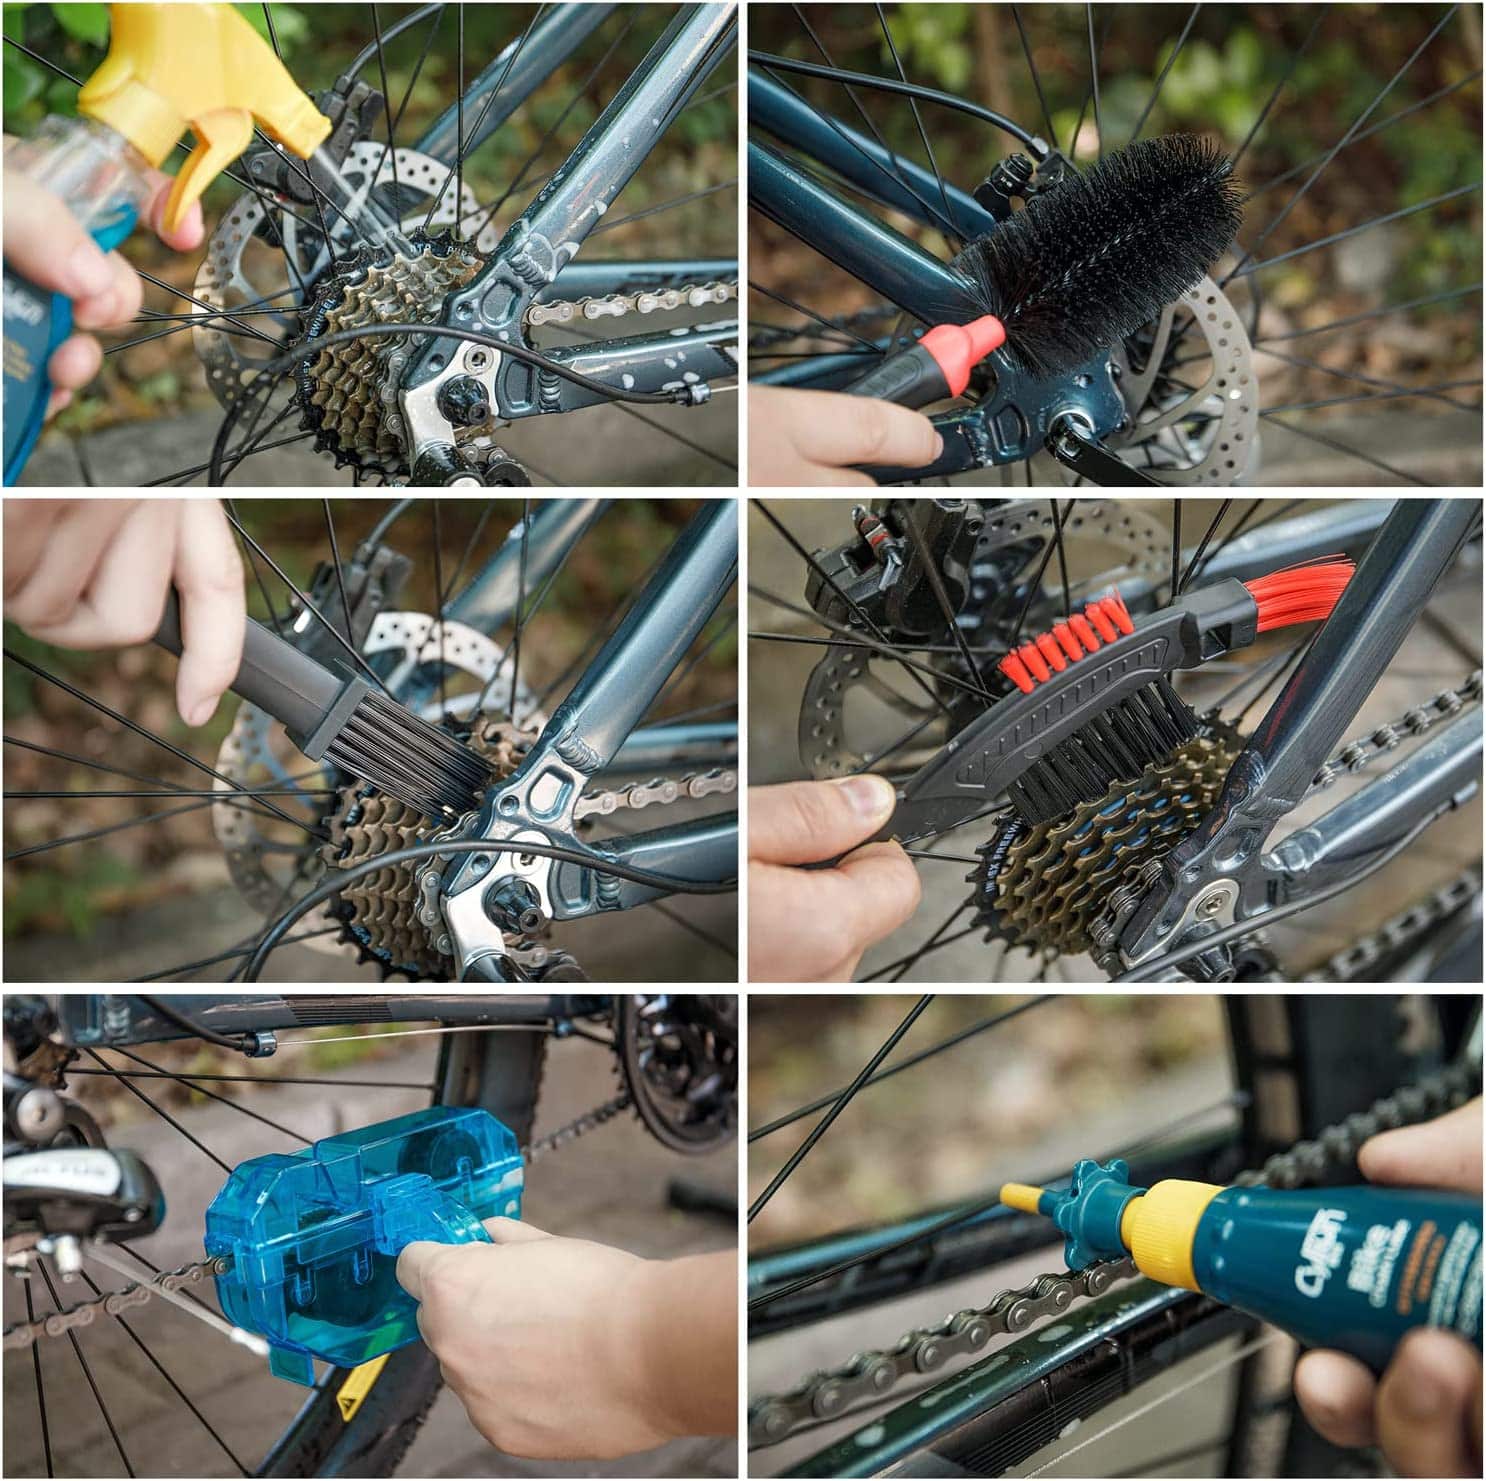
Step 10. Clean the Drivetrain
After removing the chain, it is time to clean the chainrings and cassette. Why fit a new and clean chain onto a dirty drivetrain? A drivetrain clogged with dirt and grease will affect the performance of your bike and can even cause your bike chain to wear down faster by increasing friction. Get a cleaning kit like this and use a neutral detergent and lubricant to clean and lubricate the components. Next, use a brush to remove dirt and sand off the sprocket, chainrings, and gear shifters.
Step 11. Check for Chain Length
This is one of the most crucial steps when installing a mountain bike chain. No universal bike chain length fits all types of bikes, so you need to get the right length for your chain – not too long or too short. If you calculate the bike chain length to be longer than it should be, it could hang or make shifting gears difficult. Conversely, calculating the length to be shorter will damage the chain itself and other components like the derailleur hanger. There are several ways to determine the bike chain length. Let’s have a look at them;
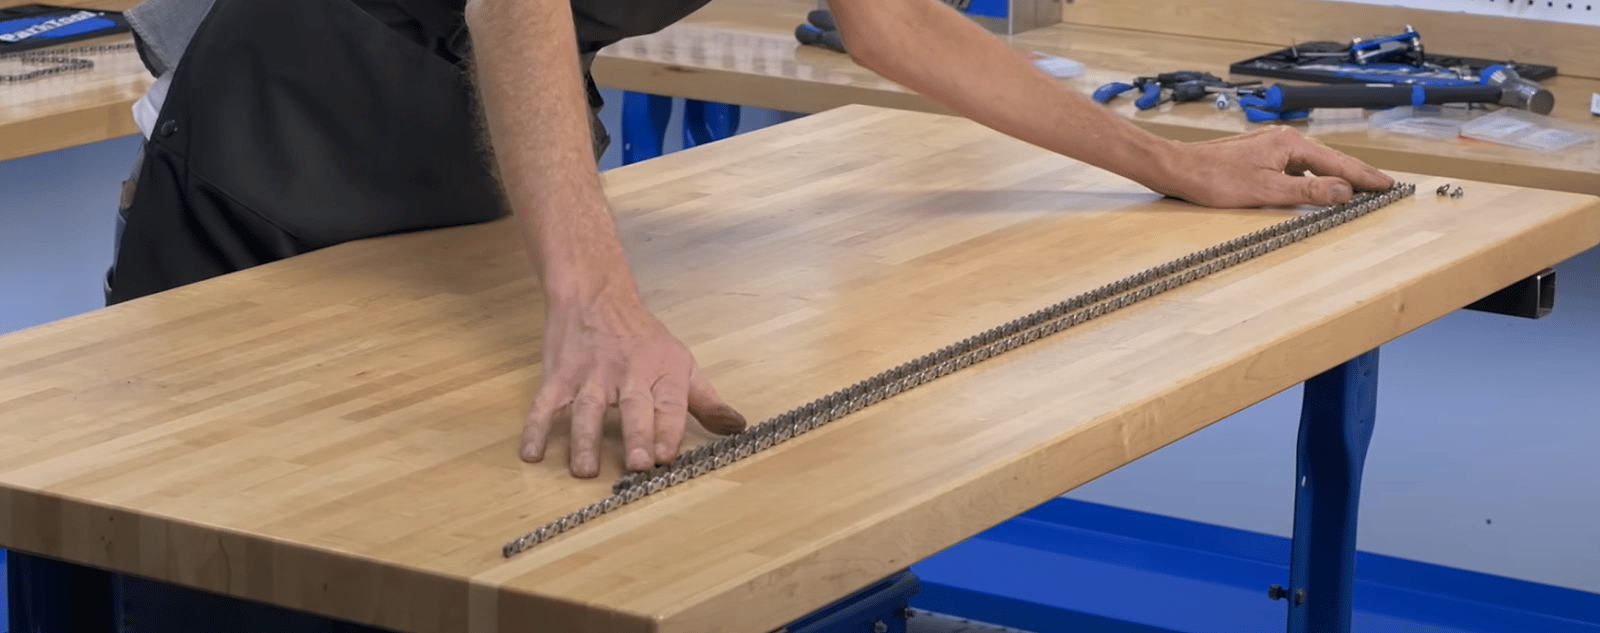
The first method is to compare the new chain with the old chain. Lay the chains on a table or hang them side by side. The old chain might be stretched a bit longer than normal due to wear and tear. As a result, your new chain has to be shorter than the old one. You could count the number of chain links because even if the old chain is a bit longer the number of links will still be the same.
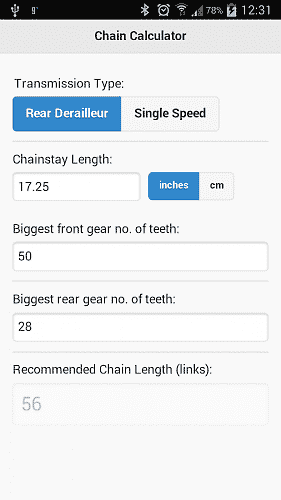
In case you don’t have a chain to reference, as in custom-built bikes, you can use other methods. One method we’ve detailed in a previous section is the chain length formula. All you need to know are the number of teeth on your rear cog, the number of teeth on the largest front chainring, and the chainstay length. You can even download a free Android app that helps you calculate the chain length here. This app that can be downloaded by Android users, uses the same formula to calculate the chain length, saving you unnecessary effort.
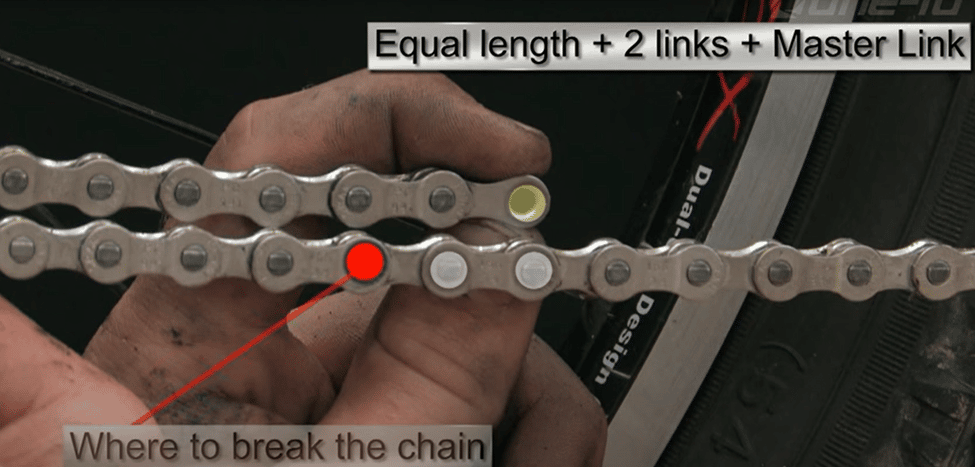
The last method you can use to calculate your bike chain length is the Fit Test. Take your new chain and remove the 2 halves of the master link like this if it has one. Next, thread the chain over the largest front chainring and through the front derailleur. Then, run the chain through the cassette and over the largest sprocket/cog. Do not go through the rear derailleur – leave it hanging. Now bring the 2 ends of the chain together and pull them tight, so they meet below the chain stay. Add 2 more links plus the master link and break the chain at that point. If using a connecting pin, you need to add 2 links from where the chain begins to overlap.
One end of the chain needs to be an inner link while the other needs to be an outer link. If this is not the case, add one more link to compensate. Remember to disconnect the rear shock and set up the linkage when running the chain. Deflate the suspension if it uses an air shock, or remove the coil spring if it uses a coil shock.
There are, however, some exceptions to this last method. If you’re using an SRAM single chainring system with 11 or 12-speed cassettes, then you’ll need to add 4 links with the reference rivet. This means 3 extra links plus the master link. And instead of having the ends both outer and inner links, both ends will have to be inner links.
Step 12. Remove the Excess Links
Once you have the correct length, use the chain splitter tool to remove the excess links from the chain. According to this manual by Shimano, for chains with connecting pins, make sure that you don’t cut in a place where the chain is joined with the pin as this will damage the chain.
Step 13. Fit the New Chain onto the Bike.
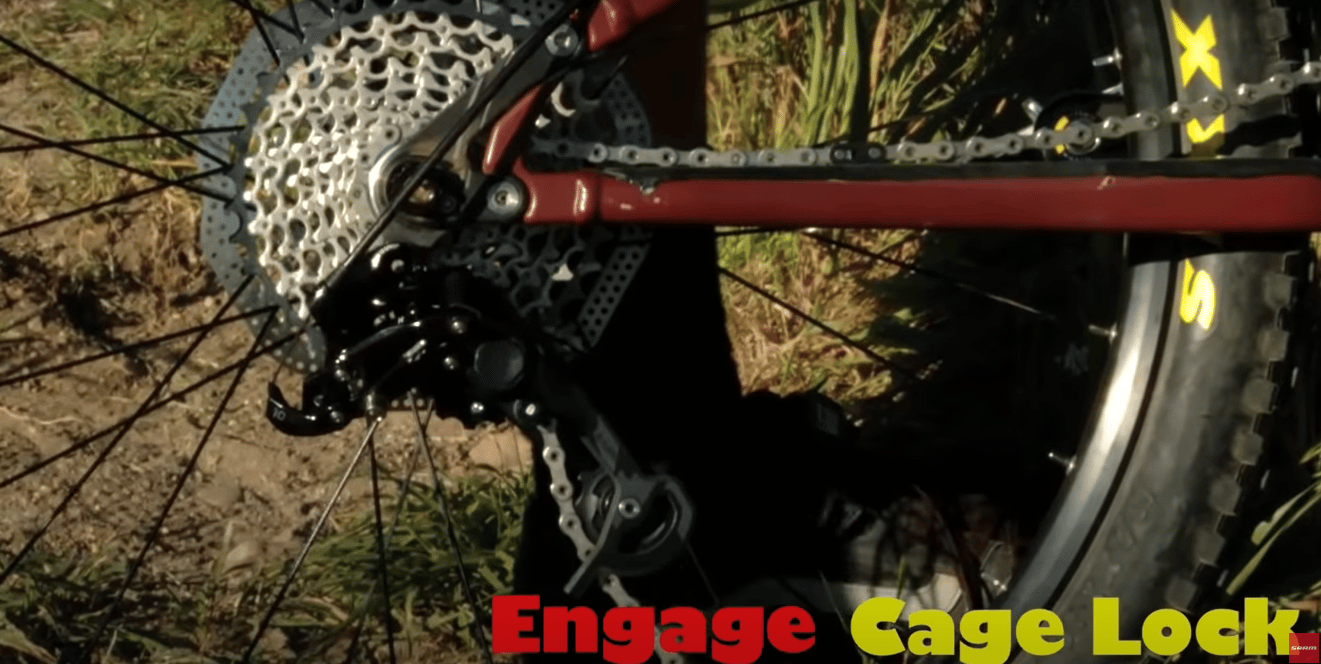
With the chain temporarily attached from the last step, you can now complete the installation. First, shift the rear derailleur to the position of the smallest sprocket and thread the chain through it. Next, run the chain over the smallest sprocket and drop it around the upper jockey wheel. Then, pull down the derailleur and run the chain through the cage and around the lower jockey wheel. For derailleurs that have the Cage Lock feature, press the small lock button and push the derailleur forward to lock it in place.
For master link systems, slide half the master link to each end of the chain. This guide by KMC recommends lubricating the pins of the master link before connecting the chain. Next, pull the chain together and assemble the master link by squeezing the center of the link and pulling it till it snaps into place. Again, you can also use the master link pliers to connect the chain with the master link.
For connection pins, use the chain tool to drive the pins back through the connecting links. Next, fit the pins in the connecting links of the chain and place the links in the outer slot of the chain tool. Finally, turn the handle of the tool clockwise to tighten and push the pins all the way through the links. When the body of the pin is securely connected, remove the break-off pin.
Step 14. Test the Installation.
Unlock the derailleur cage to finish the installation. Shift the derailleur up and down and ensure the chain runs smoothly between gears. Shift all the way to the highest gear to check that the chain isn’t too short. In addition, check that there is no stiff link in the chain. If there is, use the chain tool to loosen the affected link.
Also, test the other drivetrain components to ensure they’re working well. Test the front and rear derailleurs’ performances. Make sure they remain properly aligned as you shift through different gears.
Occasionally, you might come across a mountain bike chain that keeps breaking. When you do, be sure to check out our related article to find out why.
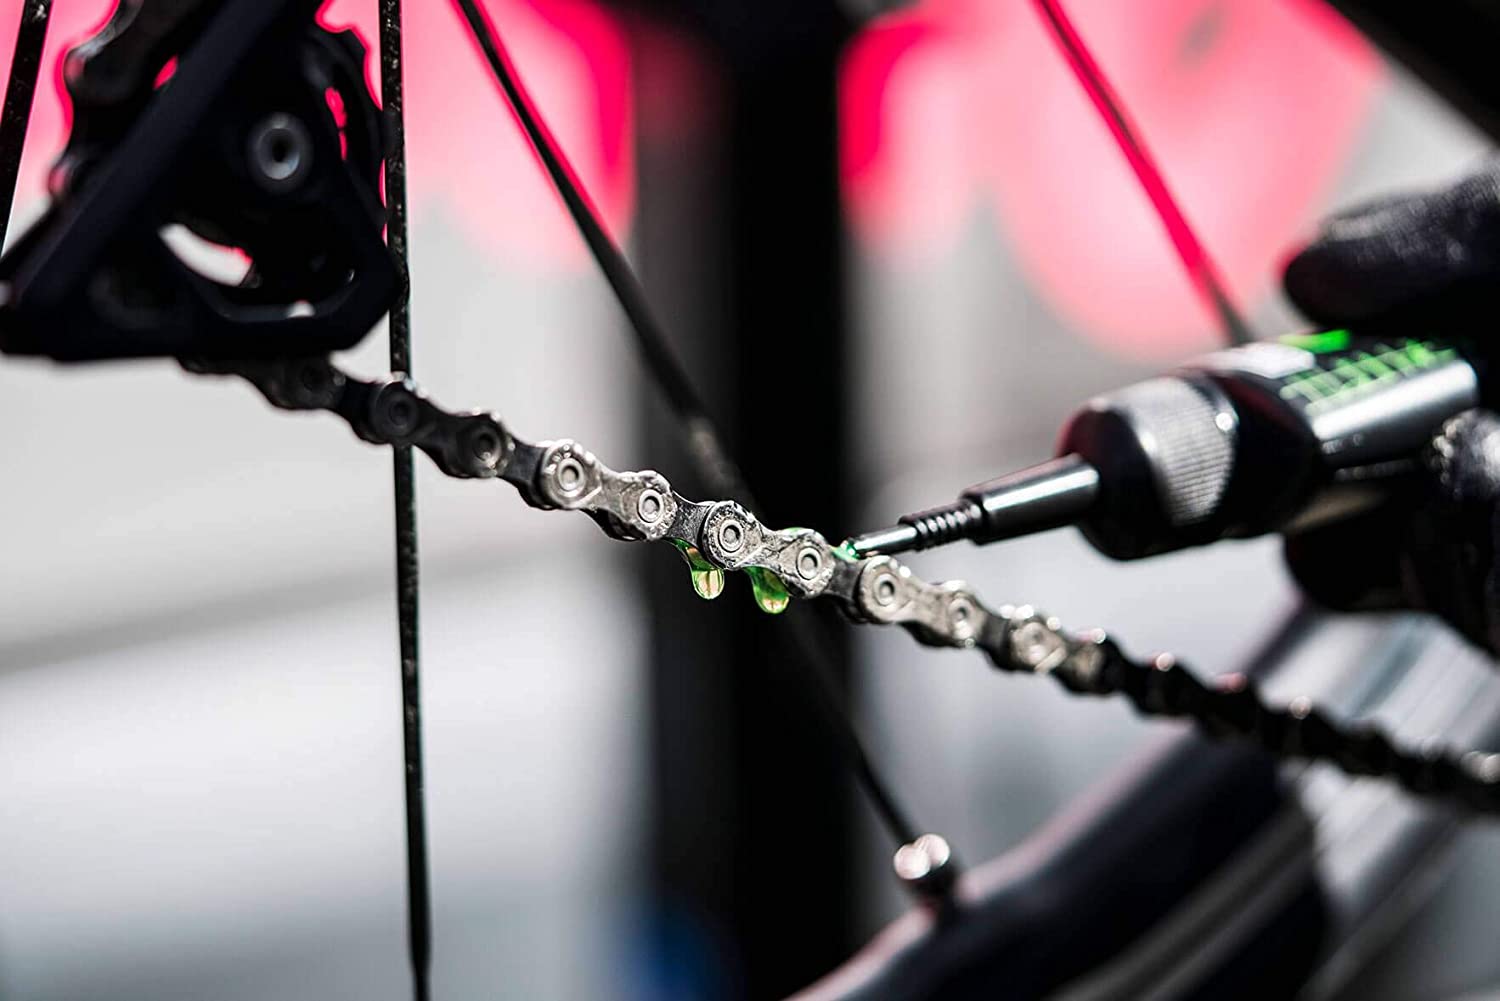
Step 15. Clean and Lubricate the Chain.
The new chain will usually feel sticky due to grease residues from its assembly. Use a degreaser like this and clean with a dry cloth. Ensure the chain is dry before lubricating it. Apply chain lube like this only on the moving parts of the bike chain. Clean any excess lubricant with a cloth. This will help increase the drivetrain efficiency and performance, allowing for smooth pedaling and gear shifting.
As you can see, changing a chain is an involved process. Make sure to learn these quick and proper mountain bike chain maintenance tips and tricks to ensure you don't have to do this more often than necessary.
What Is the Average Mountain Bike Chain Price?
There are three types of chain, regular or full-link, hollow-pin, and half-link. There are also five sizes of chains, usually dependent on the speed of your bike transmission – the number of rear sprockets. The common sizes are 12-speed, 11-speed, 10-speed, 9-speed, 6/7/8-speed, and single-speed chains.
The average mountain bike chain price can range from $5 to $300, depending on the size and quality of the chain.
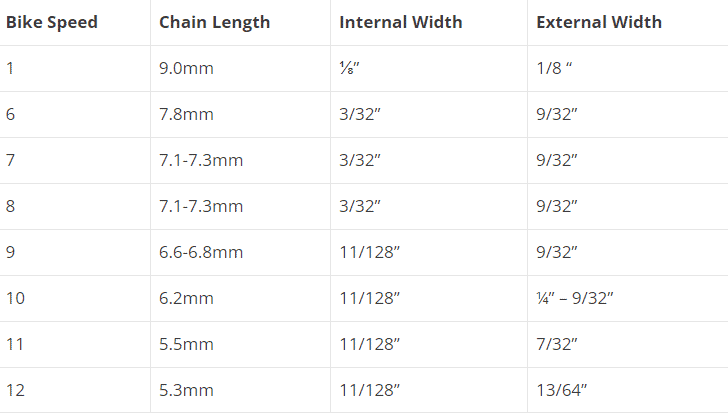
There is usually a standard external and internal width for the sizes, but the values may vary with the manufacturer. For instance, a single-speed chain like this typically has a standard 1/8 inches inner width; 5-8-speed chains like this have 3/32 inches width; chains with 9 to 12 speeds like this 9-speed Shimano chain have an inner width of 11/128 inches. The major brands for bike chains include Shimano, SRAM, KMC, and Campagnolo.
Depending on the size of the chain, as well as the type, brand, and quality, the price can differ greatly. More expensive chains are a little better and worth it for those pushing for marginal gains. You can either buy your chain at a local bike store or shop online.
Here is a table showing the average price of bike chains ranging from low-end to high-end. The prices do not account for shipping.
| Length/Size of Chain | Average Price for Basic Chain | Average Price for Intermediate Chain | Average Price for High-End Chain |
| Single-speed | ~$10 | ~$15 | ~$25 |
| 6/7/8-speed | ~$10 | ~$20 | ~$30 |
| 9-speed | ~$15 | ~$25 | ~$45 |
| 10-speed | ~$20 | ~$50 | ~$80 |
| 11-speed | ~$50 | ~$100 | ~$200 |
| 12-speed | ~$70 | ~$150 | ~$300 |