
Mountain Bike Pedal Thread Sizes – The Complete Guide
Bike pedal threads are not something you hear about regularly but they're a crucial part of your ride as you're risking stability and safety without a suitable pedal thread. So how do you know what pedal thread size will be suitable for your bike and your riding style?
Mountain bike pedal thread sizes include 9/16 inches x 20 threads per inch (TPI), 1/2 inches x 20 TPI, and 0.55 inches x 20.32 TPI. The 9/16-inch mountain bike pedal threads are the most common and used on popular mountain bikes. The 1/2-inch pedal threads are used on cheaper brands and kids' bikes. The 0.55 inches pedal threads are found in older types of bikes.
In this article, we'll go into depth on choosing and installing the best bike pedal for your mountain bike.
Mountain Bike Pedal Thread Sizes
Thread pedals and bikes are like a screw and nut. If you try to install an unsuitable pedal thread, you'll damage the threading, ending in an unusable connection.
Mountain bike pedal thread sizes include 9/16 inch, 1/2 inch, and 0.55 inch.
The size of bike pedal threads has evolved throughout the years. Old French bikes and kids' bikes have a smaller thread pitch, so a standard bike thread pedal with 20 TPI won't fit them.
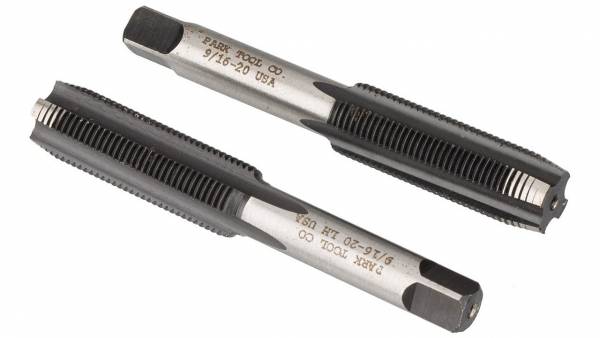
1. 9/16 inches x 20 TPI
The most common pedal thread size is 9/16 inches, with 20 threads per inch like these. They fit most newer mountain bike models, as well as regular road bikes. The 9/16 inch suggests the pedal's screw diameter, while 20 is the number of threads on the shaft. They are intended for use with standard 3-piece cranks.
Since they're fairly common, 9/16 inch thread pedals are among the least expensive ones on the market. As biking and mountain biking has become more popular, the need for an almost-standard pedal thread size has come about, and the 9/16-inch thread pedals have solved this problem.
In short, if you're buying a semi-professional adult mountain bike like this, you're probably getting it with a 9/16 inch pedal thread with 20 TPI. They work best when paired with clipless off-road pedals, hybrid pedals, or toe clip pedals.
2. 0.5 inch x 20 TPI
The second most common pedal thread size is 1/2 inch with 20 threads per inch. Popular mountain bike brands do not use them, but you can find them on cheaper brands. These ½ inch thread pedals are also found on kids' bikes, BMX, and adult road bikes.
The ½ inch thread pedals are used exclusively on bikes with one-piece or American cranks. They work best paired with kids' platforms or flat pedals.
3. 0.55 inches x 20.32 TPI
As in many other aspects and industries, the French decided to customize their thread pedals. You probably haven't heard of them as they're hard to come by on new bike models, especially mountain bikes.
The 0.55-inch thread pedals are reserved for vintage French bikes. However, some handy mountain bike enthusiasts have customized them to fit the 9/16 inches threads!
Shimano, the Japanese company specializing in bike parts, also attempted to produce custom-sized thread pedals. Almost half a century ago, Shimano created the largest bike thread pedals that were believed to offer biomechanical benefits for riders.
They called them Dyna Drive and measured at 1 inch and 24 TPI. However, these pedals didn’t last long and are impossible to find today.
Pedal Threading Directions
Orville and Wilbur Wright, known as the American aviation pioneers, were the first to dedicate enough thought to the pedal thread process. Before committing their life to building planes, they developed the correct pedal thread directions.
The right thread pedal is installed in a clockwise direction, and the left one is installed in a counter-clockwise direction. Pedal threading directions prevent the threads from loosening when pedaling forward.
What can be so confusing about pedal threading directions? Well, logically, when we screw a bolt into a nut, we go clockwise. A good way to remember this is righty-tighty and lefty-loosey. However, applying this to pedal threads means that the left pedal will become loose with riding. This can cause accidents and is a huge safety hazard for mountain bikers.
The direction of pedaling is always forward. The Wright brothers kept this in mind and used the pedaling direction to tighten the pedal threads instead of loosening them. This led to the development of a universal pedal thread direction.
Before installing the pedal threads, look for an engraved L or R, indicating which side the pedals are meant for. The right pedal thread is installed in the logical direction which is clockwise. The left pedal thread is installed counter-clockwise or from right to left.
You can still tell the two pedals apart even if there are no marks. If you take a closer look at the thread pattern you will see the right one inclines to the right as it goes up, and the left one leans to the left.
How to Measure Mountain Bike Pedal Thread Size - What Size Mountain Bike Pedals Do I Need?
Determining your pedal thread size can be challenging if you're replacing them for the first time. So it's best to know your size before any emergency occurs.
The best way to measure mountain bike pedal thread size is to undo the cranks, measure the thread manually, or take the bike to an expert at a bike shop.
Method 1. Check the Cranks
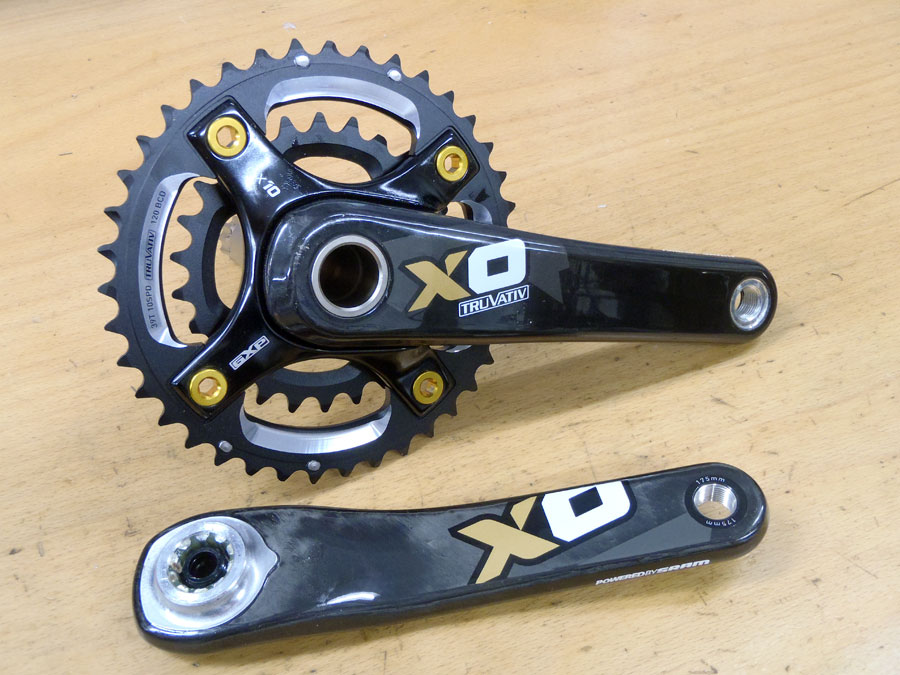
A crankset like this one is an essential bicycle component that transforms the rider's leg motion into a rotational motion, moving the drive chain and pushing the front wheel forward. Some bike manufacturers engrave the pedal thread sizes on the cranks. But that's just a recent practice.
An easy way to determine the pedal thread size is to look at the crankset components. If the cranks are made out of three components, your bike needs 9/16 inch x 20TPI pedal threads.
If the cranks are one whole piece like this without any separate sections, then you need 1/2 inch x 20TPI pedal threads. The same size applies to bikes made entirely out of a solid piece of metal.

Method 2. Take Manual Measurements
The guaranteed way to get the correct bike pedal threads is to measure the old ones. You can use a regular ruler, but we'd recommend calipers like these for precise measurement.
If you find it hard to measure the pedal threads while mounted on the bike, you can remove them from the cranks using a pedal wrench from a set like this.
Method 3. Ask an Expert
We recommend that beginner mountain bikers take professional measurements when it comes to purchasing essential bike parts. Inadequately sized pedal thread can strip and damage, wasting your time and money and putting your safety at risk.
If you are just beginning your mountain biking adventures then we suggest that you check out our articles that discuss what mountain bike you should buy and our article about mountain bike sizes, which could be handy resources to help you get started.
Take your bike to a reputable bike shop and ask for assistance. They most likely know the size at first glance but are also capable of professionally removing the pedal if needed.
How to Tell If Pedals Are 1/2 or 9/16?
If you've had your mountain bike for a while but never thought of measuring pedal thread size then you're not alone. Many advanced bikers aren't aware that there are sizes other than the 9/16 inch that dominate the market.
To determine if the pedal threads are 1/2 inch or 9/16 inch, determine the number of parts that make up the crank. If there are 2 or 3 parts, the bike needs 9/16 inch pedal threads; if it has one single crank, it will need 1/2 inch pedal threads. To confirm, manually measure the pedal thread.
You might also want to consider the type and price of your mountain bike. As a rule of thumb, the more expensive bikes like these come with 2-piece cranksets and 3-piece cranksets, and 9/16 inch pedal threads.
Step 1. Take Apart the Crankset
When taking apart the crankset, you must be careful not to damage the parts. Start by taking a crank puller like this which is available in a universal size. Screw the threaded end of the crank puller into the crank arm. The rotating part will press against the bottom bracket spindle. This motion pushes the crank arm away from the spindle.
If you don't have a crank puller, beware of using any alternative methods. Some of the more popular methods include force that might damage the spindle and the crank arms. These include a bolt joint separator tool and a hammer, a brute force method with a rubber hammer, a screwdriver, etc.
Although most cranks are made from a durable material like aluminum, using force, under-tightening, or overtightening ruins the crank thread and cranks are unrepairable.
Step 2. Count the Parts
If both crank arms are removable, you have a 3-piece crankset. If one of the cranks is connected to the spindle, you have a 2-piece crankset. Both the 3 and 2-piece cranksets use 9/16 inch pedal threads.
But if you can't seem to separate the crankset and it's a single unit running through the bike, you need 1/2 inch pedal threads.
Step 3. Measure the Pedal Threads
It's easy to get overwhelmed by the number of parts, especially if you're taking apart this section of your bike for the first time. Identify the pedal threads and take a caliper. Measure them and convert the size into inches. This is the most accurate type to know if you need 1/2 inch or 9/16 inch.
Similarly, if you're interested in learning how to change pedals on a mountain bike, be sure to read our related guide. It's filled with useful information for you.
Are Mountain Bike Pedals Universal?
Due to the market mainly offering 9/16 mountain bike pedals, many riders aren't aware that these aren't a universal size. However, if you have been riding for a while, you probably know that there are two main sizes.
Mountain bike pedals are not universal since there are two main pedal thread sizes. However, the standard size is 9/16 inches, and most mountain bikes have these pedals.
Some pedals aren't dependent on the pedal thread size. These are toe clip or clipless pedals as we explain in our article about how to choose mountain bike pedals for maximum grip. Most riders claim that these pedals provide a more efficient ride and aid in fluid and powerful pedaling. We even share instructions on how to install mountain bike pedal straps and toe clips. Similarly, you may be interested in finding out why you should use toe clips on a bicycle. Our pros and cons list will provide you with additional information.
Mountain Bike Pedal Thread Adaptors
Do you have an older bike that you love but can't use your favorite 9/16-inch pedals with it? Experts thought of this and created the pedal adaptors.
Mountain bike pedal thread adaptors are small metal parts made out of two different size sections. They are used to convert a 1/2 inch pedal thread to a 9/16 inch pedal thread and vice versa.
If you are wanting to use pedals that are compatible with pedal straps but the pedals have a different size thread then you can simply use adaptors to connect them. Why not check out our article that provides step-by-step instructions for threading mountain bike pedal straps. Similarly, you may be wondering if pedal straps are dangerous. If so, make sure to read our related article to find out more.
Types of Bike Pedal Thread Adaptors
Although the 9/16 is the most common thread size, there are still good bikes on the market that use the less common pedal thread sizes. If you spent hundreds of dollars customizing your bike, you wouldn't want to change it just because it doesn't fit the standard size pedals. Investing in suitable pedal adaptors is worth it.
Different pedal thread adaptors include 9/16 to 1/2 inch, 1/2 inch to 9/16, and 0.55 inch to 9/16. They need to be durable and lightweight to work well.
Adaptor 1. 9/16 inch to ½ inch
Got your hands on some unique pedals that don't fit your new bike? The 9/16 to 1/2 inch adaptor is ideal for your one-piece crankset. The 9.16 top part screws onto the crank, and you're able to use the 1/2 inch pedals by attaching them to the bottom part.
Adaptor 2. ½ inch to 9/16 inch
This is the most purchased adaptor. The top part fits a 1/2 inch crank and enables it to attach a 9/16 pedal. Since they're more common than other sizes, their price is also lower.
Adaptor 3. 0.55 inch to 9/16 inch
Although less common, 0.55 bike pedals are still produced and used. But the choice is much more limited, so this size adaptor means that many bike owners can still use the standard 9/16-inch pedals. Just as with the other two types, the top part fits the manufacturer's crank while the bottom fits 9/16-inch pedals.
For more related information, be sure to read through our step-by-step guide on how to remove mountain bike pedals.
How to Install Pedal Thread Adaptors
So how do the pedal thread adaptors work? Are they secure enough to not come loose while riding?
To install pedal thread adaptors remove the old pedals, screw on the top part of the adaptor, and then screw the new pedal into the adaptor.
The adaptors are as safe to use as the pedals, so if you install them properly, they will remain securely fastened.
Step 1. Remove the Old Pedals
Start by removing the old pedals. Turn the crank downwards for easier handling. Then take the right size hex key from a set like this, or pedal wrench depending on your bike, and try to loosen it up. Rotate the wrench in an anticlockwise direction for the right pedal and clockwise for the left pedal.
Step 2. Attach the Adaptor
Take the adaptor and insert the correct size into the crank. For example, if you're using a 1/2 inch to 9/16 inch adaptor, insert the 1/2 inch side into the crank. Turn to secure. You might need to lubricate the crank with a lubricator like this to make attaching the adaptor easier.
Step 3. Install the New Pedals
Now it's time to attach the pedals. Screw them onto the adaptors the same way you would install pedals onto the cranks. And you're done! Turn the new pedals a few times to check that they are attached securely and then take your bike for a test ride.
If you are unsure about which pedals to install then you may find our article about the benefits of clipless pedals on a mountain bike, useful.