
A Guide to Mountain Bike Seat Dropper Repair
One of the best upgrades you can make to your mountain bike is fitting a dropper post. It is one of the biggest innovations in mountain biking and has become a must-have for cyclists traversing technical trails. However, like any other component, it can get damaged or become faulty. In this guide, we’ll cover how to properly maintain your dropper for the best experience by going go through common dropper seat post problems and mountain bike seat dropper repair.
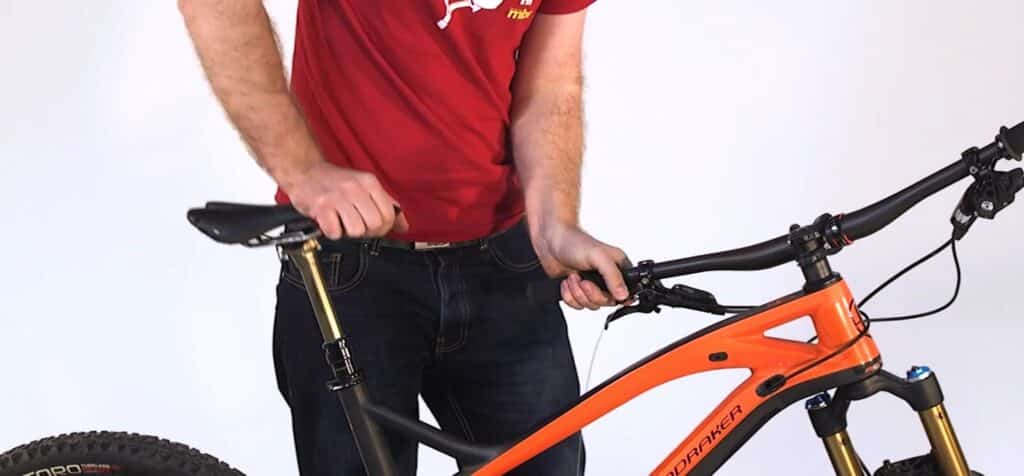
Seat dropper repair is usually needed due to broken, loose, or sticking levers, loose or broken inner cables, a broken cable clamp, or sinking, sliding, slow, or stuck dropper post. To repair a mountain bike seat dropper that’s loose, tighten it by turning the hex nut on the lever handle counterclockwise with an Allen key.
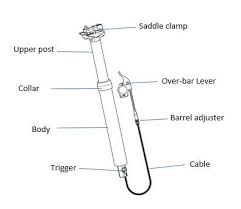
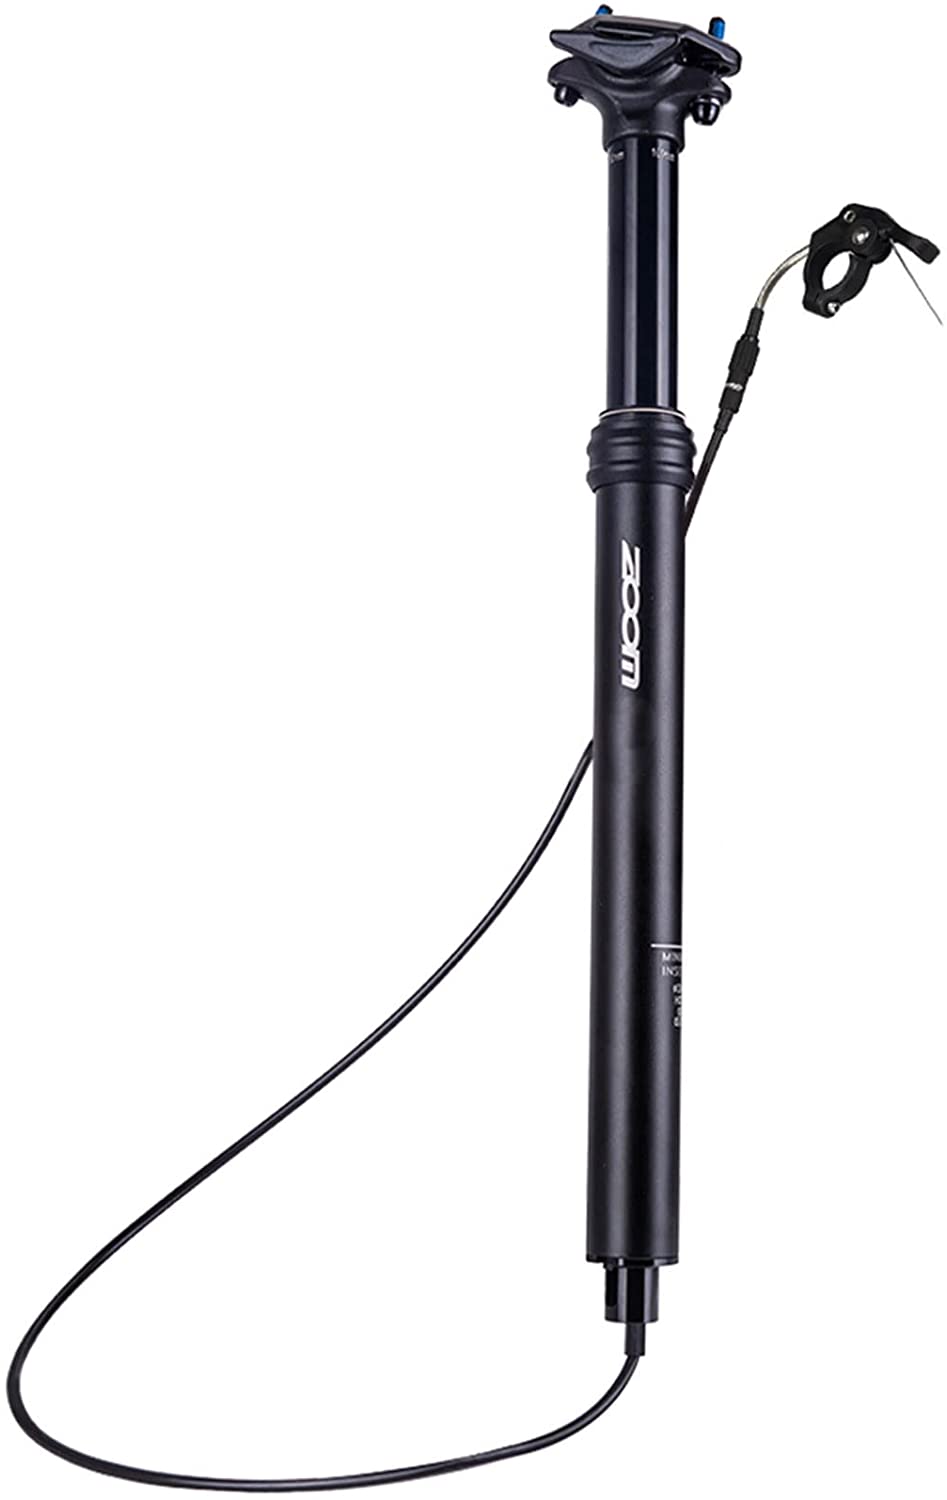
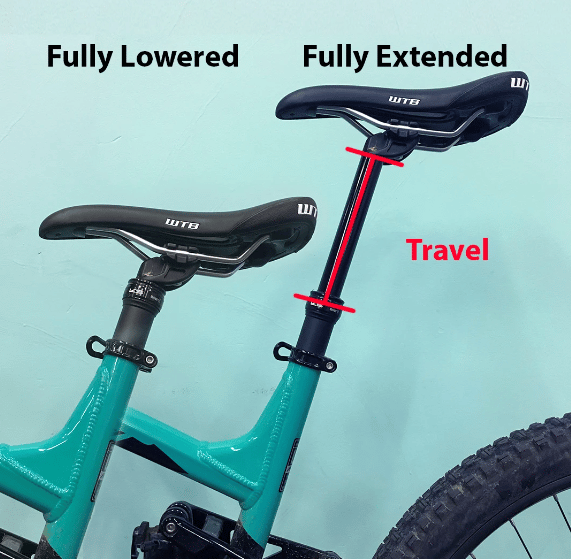
A dropper post like this acts as the bike’s seat post and allows the rider to easily and quickly adjust the saddle height on the fly without stopping or getting off the bike. Most droppers feature a cable connecting the post to a lever on the handlebar. If you’re seated on the bike and push the lever, your body weight drops the post all the way down. On the other hand, if you’re standing, the dropper post pops back up to the preset position.
According to this survey, the dropper post is the most essential and popular component preferred by riders. The dropper post allows you to quickly get the saddle out of the way when riding on rough terrains. It allows for faster and safer descents by letting you shift your weight more easily. It enhances confidence and makes riding much more fun. Adjusting the seat height can also improve traction, handling, and pedaling efficiency. Check out our article on choosing mountain bike pedals for grip for more information on optimal pedal efficiency and power transfer.
Common Dropper Seatpost Problems
When you cycle using a seat dropper, the saddle height can easily be adjusted, helping you to avoid knee and back aches while riding. However, due to frequent use and abuse on off-roads, your dropper post can start to misbehave. Some of the problems that lead to mountain bike seat dropper repair are minor and can often be resolved quite quickly.
Common dropper seat post problems include issues with the lever, such as a broken, loose, or sticking lever. The inner cable may become loose or break, and the cable clamp can also break.
Most modern mountain bikes now feature a dropper post like this as it increases safety for downhill biking. According to this study from The Open Access Journal of Sports Medicine, knee pain is a common issue faced by amateur and professional cyclists. It can be caused by improper saddle adjustment, whether too low or too far forward. We discuss this a little more in our mountain bike reach calculator tips and tricks guide. Similarly, our article explaining how to reduce mountain bike saddle pain may also provide you with some relieving tips and tricks for your next ride.
Here we list common mountain bike dropper seat post problems:
A Broken Dropper Post Lever
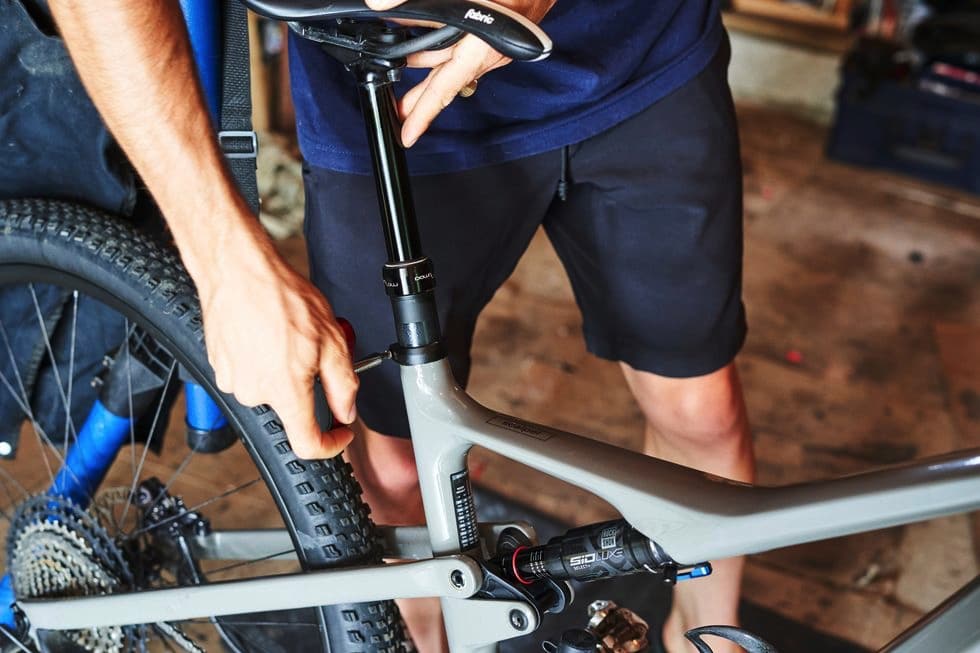
A broken dropper post lever is the most common dropper post problem. This dropper post lever is one of the essential but vulnerable parts of the dropper and can be easily damaged by sudden impact. This can be caused by wrecking it on rocky trails or sudden bike drops and crashes. To diagnose the issue, check for any signs of breakage on the dropper lever housing. Then, you can loosen the seat post collar and remove the seat post to inspect it properly for wear.
A Loose Dropper Post Lever
If your dropper post lever moves when you’re trying to engage it, then the lever is loose. This can be caused by clamping the handlebar backward, which can cause misalignment of the lever. If you need help installing your handlebars, our simple steps for adding drop bars on a mountain bike could be very helpful.
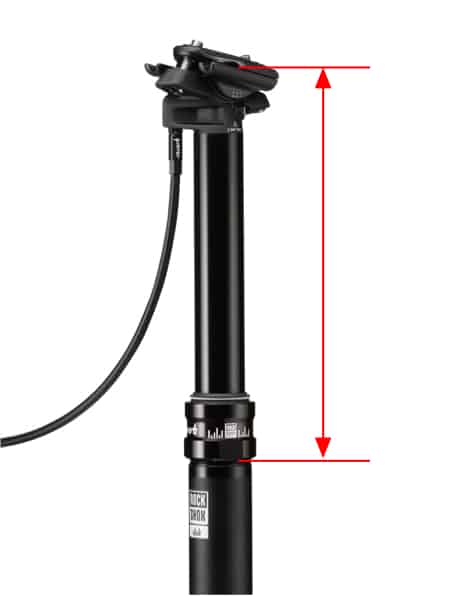
A little rotational play or wiggle is standard with the dropper post. There’s a little space between the post and seat tube, preventing dirt and grime from scratching and damaging the components. However, there shouldn’t be more than 1-2 mm of play in the dropper post.
You can test for the rotational play during mountain bike seat dropper repair by placing a piece of tape on the stanchion and mid-cap of the dropper. Next, use a marker to draw a vertical line between both tapes and gently twist the saddle till you feel resistance. If the distance between the two vertical lines is more than 2mm, your dropper has a problem.

A Sticking Dropper Post Lever
This is another common issue with dropper posts. It occurs if the saddle gets stuck in the up position and has difficulty going down or returning right back up. It can be caused by a number of factors. You may have a corroded or stuck cable. If the cable can’t move through its housing, then the seat won’t engage. The dropper seat post may also not be able to drop due to pressure from high torque on the bracket. You’ll get a sticking dropper post if the clamp is too tight. Overtightening the seat post clamp can even permanently damage the dropper.
Finally, a sticking dropper can be caused by a cable that’s too long. If the cable housing is unseated, you could have excess cable length, which could disengage with time. Inspect your cable and housing for any corrosion or slackness. You can also check the seat clamp for proper torque measurement as we discuss in our article on how to fix a mountain bike seat that keeps moving.
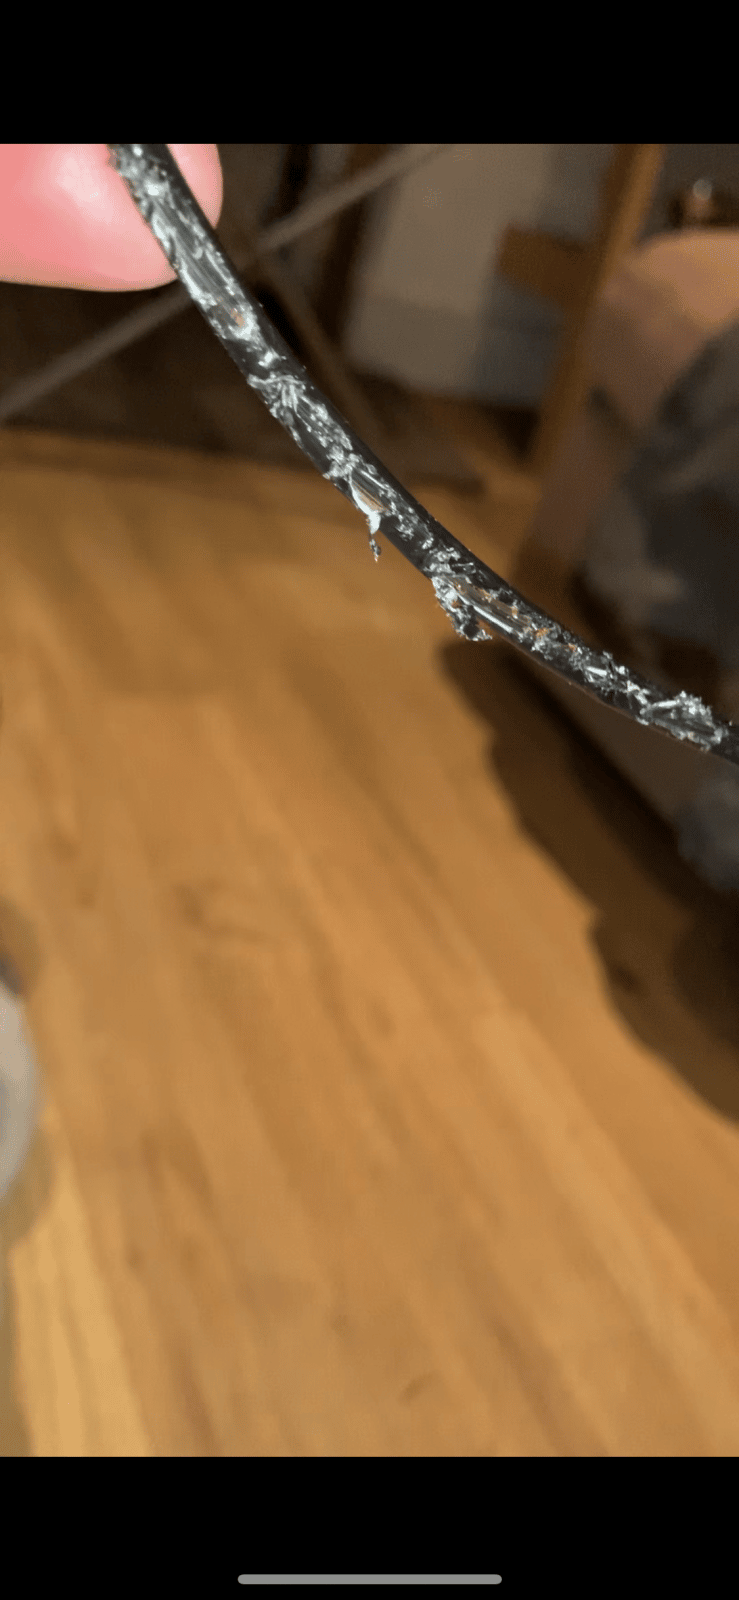
A Broken Dropper Post Inner Cable
Having your inner cable snap while riding can be quite frustrating. It can be caused by pushing hard on the thumb lever. It could also be caused by overtightening the screw on your lever. Most levers come with a recommended 1.5-2nm for torque measurement on the set screw. If the internal mechanism of the dropper post gets stuck, the problem could be a broken inner cable. You might need to replace the entire cable or shorten it if it breaks at the end. Next, you should check to see if the housing is still in good shape. If it is, you only need to push in a new cable. However, if it’s a bit old, you can use the opportunity to replace both.
A Loose Dropper Post Cable
This occurs due to low cable tension. Over time, the cable settles into the housing, which can cause it to loosen. You can diagnose this issue with the dropper post lever. If you press the lever and the post stays in its position (either up or down), the cable is too loose and requires more tension.
If the dropper post moves slowly, you also need to add a bit more tension. However, if the dropper post moves up without pressing the lever, then there’s too much cable tension, and you’ll need to loosen the cable. Make sure you micro-adjust the tension using the barrel adjuster to avoid too high or low cable tension.
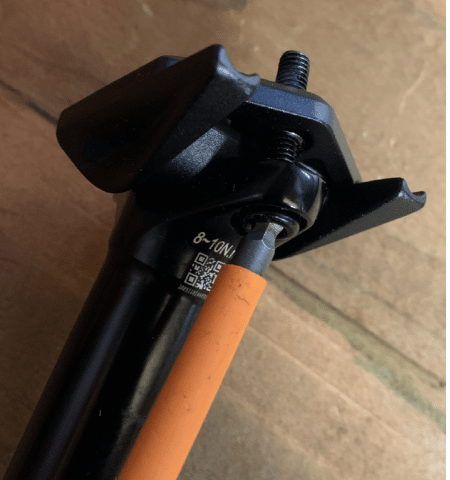
A Broken Dropper Post Cable Clamp
This can be caused by over-tightening the screws on the seat clamp of the bike. As a result, both the screw and the clamp could get damaged. As a result, it is usually recommended to use a torque wrench like this to set it to the recommended torque on the clamp. In addition, a broken cable clamp will lead to the dropper cable frequently coming out of the barrel connector. This can cause the dropper post to malfunction in which case it will have to be replaced with one like this.
A Sinking Dropper Post
This could be caused by a faulty dropper post lever that won’t disengage fully after being pushed. This increases cable tension, causing the post to sink down when you sit. Another factor could be inadequate air pressure in the dropper post. If the pressure is not set up for your weight, the dropper will sag and sink. Sinking dropper posts could also be caused by raising your bike by the seat when the dropper is down. This may lead to air leaking past the internal seals, forming bubbles and allowing the post to sink under your weight.

A Slow Dropper Post
If your dropper extends slowly or feels spongy, you may have insufficient air pressure. Too low psi will cause your dropper to return to full mast quite slowly. Slow dropper posts could also be caused by over-tightening the seat post clamp. It could also be caused by dirt build-up in the seals.
Check the manufacturer’s recommended inflations and the pressure in the posts. According to this troubleshooting page by the manufacturer 9Point8, with time and wear, your dropper may require higher pressure to return at the same rate. Also, check the torque recommendations for the seat post clamp.

A Stuck Dropper Post
This occurs when your dropper post fails to move up or down no matter what you do. The dropper post could also have extension issues where it doesn’t reach the top end of its travel. It could be caused by the seat post clamp gripping the post too tightly, preventing it from working correctly. It could also be caused by a corroded or damaged dropper post cable. This prevents the cable from moving through the housing when you push the lever.
You may also have a cable that’s too long or too short. Excess length could cause the cable to move when the lever is pushed, preventing it from functioning. On the other hand, inadequate length could cause kinks in the cable, which lead to the cable rubbing within the housing and preventing actuation. These issues hinder the post from reaching full extension.
How to Fix a Broken Dropper Post Lever
Your dropper post lever will have to be replaced and upgraded if it is broken. In these cases mountain bike seat dropper repair wouldn’t be very useful so here are steps to replace it.
To fix a dropper seat post with a broken lever, first, check for compatibility, and remove the cable and old lever. Then, install the new lever, adjust the settings, and reconnect the cable.
Here are the steps to fix a broken dropper post lever:
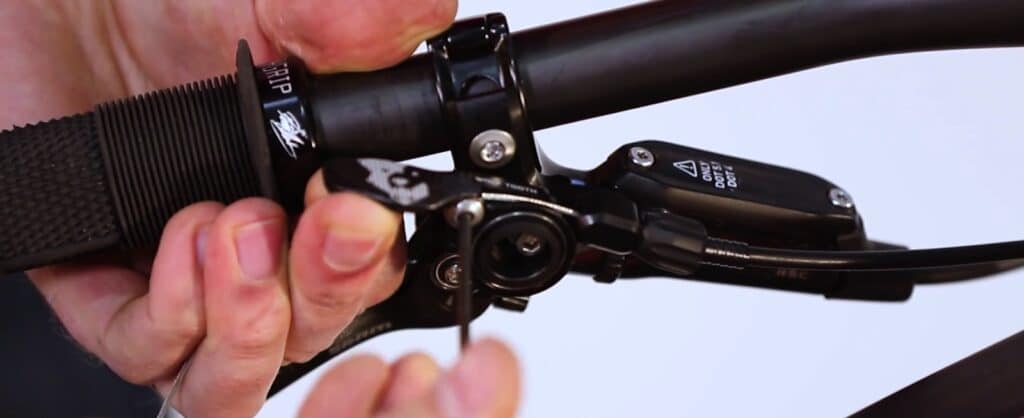
Step 1. Check for Compatibility
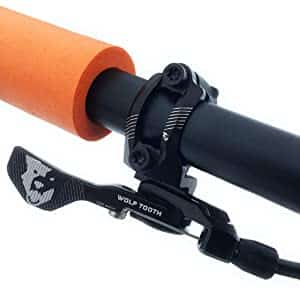
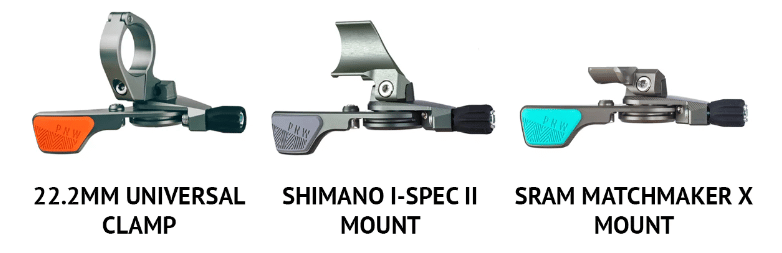
Before purchasing, you need to check that the lever like this is compatible with your dropper post. Check the dropper actuator at the base of the post. If the cable end mounts at the dropper, then you should be able to use most of the levers on the market like this. On the other hand, if the cable mounts at the lever, you'll be limited to what lever you can use. You also need to check how the lever integrates with other components. Many manufacturers sell levers tailored to particular brakes to make them easier to install.
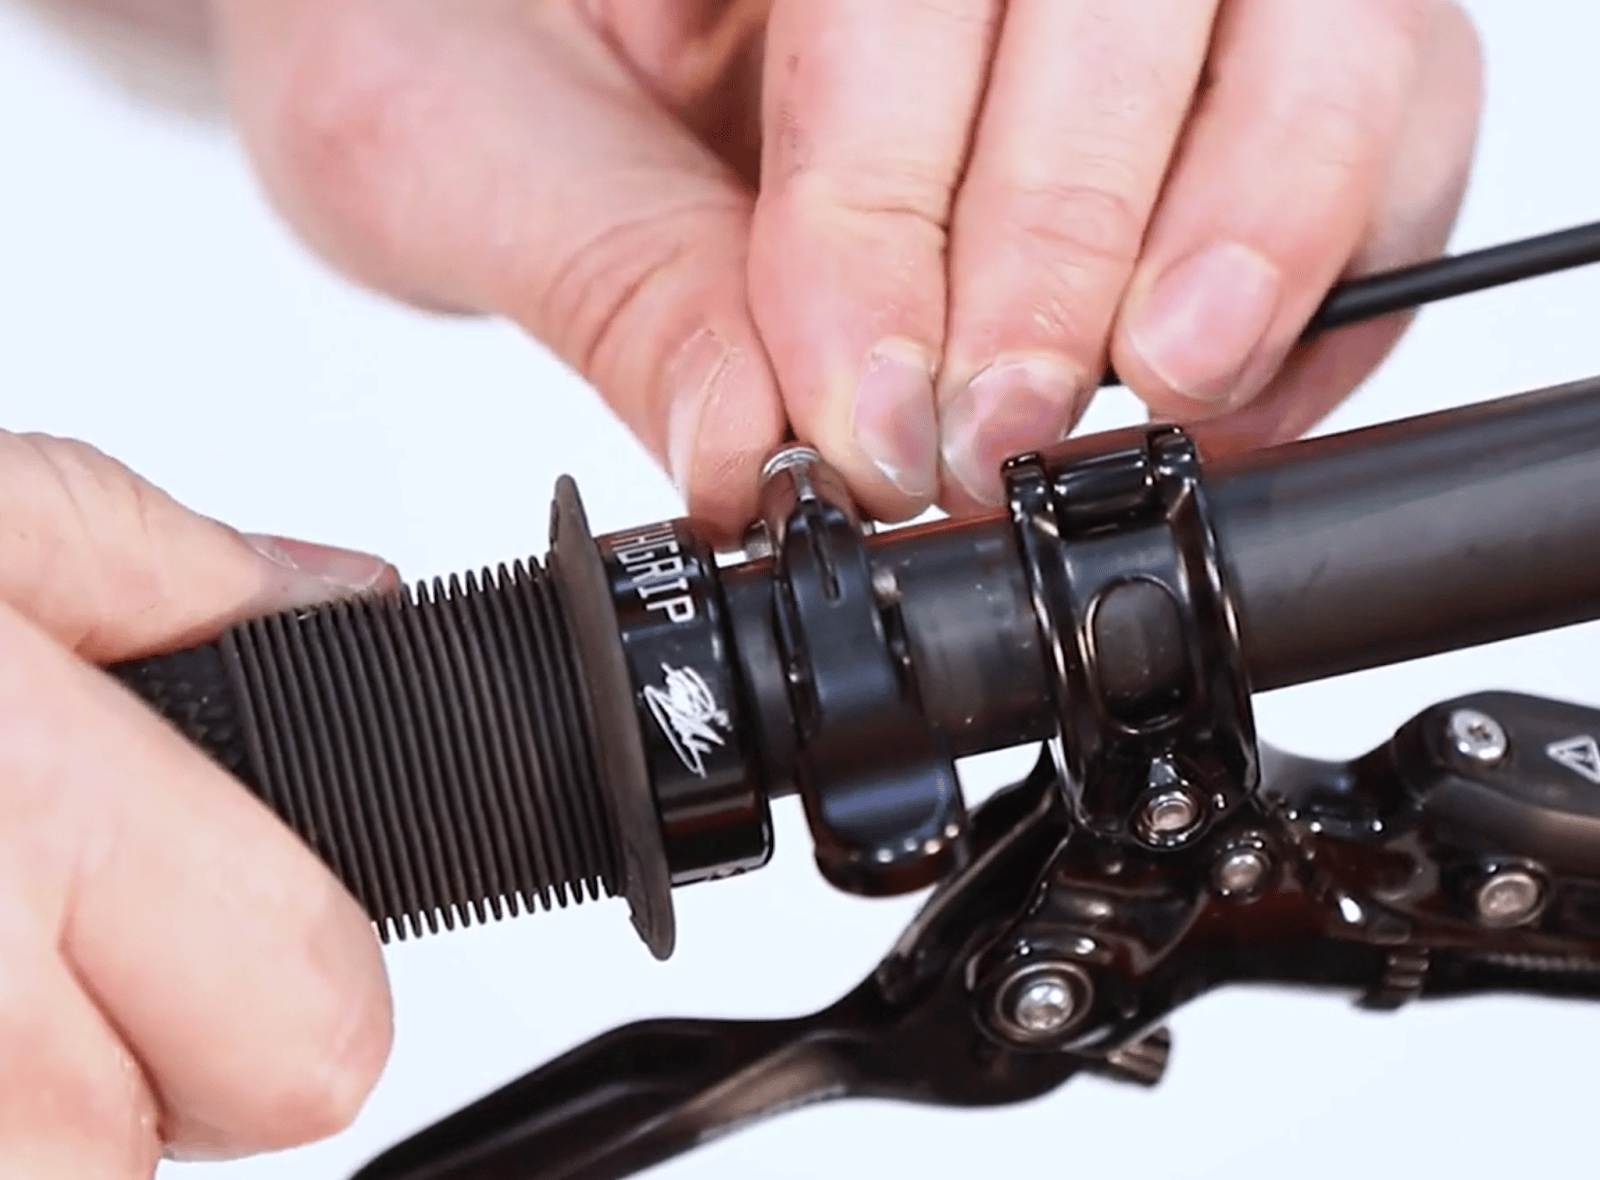
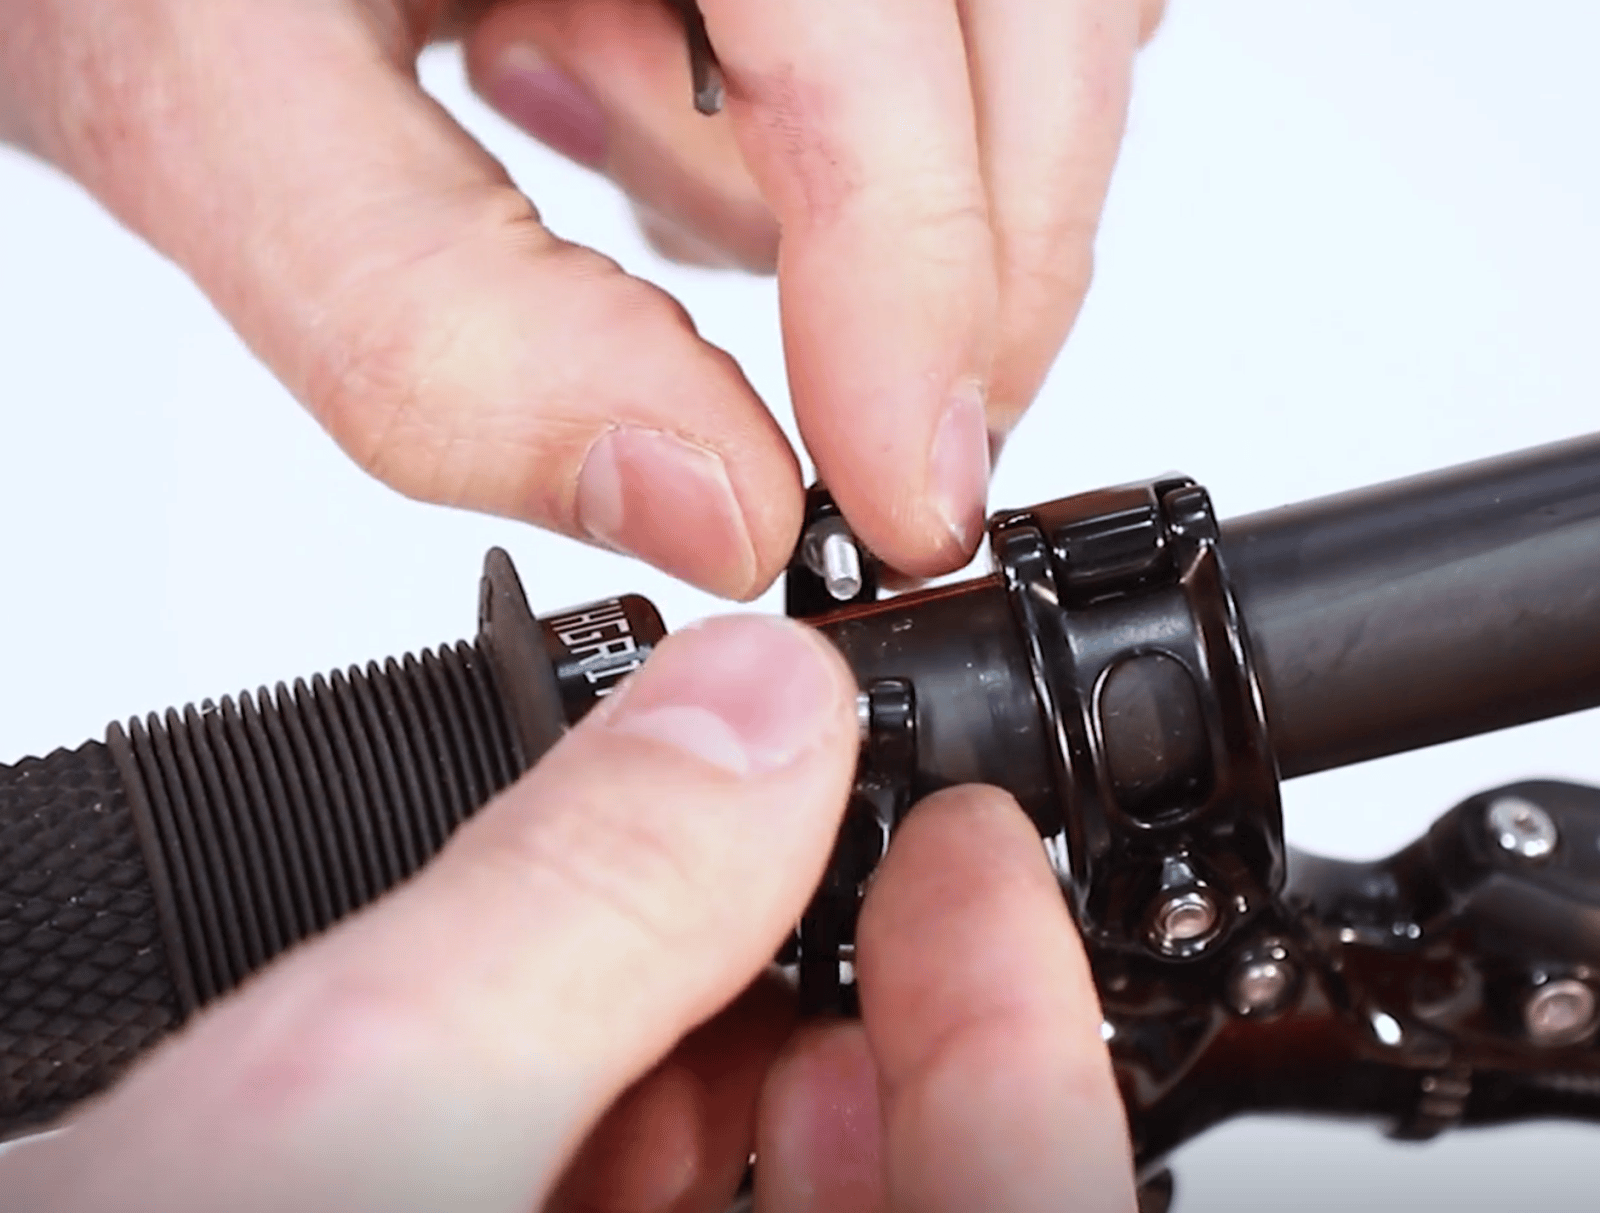
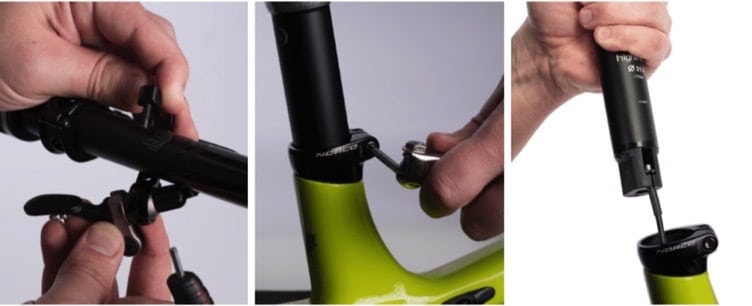
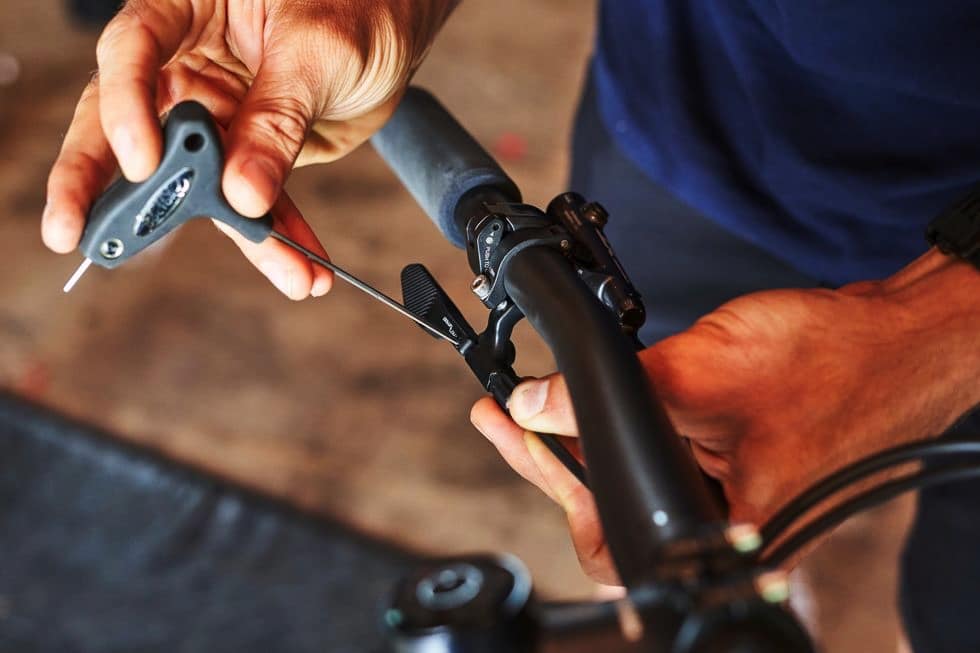
Step 2. Remove the Cable From the Old Lever
Unthread the cable clamp with a 2 mm Allen key like this. Pull the cable from the lever. This video tutorial by MBR shows you exactly how to do this.
Step 3. Remove the Old Lever
Unscrew the old lever and remove it from the handlebar.
Step 4. Install the New Lever
Fit the lever nut under the brake lever. Apply Loctite like this on the thread and mount the new lever. Screw it into place.
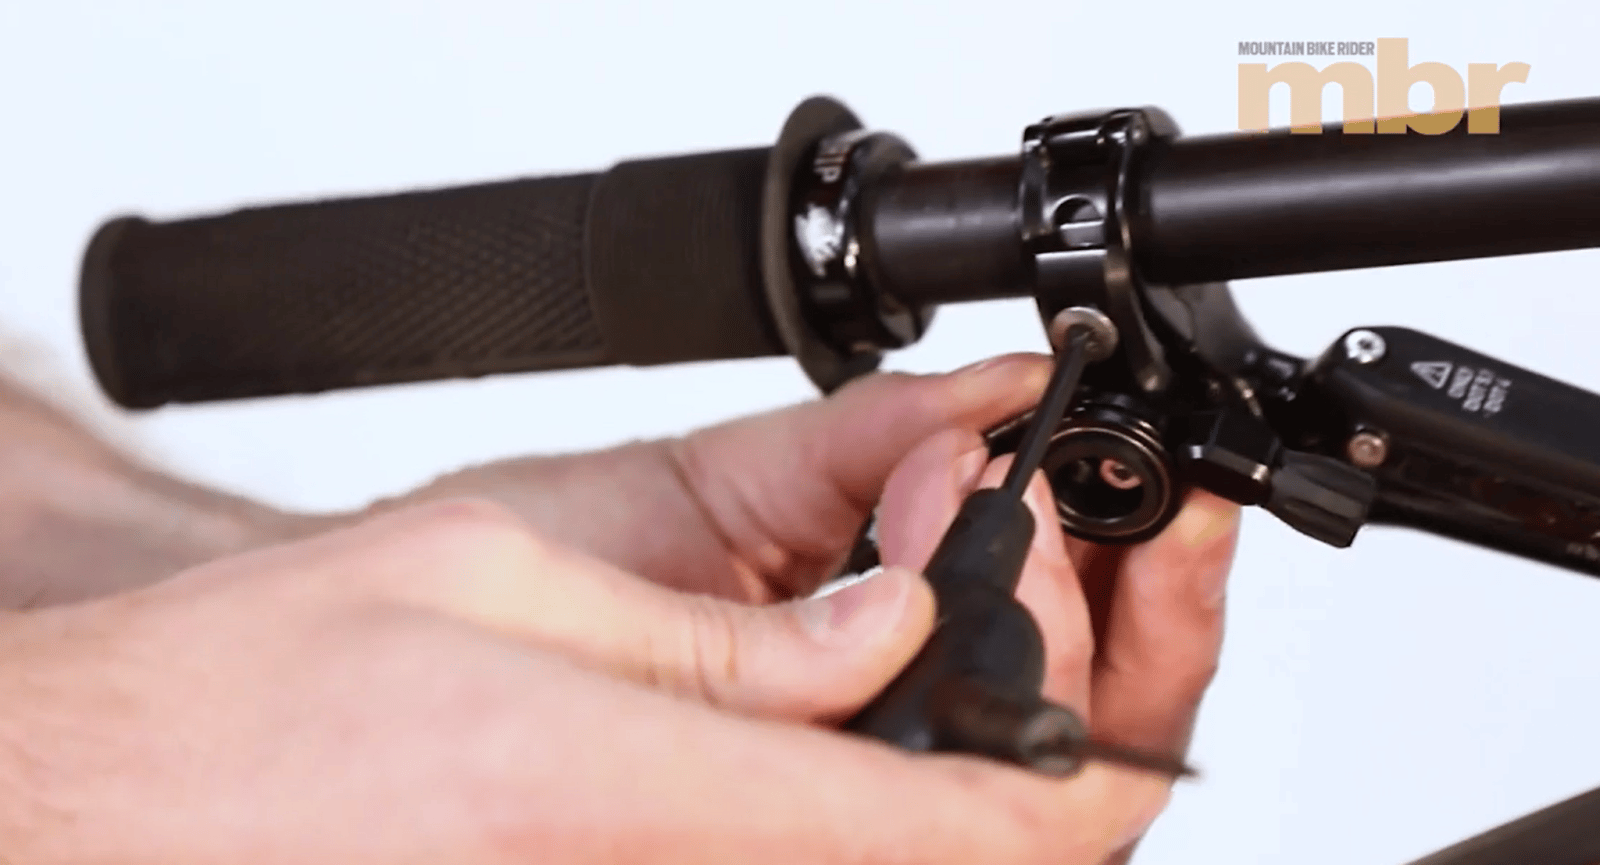
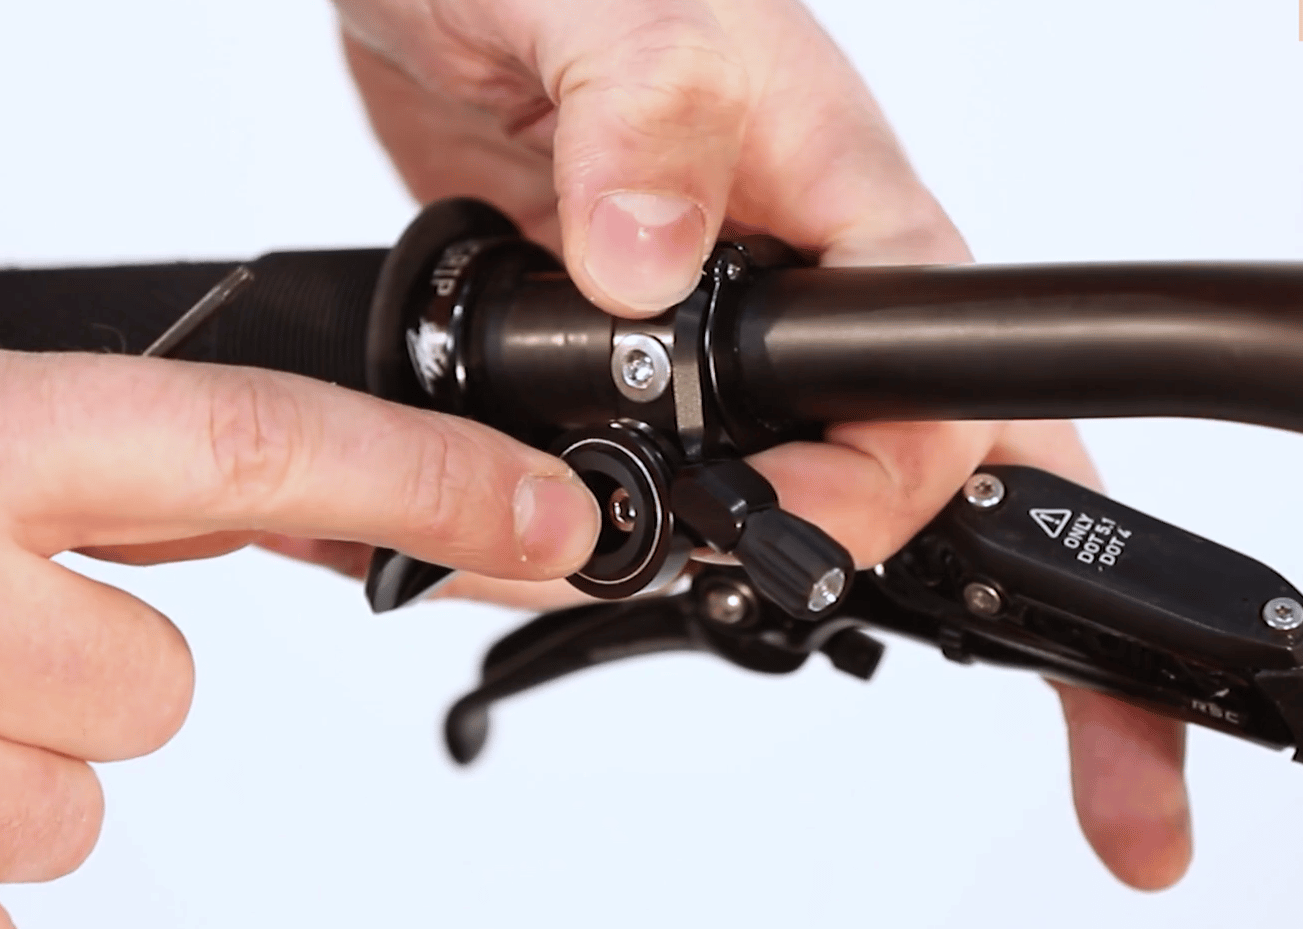
Step 5. Adjust the Position and Angle of the Lever
Change the angle and distance of the lever from the bar to a comfortable position. You can use a 3mm Allen Key like this to loosen and push it forward, backward, towards, and away from you.
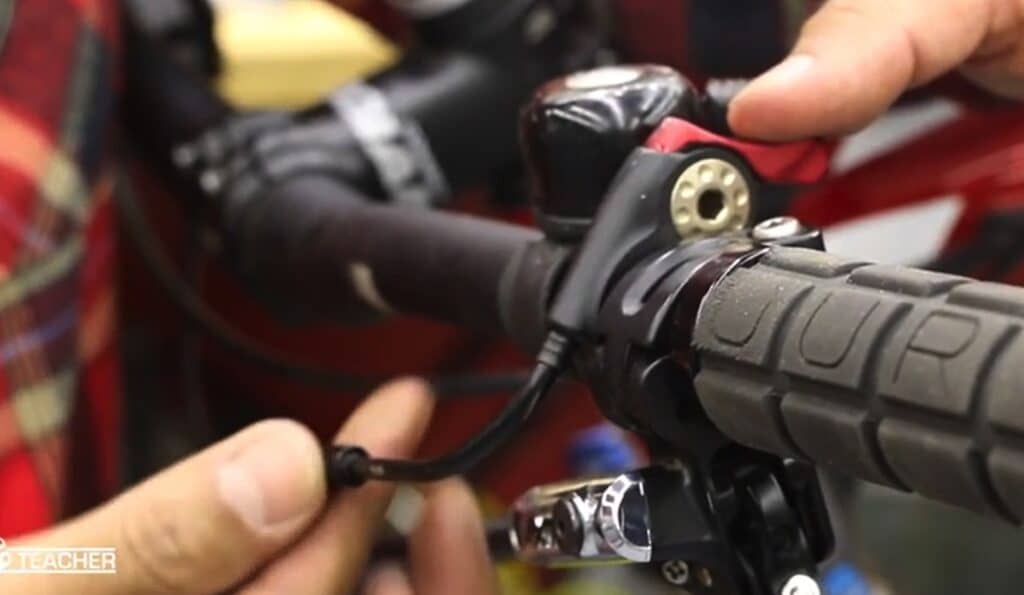
Step 6. Reconnect the Cable
Check the cable length against the new lever and cut off the excess cable length. Next, thread the inner cable through the barrel adjuster and pull the housing into place. Then, unscrew the cable pinch bolt and feed the cable through. Next, pull the cable taut and clamp the cable. Finally, test that the lever functions properly by actuating and cycling the dropper a few times.
Similarly, you might be interested in learning how to choose the proper mountain bike saddle height. If so, be sure to read our related article for more information.
Step 7. Take the Dropper to a Bike Repair Shop
Alternatively, you can take the dropper to a repair shop, or you can have the repair shop come to you as Velofix does, to have the dropper replaced or upgraded. Similarly, you may find interest in learning how to fix a mountain bike seat that's too hard. Be sure to check out our related article for additional information.
How to Fix a Loose Lever
To fix a dropper seat post with a loose lever, first, tighten the lever handle. Then, set the seat to the proper height and tighten it correctly.
Here are the steps to fix a loose lever and complete mountain bike seat dropper repair:
Step 1. Tighten the Lever Handle
Use an Allen Key to tighten the hex nut on the opposite side of the handle. Turn clockwise to tighten the nut.

Step 2. Set the Seat to the Proper Height
Pull back on the lever handle till it's straight to open it. Then adjust the seat height. Finally, push down on the lever to lock it in place. Check that the nut isn't too tight. If it is, loosen it by turning the lever handle counterclockwise.
How to Fix a Sticking Lever
To fix a dropper seat post with a sticking lever apply oil to the dropper, loosen the seat post clamp, and increase the air pressure.
Here are the steps to fix a sticking lever:
Step 1. Apply Oil to the Dropper
Clean the tube and dropper post of all dirt. Then oil it with a light coat of chain lube or this slick honey lube. Finally, wipe off any excess grease.
Step 2. Loosen the Seatpost Clamp
Use a torque wrench like this to loosen the seat post clamp bolt a bit. Check the manual for the appropriate torque to set. If it is too tight, you may need to lower the torque slightly. You can also use carbon paste to reduce the seat clamp force.
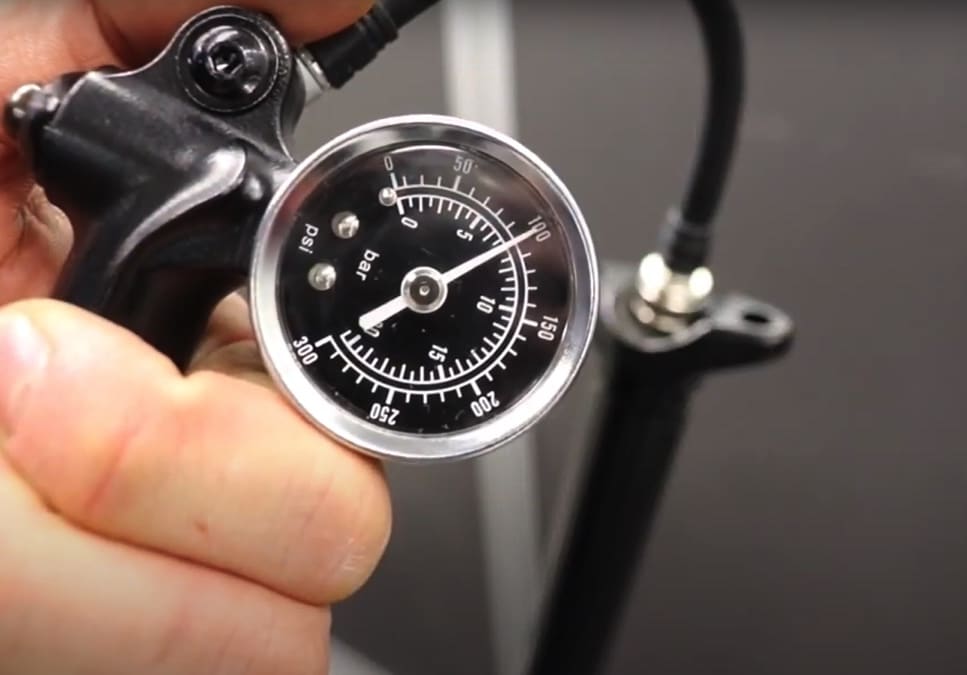
Step 3. Increase Air Pressure
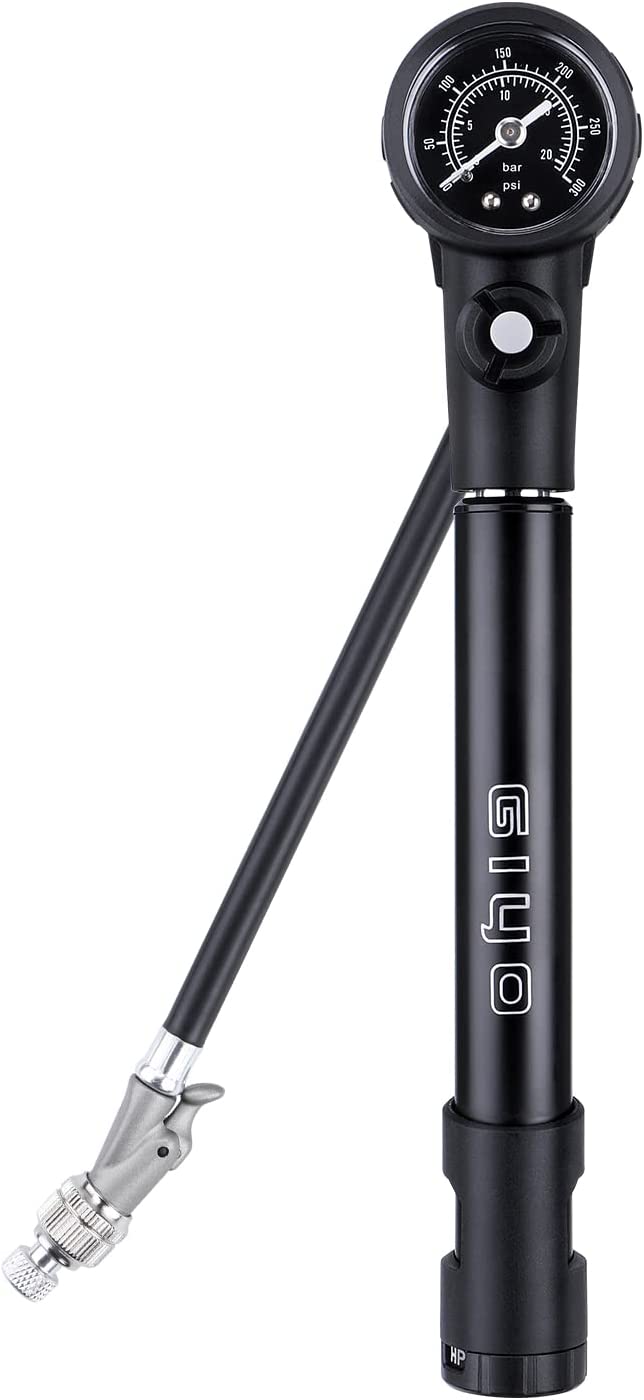
Locate the air valves under the seat head of the internal droppers and on the stanchion of the external droppers. Check if the air pressure is less than the manufacturer's recommendations. If it is, remove the seat clamp and use a high-pressure shock pump to increase the PSI to the recommended pressure as this YouTube video tutorial by THOK E-bikes demonstrates.
How to Fix a Broken Dropper Post Cable
To fix a broken dropper seat post cable, first, remove the old cable and install a new cable.
Here are the steps to fix a broken dropper seat post cable:
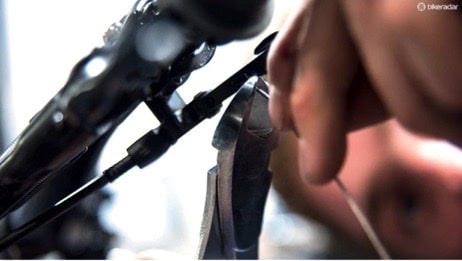
Step 1. Remove the Old Cable
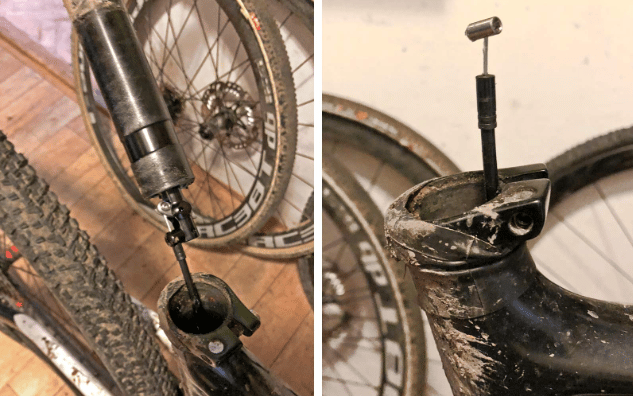
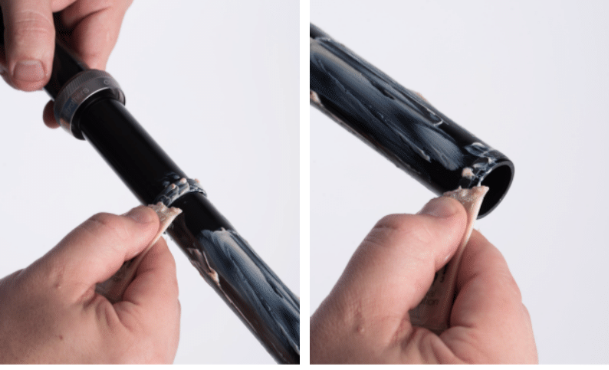
Cut off the cable-end crimp and loosen the cable pinch bolt to disconnect it from the lever. Ensure you mark the height for reinstalling the post later. Next, slide the dropper out of the seat tube. Then, guide the cable housing until a couple of inches are exposed above the clamp. Finally, pull the inner cable entirely out of the housing.

Step 2. Fit the New Cable
If the old cable snaps close to the end, you might get away with cutting off the damaged part and reinstalling it. If not, you'll have to get a new cable like this. First, fit the cable bushing onto the new inner cable. Next, thread the cable through the housing from the post end and hook the bushing onto the dropper post lever. Finally, pull the inner cable taut to avoid slackness, and plug the outer cable into the port on the post.
Step 3. Reinstall the Post
Reinstall the dropper post in the seat tube. Set it back to the marked height and retighten the seat clamp and cable fasteners. Ensure you follow the torque recommendations to avoid overtightening the clamp.
Step 4. Connect the Cable to the Dropper Lever
Thread the inner cable and attach it to the dropper lever. Tighten the cable pinch bolt to the recommended torque settings. Actuate the lever several times to ensure the cable is not slack. Install a cable-end crimp.
How to Tighten a Loose Dropper Post Cable
To tighten a loose dropper seat post cable, first, increase the cable tension with a barrel adjuster or cable clamp. Alternatively, take the dropper to a repair shop to be serviced.
Here are the steps to tighten a loose dropper post cable:
Step 1. Increase Cable Tension with the Barrel Adjuster
Check to see if your dropper post has a barrel adjuster. It is the rotating plastic piece located where the cable connects to the lever. To increase cable tension, turn the barrel adjuster counterclockwise. Turn one click at a time to find the proper tension till there's no play in the cable.
Step 2. Increase Cable Tension with the Cable Clamp
If the dropper post uses a cable clamp, you'll have to adjust the tension using the set-screw at the base of the post. Loosen the set screw and pull the cable taut to remove the excess play. Then re-clamp the cable. Take care to screw it to the recommended torque settings (usually 1.5-2 Nm)
Step 3. Service the Post
If the above methods do not work, disconnect the cable and check if the set screw is still stuck. Take the dropper post to the bike shop to be serviced.
How to Fix a Broken Dropper Post Cable Clamp
To fix a dropper post cable clamp, first, remove the seat post and cable clamp and install the new cable clamp.
Here are the steps to fix a broken dropper post cable:
Step 1. Remove the Seat Post
Loosen any fasteners attaching the cable to the frame. Next, pull the seat post out of the seat tube.
Step 2. Remove the Cable Clamp
Unscrew and remove the broken cable clamp.
Step 3. Install the New Cable Clamp
Install the new cable clamp and use a torque wrench to screw it to the recommended torque.
How to Fix a Sinking Dropper Post
To fix a sinking dropper post, first adjust the cable tension, install the dropper post lever, and increase the air pressure in the dropper post.
Here are the steps to fix a sinking dropper post:
Step 1. Adjust the Cable Tension
Check to see if the cable tension is too high or low. If the tension is too high, turn the barrel adjuster clockwise to loosen it up. If the tension is too low, turn the barrel adjuster counterclockwise to tighten it.

Step 2. Inspect the Dropper Post Lever
Check to see if the dropper lever is damaged and needs to be replaced. If so, check the section above for more details.
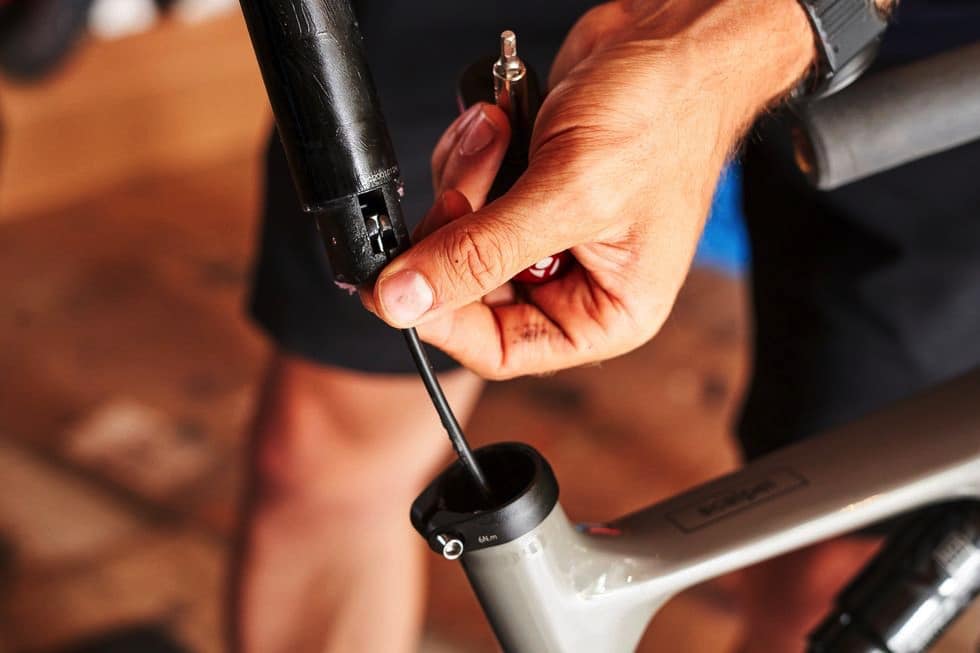
Step 3. Increase Air Pressure in the Dropper Post
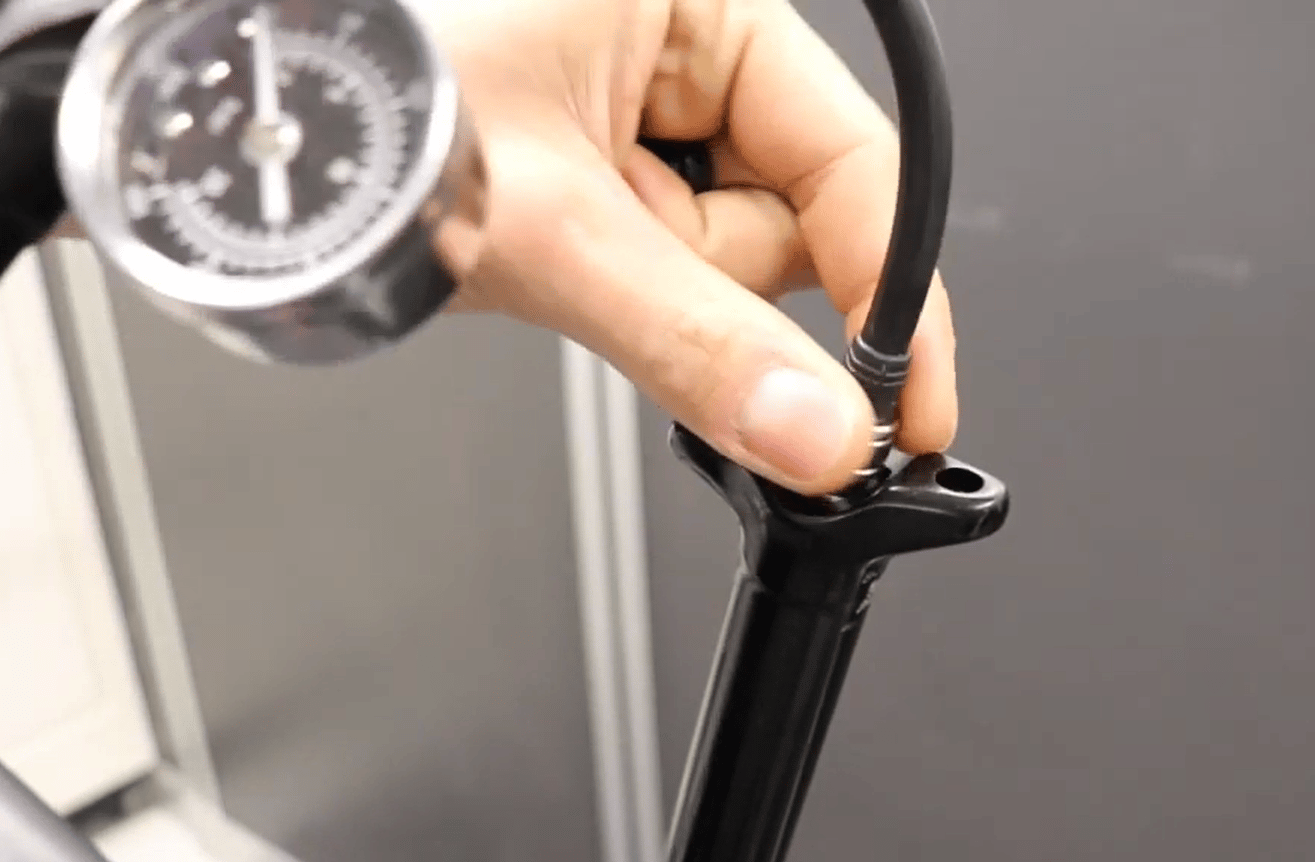
Extend the dropper post fully and then remove the saddle from the rails. Then add more pressure using a high-pressure shock pump like this. Ensure you do not exceed the manufacturer's maximum air pressure settings. Finally, replace the saddle and check if the problem is solved.
Step 4. Take the Dropper Post to a Mechanic
If none of the above methods worked or you find that air has leaked past the internal seals, take the post to be serviced. A mechanic can bleed the air out of the post and fix the sinking or spongy feeling you get when sitting.
How to Fix a Slow Dropper Post
To fix a slow dropper post, first check the air pressure and then, pump air into the cartridge.
Steps to fix a slow dropper post:
Step 1. Check the Air Pressure
Locate the Schrader air valve under the saddle clamp and check the air cartridges for pressure. Compare it to the manufacturer's inflation recommendations as discussed in this thread on MTBR.
Step 2. Pump Air into the Cartridges
If the pressure is too low, fully extend the post and use a shock pump to add air to the cartridges using a shock pump like this. Dial in till you get your preferred dropper return rate. Ensure you do not exceed the maximum inflation point (usually 300psi).
How to Fix a Stuck Dropper Post
To fix a stuck dropper post, first, inspect and loosen the seat post clamp. Then inspect and fix any damaged or slack cable.
Here are the steps to fix a stuck dropper post:
Step 1. Inspect and Loosen the Seatpost Clamp
Loosen the bolts, pull out the post from the seat tube and inspect it for any damage. If it's good, reinstall and tighten the seat clamp to the recommended torque. Tighten it enough to hold your weight without wiggling and prevent the post from slipping.
Step 2. Inspect the Cable for Damage or Excess Length
Loosen the cable bolt and detach it from the bottom of the dropper post. Check to see if the cable is frayed, kinked, rusty, or otherwise damaged. If it is, replace the cable. Also, extend the seat post fully and check if there is an excessive amount of cable. If there is, cut it down from the lever side and reinstall the cable. Reconnect the cable head to the actuator arm if detached.
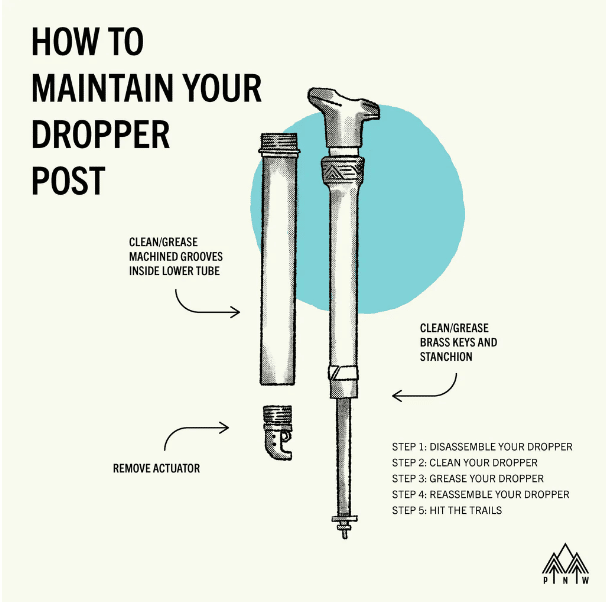
Dropper Post Maintenance
Like any other component on your bike, the dropper post requires proper and regular maintenance.
A dropper post maintenance routine should include cleaning, lubing, and re-inflating. The dropper post should be cleaned every six months. To clean a dropper post, remove the post and seat clamp to expose the main wiper seal. Separate the upper and lower tubes and clean all the components. To lube your dropper post, disassemble the dropper, clean off the old grease and regrease the components.
General cleaning and maintenance will prevent many of the issues discussed above. With regular inspection, cleaning and lubrication, you'll be able to prolong the lifespan of the post and keep it functioning properly. You should also clean and maintain other bike components regularly as our article on mountain bike chain maintenance discusses.
Riding in harsh conditions like wet, muddy, or dusty terrains will typically require frequent maintenance for your droppers. Check out this post by Pnw Components for maintenance and servicing tips. You can also install fenders to protect yourself and your bike. Read our articles on the importance of mudguards on a mountain bike and mountain bike rear mudguard installation for more information.
Clean the Dropper Post
The best maintenance for your dropper post is to keep it clean after every ride. This will go a long way to preventing any issues with your seat post, allowing you to avoid any expensive repair bills later on. Many manufacturers give recommended instructions for their dropper seat post models. You can check out this article from the manufacturer OneUp for information on the V2 dropper like this. You can also find user manuals for SRAM products here.
Here are the steps to clean your mountain bike seat dropper post:
Step 1. Remove the Seat Clamp
First, note the saddle position. Next, Pull the dropper seat post up from the seat tube. Then, unscrew the rear clamp bolt using a 5mm hex key like this and remove the clamp nut and upper clamp. Then, remove the saddle and lower clamp.

Step 2. Expose the Main Wiper Seal
Compress the dropper post and unscrew the threaded mid-cap. Then using a strap wrench like this, slide the cap up the seat post and remove it to gain access to the main wiper seal.
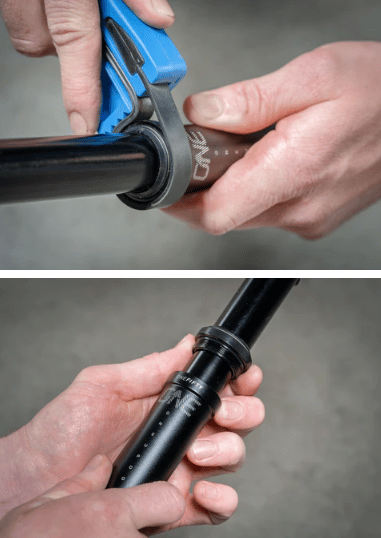
Step 3. Separate the Upper and Lower Tube
Remove the lower actuator and cartridge from the lower tube using your torque wrench. Then unscrew the collar locking ring and slowly slide the lower tube off the upper tube.
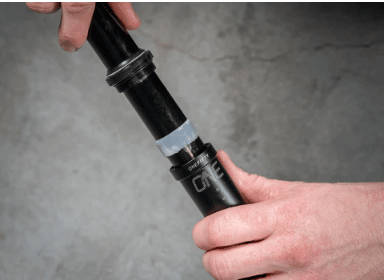
Step 4. Clean and Dry the Components
Use a clean, lint-free cloth to wipe down all the components. Clean the upper tube, inside the lower tube, and under the wiper seal. Make sure to remove all old grease. Gently wash off any mud, dirt, and grime from the post shaft. You can also clean the upper tube with rubbing isopropyl alcohol like this.
Be careful not to knock off the guide pins when cleaning the lower tube. In addition, make sure not to pressure wash the wiper seal. Avoid using any degreasers, penetrating oils, or aggressive cleaners. This is because they tend to clear out the factory's internal grease, decreasing the longevity of your dropper.
Step 5. Reinstall the Components
Align the guide pins and reconnect the lower and upper tubes. Reinstall the actuator and thread it into the lower tube. Thread the mid-cap into the lower tube and tighten with the strap wrench. Reinstall the seat clamp and torque it to the recommended settings. Slide the dropper post back into the seat tube. Pull the housing alongside to avoid any kinking in the inner cable and housing.
You might also be interested in learning the differences between trekking seats vs. mountain bike seats to find out how to choose the right one. If so, be sure to read our related article.
Dropper Post Lube Routine
Dropper posts usually come with internal factory grease to function for up to 10 years of regular use. You can also regrease the components periodically to reduce friction and preserve the smooth functioning of the parts. Different manufacturers have different recommended greasing intervals for their dropper posts.
Here are the steps to lube your dropper post:
Step 1. Disassemble the Dropper Post
Slide the dropper seat post off the seat tube and unthread the seat clamp. Unscrew the mid-cap to gain access to the wiper seal. Remove the actuator and separate the upper and lower tubes.
Step 2. Wipe off All the Old Grease
Wipe off all old grease with a clean cloth. Do not use any degreasers.
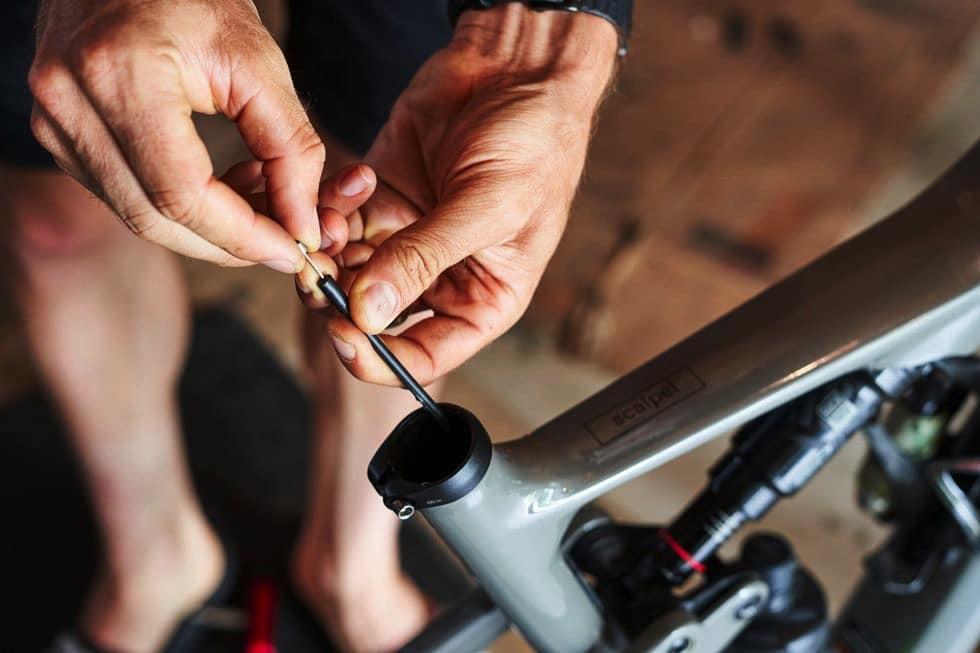
Step 3. Grease the Components
Using your finger, add a little suspension grease like Slick Honey, Wet Seal, Silicon Shine, or SRAM butter. Dropper manufacturers usually recommend specific grease for their products. Apply on the seals, guide pins, bushing, and upper and lower tubes. Actuate the post several times to distribute the grease inside. Wipe off all excess grease to avoid attracting dirt.
Dropper Post Storage
Apart from cleaning and lubricating, you also need to make sure to store the dropper post properly. Failure to store it properly can lead to complications like a stuck dropper post, corroded components, and other damage.
Step 1. Fully Extend the Dropper Post
Ensure you always store your bike with the dropper post in the extended position. Storing it in the down position can cause air to seep past the internal seals and lead to a sinking dropper post.
Step 2. Mount it Properly on a Repair Stand
If the dropper is below the fully extended position, never pull up on, lift or hang the bike by the seat. Otherwise, you risk forcing air into the seal and increasing wear on the dropper post wiper seal. Always extend the dropper seat post before mounting your bike on a repair stand or at bike parks. Use a clean, soft cloth between the clamp and post shaft to protect the surface.
Step 3. Service the Bike Before Long-Term Storage
If you are storing your bike for extended periods, then service the bike first. Then, put the bike away with the clean, dried, lubed dropper seat post.
How Much Does a Dropper Post Service Cost?
Apart from regular post-ride maintenance, you must perform regular services on your dropper post. We recommend taking your bike to a bike shop and fully servicing the post annually or biannually. This will help keep your dropper in good working condition and also preserve the warranty from most manufacturers. In addition, if you notice any issues like a slow dropper post, sliding dropper post, or a shaky saddle, then it's time to service the post.
A dropper post service costs about $50. A full service includes completely disassembling the dropper post, replacing rubber seals and wiper seals, inspecting all components for damage and any issues, cleaning and lubricating all parts, testing the air pressure, and reassembling the dropper using factory parts.
Dropper Post Maintenance and Service Routine
Here is a table of service and maintenance requirements recommended by popular manufacturers:
| Manufacturer | Model | Cleaning Routine | Inspecting Routine | Lubricating Routine | Full Servicing Routine |
| OneUp | V2 | Every ride | Every ride | Every ride | Every 50 – 100 hours |
| Bontrager | Line Elite | Every ride | Every 50 hours/6months | Every 50 hours/6 months | Every 100 hours/ 12 months |
| Fox | Transfer Performance Elite | Every ride | Every ride | Every ride | Every 125 hours |
| RockShox | Reverb AXS | Every ride | Every ride | Every 50 hours | Every 200 - 300 hours |
| 9Point8 | Fall LIne | Every ride | Every ride | Every 12 months | Every 12 months |
| Crankbrothers | Highline 11 | Every ride | Every ride | Every 150 -175 hours | Every 400 hours |
| KS | Lev Integra | Every ride | Every ride | Every 6 months | Every 6 months |
| Bike Yoke | Revive | Every ride | Every ride | Every 100 hours/12 months | Every 100 hours/12 months |