
How to Replace a Chain on a Mountain Bike – Step by Step
Replacing a mountain bike chain when worn out or faulty beyond repair is crucial for the best and safest biking experience. Failure to replace a worn-out chain can lead to serious injury as the chain becomes loose and stretched out. A loose chain will end up slipping off the chainrings during rides and jamming into the wheel spoke or cassettes. So that you can avoid this, we provide all the information you need to replace a chain on a mountain bike.
To replace a chain on a mountain bike, start by choosing a new chain with a width compatible with the number of sprockets on the bike. Then, look for the quick link on the current chain, open it, remove the chain, and clean the chain cassette. Next, thread the new chain and cut it to the correct size. Lastly, connect the two endpoints of the new bike chain.
A worn-out chain can damage other expensive components of your drivetrain, like the chainrings and cassettes. This damage can, in turn, reduce the efficiency of your bike and cause any new bike chain to snap or wear down faster and cost you more in the long run. Be sure to take a look at our quick and proper mountain bike chain maintenance for more ways to keep your chain in tip-top shape.
Single-bicycle crashes are usually caused by the chain breaking or slipping off, or poor tire grip leading to skidding while cornering, as this study by Cycling Research International discusses. Therefore, ensuring sufficient tire grip is also essential so we suggest that you read our guide on how to choose mountain bike tires for maximum grip.
Types of Mountain Bike Chains
Before replacing your bike chain with a new chain, you must be familiar with the different types of bike chains. Depending on the type of bike chain you get, you can reduce weight and increase the efficiency of your bike. Each type of bike chain has different qualities that are important for different bikes and terrains. However, regardless of the chain type, you must choose chains with the right speed and length for optimal compatibility with your drivetrain.
The four different types of mountain bike chains are regular bike chains, hollow-pin bike chains, solid pin chains, and half-link bike chains.
To understand what separates each chain type, you must also understand how bike chains are constructed. A bike chain typically consists of outer or pin-link plates, inner or roller-link plates, rollers, pins/rivets, and bushings.
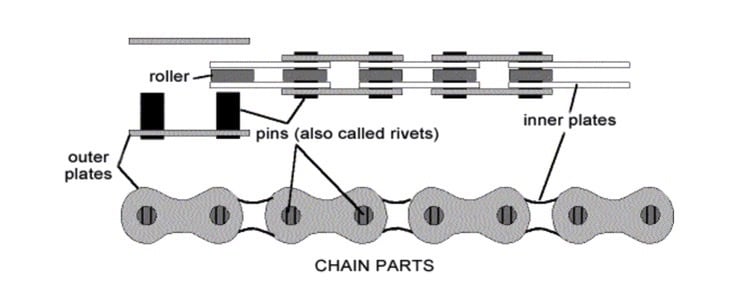
Each pair of outer plates forms the outer link, while each pair of inner plates forms the inner link. Regular and half-link chains differ in the number of links you can remove at a time from the chain. The rollers separate the inner chain plates while the pins or rivets connect the outer chain plates. The bushing usually fits into the inner chain plates with the pins passing through it. The pins are quite important as they provide the pivot for each chain link. Hollow-pin and solid-pin chains differ in the construction of these pins.
Now let's take an in-depth look at the different types of bike chains to help you figure out which is best for you.
1. Regular Chains
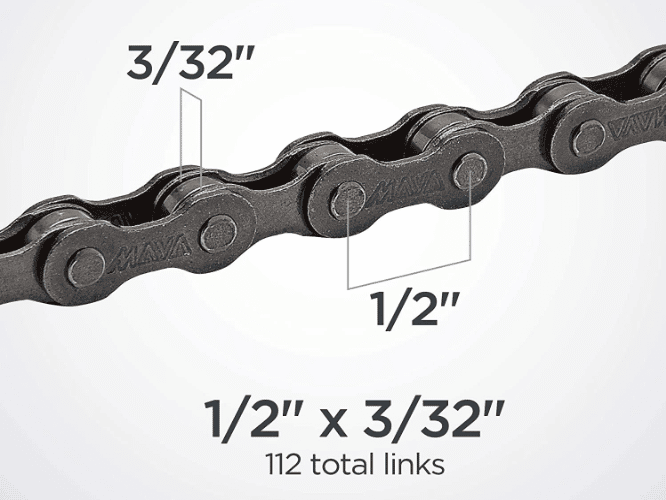
These traditional full-link chains have outer links connected by pins and inner links connected by rollers. The stand-out feature of regular chains like these is that a single removable unit on the chain consists of 1 outer link and 1 inner link. Each individual link counts as half a link and together, they make a full link.

Since each individual outer or inner link measures 0.5 (1/2) inches, removing a full link shortens the chain by an inch. In addition, adding or removing a full link shifts the rear wheel on the bike by about 0.25 (1/4) inches. This is a significant change in chain length and rear wheel position. As a result, regular chains have less precise adjustability, meaning you don't have as much freedom and flexibility when replacing or fixing your chain.
When replacing your chain, you may find that your new chain is a bit too tight or short, so you may want to adjust the chain by lengthening it. However, with the full link chain, adding an outer and inner link together could overcompensate and push the rear wheel far back or forward in the swingarm. As this thread on Vital Mx Forum discusses, this change alters the front and rear weight bias, wheelbase, and shock leverage, changing the bike's stability, cornering, and grip. In addition, the rear shock gets softer with the rear wheel further back and stiffer with the rear wheel forward.
While this overcompensation might help increase the traction, stability, and turning ability and decrease the lap times of your bike, it could also affect the feel and characteristics of your bike. This is because changing the rear wheel position changes the effective angle with which the fork attacks the ground. You might need to counter these effects with riding style and clicker adjustments. As a result of these effects, regular full-link chains are best for bike frames with longer dropouts as the frame has enough room for the rear wheel.
On the other hand, connecting regular chains is easier as the 2 ends will always align. When putting together a chain, you must ensure that one end is an outer link and the other is an inner link. With the regular full-link chain, you don't have to be concerned about that. No matter how many links you add or remove, one end will always be an outer link and the other an inner link. Again, this is because a removable link is made up of both an outer and inner link, so the ends will always remain the same.
2. Hollow-Pin Chains
These bike chains have hollow pins as opposed to solid pins. The hollow pins allow the chains to be lightweight while maintaining their strength and durability. The chains test just as high in tensile strength as other chains and so will not break easily. In addition, the chains do not make any noise during rides and offer excellent performance and aesthetics. This hollow-pin chain uses a master link that can be attached and detached with a 3mm hex key. This means you can easily take the chain apart and put it together with an Allen wrench like this.
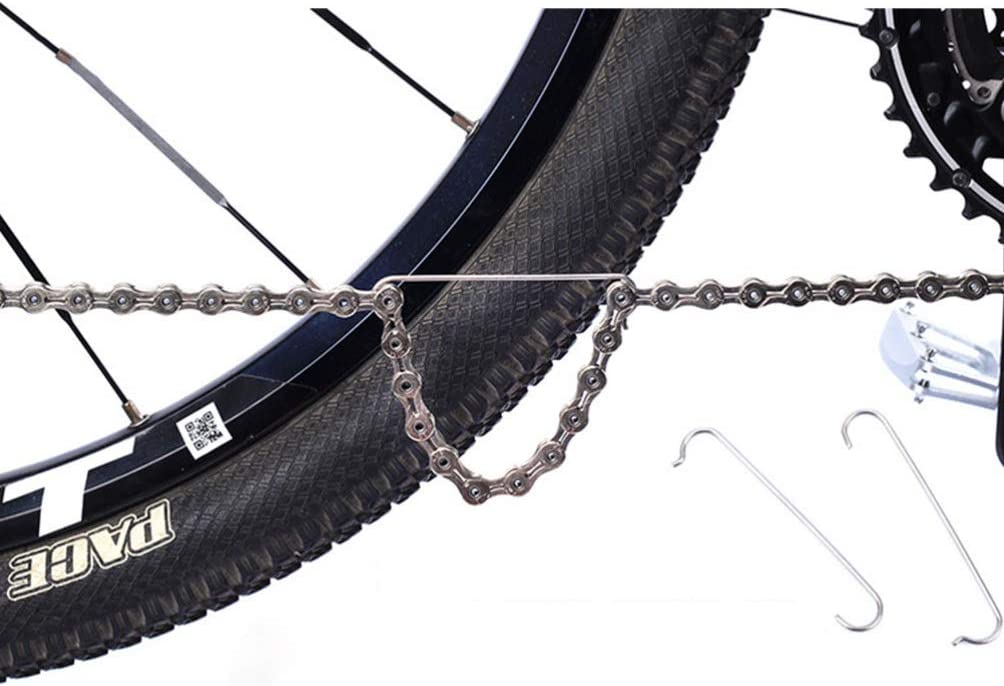
When connecting the hollow chain, you can make use of chain hooks like these to hold the links as you fit them together. Then, push in the hollow pin and use the Allen wrench to tighten it down. Ensure the pin is pushed through the link and protrudes from the outer plates in equal amounts on both sides. Watch this YouTube video tutorial by The Basement Bike Shop for a demonstration of the process.
However, the holes in the hollow pins tend to hold water, dirt, mud, or oil. Therefore, you need to pay attention to that when cleaning your chain. In addition, certain chain splitter tools may not work with the hollow pin chains, especially the chains with stops that prevent the pin from being pushed all the way out of the outer plate. This is because the chain tool pin will rest in the hole of the hollow pin and so may not be able to push the pin far enough.
3. Half-Link Chains
Also called pintle chains, half-link chains like these use identical links throughout their length. Each link is larger on one side and smaller on the other. The links connect by fitting the smaller end into the larger one. The half-link chain allows you to remove one link at a time instead of the standard full-link chains.
Just as with the full-link chains, each individual link measures 1/2 inches, but since you can take out one link, the chain only shortens by 1/2 inches. In addition, the rear wheel only shifts about 1/8 inches forward or backward when you add or remove a link. This accounts for the smaller change in chain length and rear-wheel placement with half-link chains. As a result, there is a decreased effect on the feel of the bike when adding or removing links. You can check out this YouTube tutorial for more information on installing your half-link chain.
With half-link chains, you can easily make adjustments to different cogs, as this KMC page on their half-link series states. Pro riders who need the flexibility and fine-tuning ability will prefer these chains to regular ones.
Half-link chains are usually made with added weight and thickness to compensate for the slight weakness at the connection points. As a result, they tend to be heavier than full-link chains. Half-link chains are usually best with bikes with shorter dropouts, as they need precise adjustments. They are also great for achieving optimal chain tension on single-speed bikes without having to use chain tensioners.
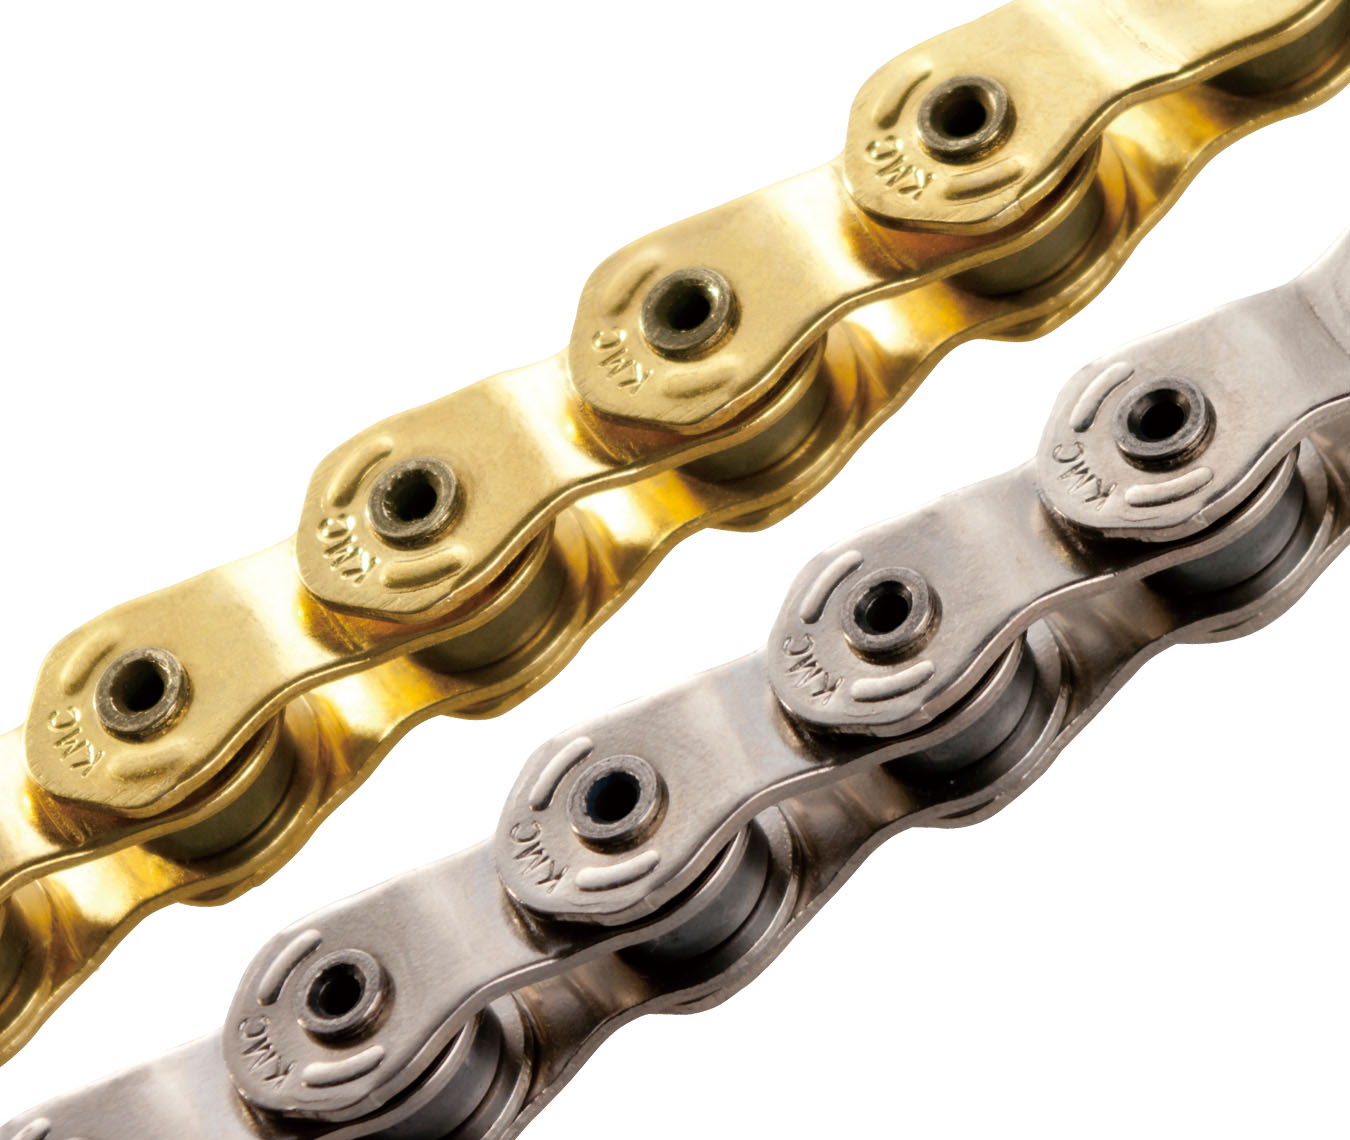
4. Solid Pin Chains
These chains are more traditional ones featuring a solid rivet pin construction. They are usually highly rated due to their strength and durability. The chains are quite easy to clean, and they will last a very long time with proper maintenance. Compared to hollow-pin chains, solid pin chains are slightly heavier. Chains are the bulkiest part of a mountain bike drivetrain; therefore, some riders might prefer lightweight hollow pin chains. However, solid pin chains are also a great option if you do not mind the extra weight.

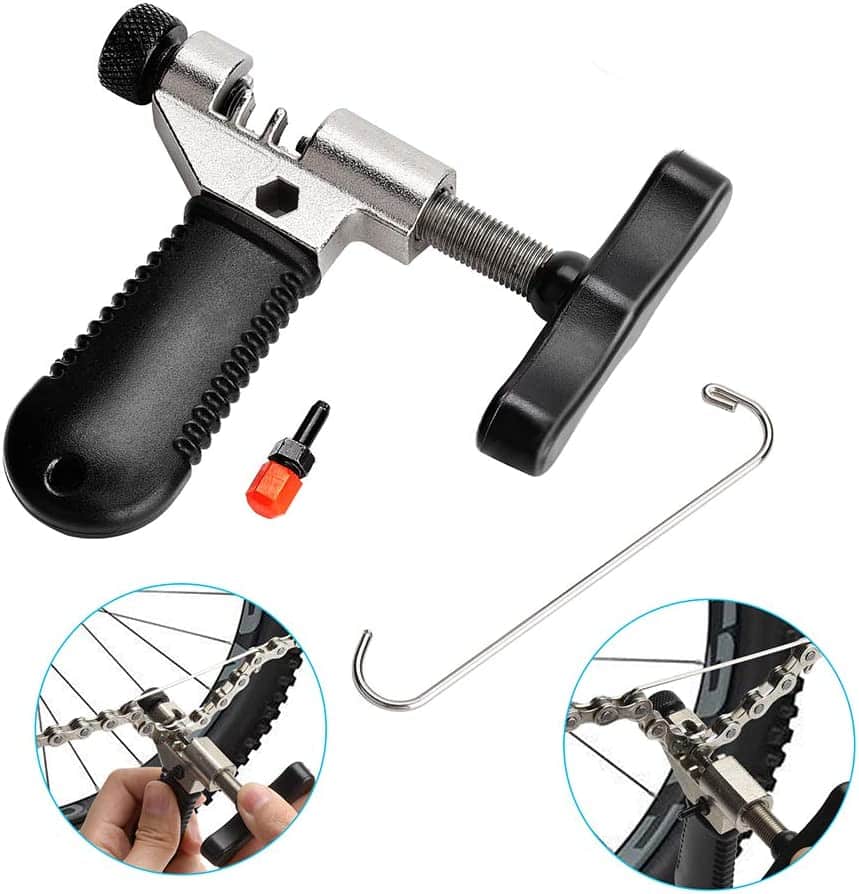
Disconnecting the chains during installation can easily be done with chain tools. Place the chain in the slot of the tool and tighten the handle clockwise till the chain tool pin connects with the solid connection pin. Turning the handle helps to drive the pin out and split the chain.
You can also use a chain tool to connect the chain easily. Position the chain the same way and place the solid pin, so it faces the chain tool pin. Turning the tool clockwise pushes the pin back through the connecting link.
When to Replace a Mountain Bike Chain
The more you use your mountain bike chain, the more stress it undergoes and the more it gets worn out. No matter how well you maintain your chain, it is still prone to natural wear and deterioration.
Replace a mountain bike chain if it keeps slipping, doesn’t shift or shifts slowly, is stretched, has rusty links, has been used for a while, and if your bike has worn cogs or cassette teeth.
Over time the rollers and pins wear down, leading to stretch and other complications. Therefore, it is important to know when to upgrade your chain as early as possible. However, because most riders take chains for granted, they don't pay attention to them till the chains reach a breaking point. Here are a few tell-tale signs that your bike chain needs to be replaced:
Chain Keeps Slipping
This is one of the most decisive factors that shows a chain is worn-out. Just as any device used on a regular basis, the bike chain is prone to getting worn. A worn chain usually loses its shape and is elongated and stretched. As a result, the chain will fail to fit properly onto the cassette and start slipping frequently.
A chain slipping may not always mean the chain is worn out. The chain could be too long, bent, or stiff, or the issue might be with other drivetrain components. As a result, you might be able to fix the problem. For more information, check out our detailed guide on how to fix a mountain bike chain that keeps breaking as well as what to do if your mountain bike chain is too long.
Sloppy Or Slow Shifting
Another way to determine if it is time to replace your chain is if you keep experiencing sloppy or slow gear shifting. This could be due to high chain tension or imperfections in the chain like stiff, unbalanced, rusty, or bent links. If the chain has many imperfections, upgrading rather than fixing them might be better. These imperfections could cause your chain to jump gears during rides. They could also make it difficult to shift gears or even prevent you from shifting to some large gear combinations.
To test the shifting ability of your chain, shift your chain to the largest front chainring and smallest sprocket on the cassette. Next, pull the chain at the front of the bike chainring. If your chain starts to lift off the top of the chainring, then it has started wearing out.
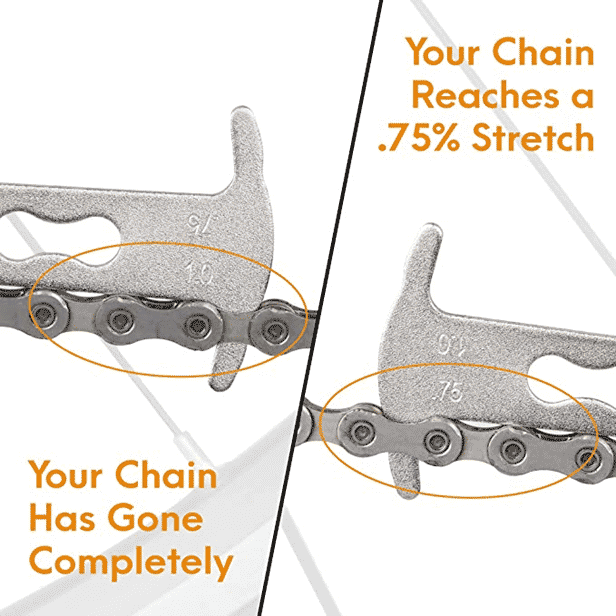
Increased Stretch on Chain
The most precise method to know whether you should replace your chain or not is using a chain wear indicator like this to check the state of your chain. If when measuring the degree of stretch, the indicator falls between 0.5 and 0.75, then you should replace the chain. If it falls above 1.0, using the chain again is dangerous. For competitive bikes, a 0.5 stretch is high and indicates that the bike chain should be changed.
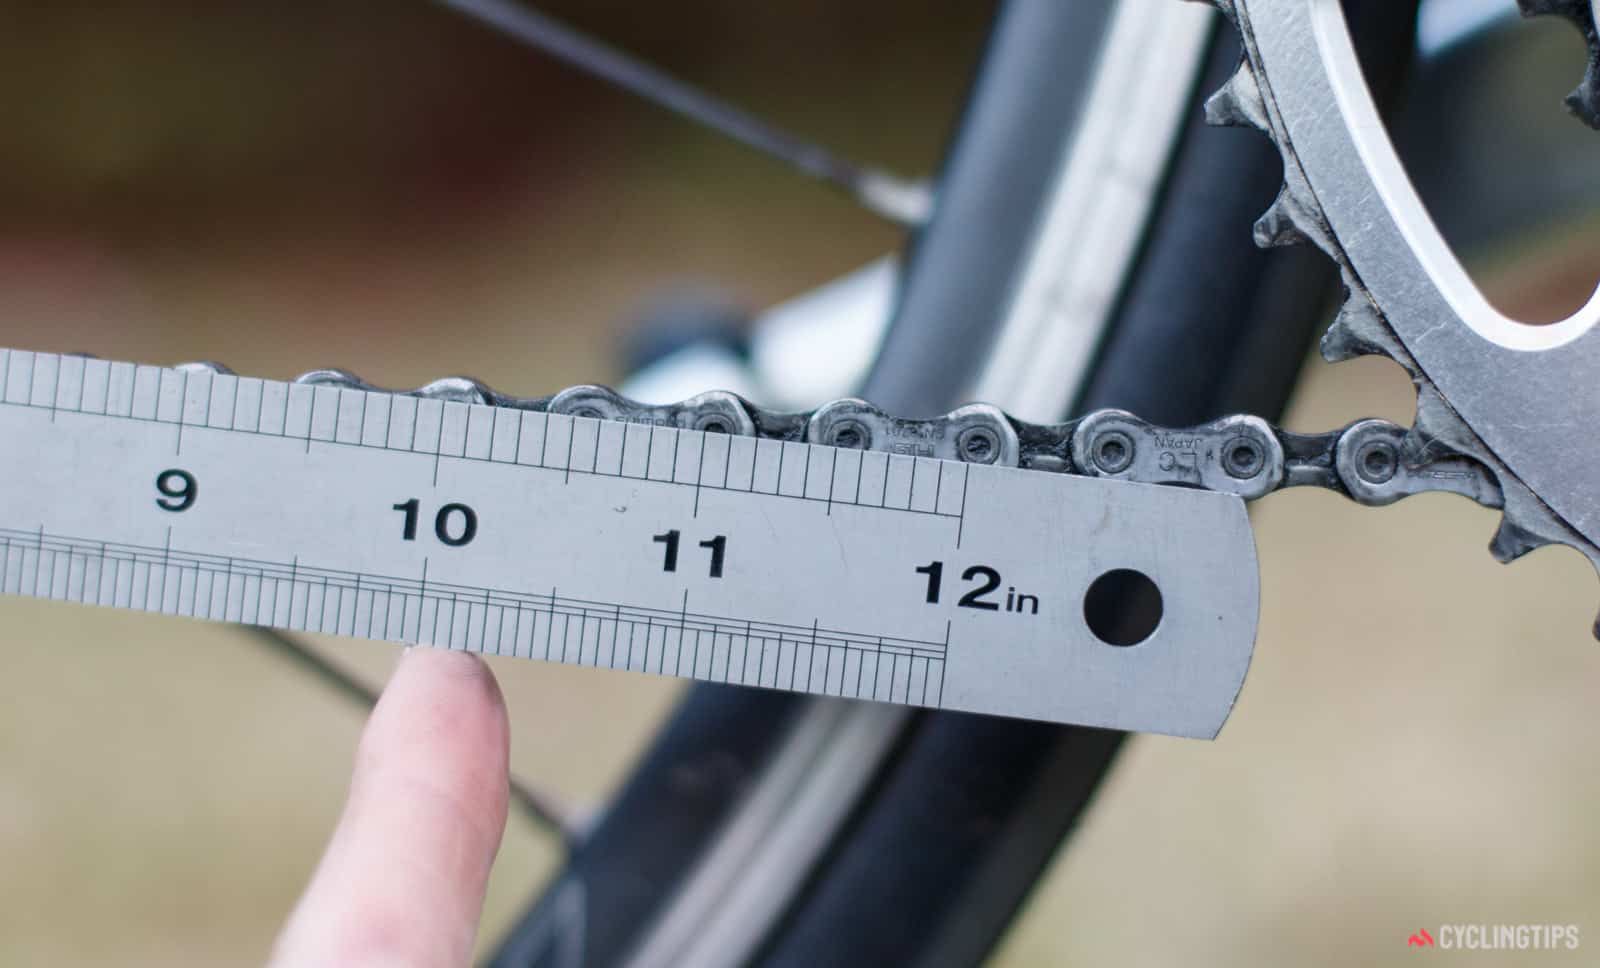
You can also use a ruler to measure 12 full links (an inner and an outer link) from rivet to rivet. The measurement should be 12 inches (30 centimeters). If the length measures 1/12 of an inch (2 millimeters) more than this, you need to replace the chain.
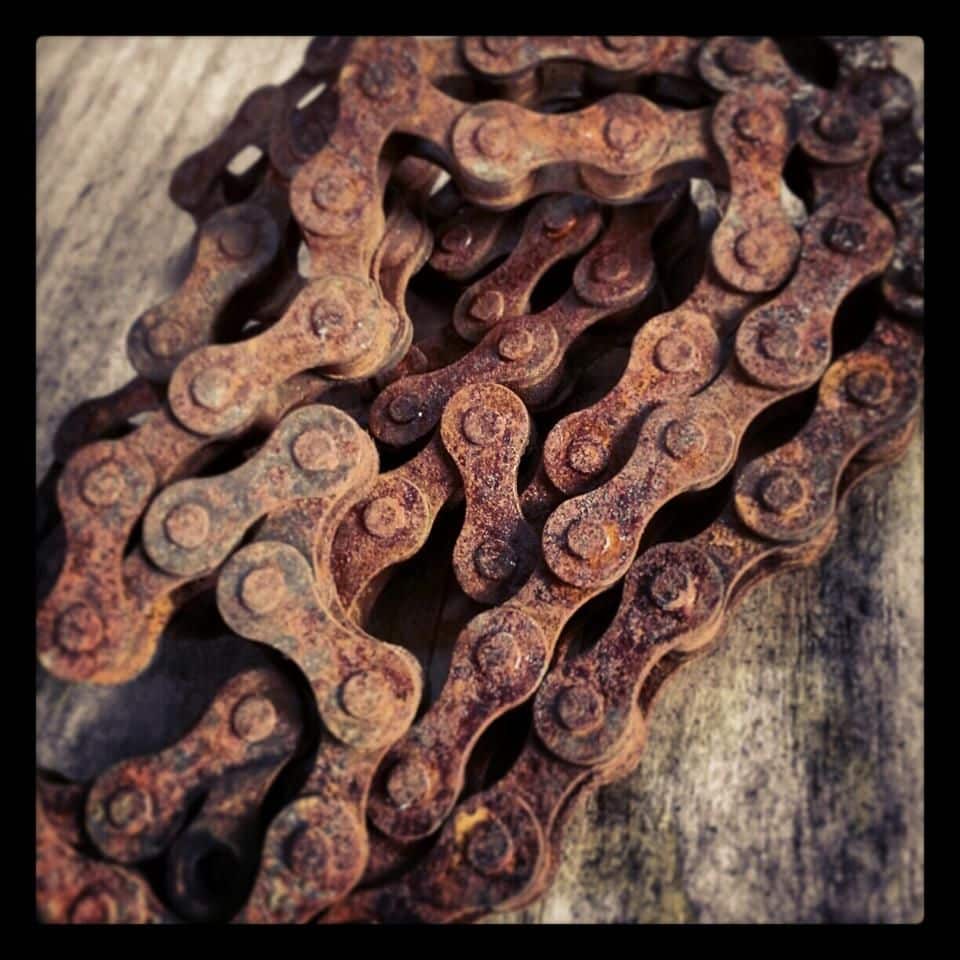
Rusty Links
Another sign you need to replace your bike is when the entire chain is visibly rusty. This usually occurs due to poor bike maintenance. A rusty chain decreases bike performance and wears down the sprockets. The chain is also more likely to snap during rides, so you should check the wear when your bike chain starts getting too rusty. Although you can get rid of the rust with proper cleaning and lubrication using a kit like this, every chain has its limits, and you'll know when it's time to part ways with yours.
Extended Use
There are occasions when you've simply used the chain for too long. Just because the chain still looks fine does not mean it has not reached its limit. This article by Shimano states that a bike chain should be replaced every 2000 miles. This lifespan could even be shorter depending on your cycling pattern and trails.
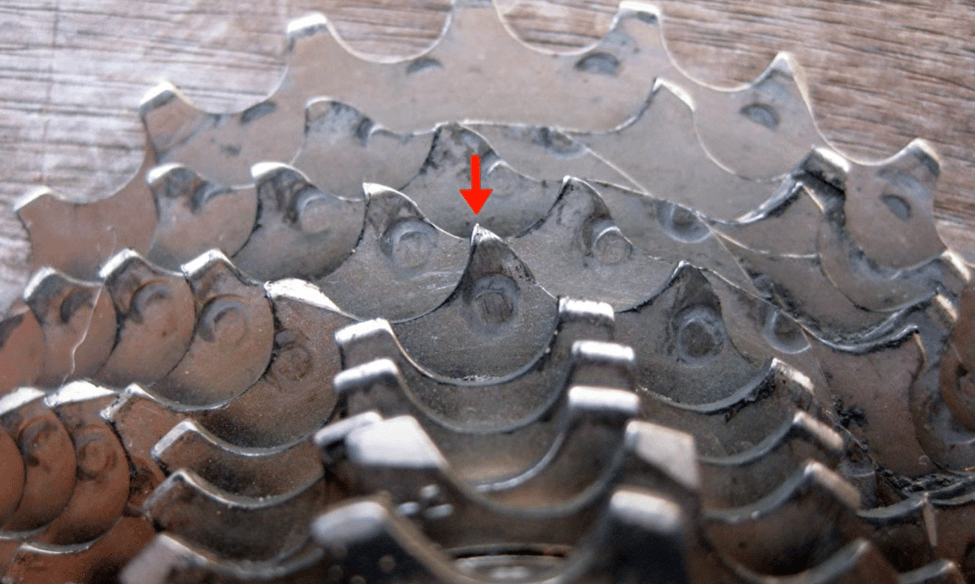
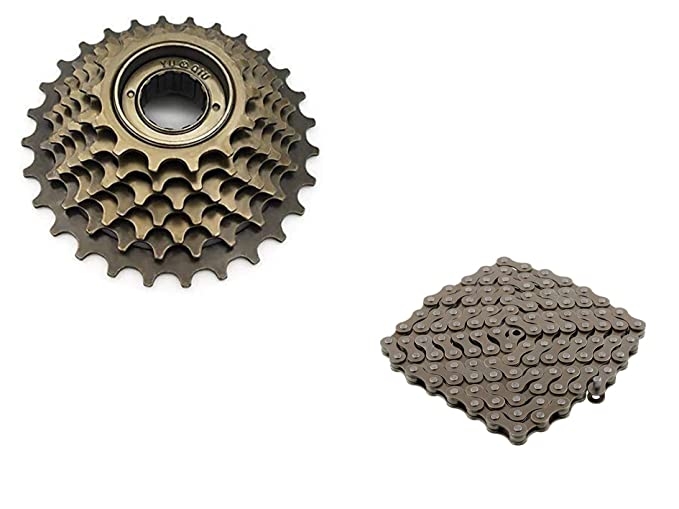
Worn Cogs or Cassettes
While it might not be easy to see the effect of wear on the chain, you can easily see when a cog is worn. A worn cog is usually caused by a worn chain. As the chain stretches, it widens the space between the cog teeth leading to 'shark' teeth. At the same time, a worn cog leads to faster wear on the chain.
Therefore, once you start noticing that a lot of your cog teeth are damaged, it is time to replace the cassette with one like this and possibly the chain. If this is the case then our guide on mountain bike chain installation could be helpful.
How to Replace a Mountain Bike Chain
Knowing how to replace a mountain bike chain is a must for riders. Unfortunately, many tend to ignore the bike chain until it's completely worn out and causing issues.
To replace a mountain bike chain, start removing the old chain by locating the quick chain link and then removing the quick link using the master link pliers. Next, measure the length of the new chain against the old chain and cut the new chain if necessary. Now, thread the new chain through the derailleur carefully and make sure the size of the chain is correct. Finally, join the two ends by inserting a joining link and push until the new link is flush with the outside part of the chain.
Leaving a chain that needs attention can be really dangerous. According to this research paper by the Medical Journal of Malaysia, injuries caused by the bicycle chain can be quite traumatic for riders, commonly leading to soft tissue damage. Therefore, it is important to replace the chain as a regular maintenance routine for maximum protection. In addition, this article by the ARC Journal of Research in Sports Medicine lists the chain among the most hazardous sites on a bicycle, along with the spokes of the wheel and handlebar. To protect your hands while riding, check out our article on mountain bike grip installation and choosing mountain bike gloves with grip.
Thankfully the tools required to replace your mountain bike chain are few and inexpensive. You can check out our ultimate list of tools needed for mountain bike maintenance for more information on assembling a mountain bike tool kit. Here are the tools you'll need to replace your bike chain:
| Tool Needed To Replace A Mountain Bike Chain | Why It Is Needed | Example From Amazon |
| Bike chain | To replace the old chain and efficiently transfer power from your pedals to the rear wheel. | Shimano SLX CN-M7100 12-Speed Chain |
| Chain Wear Checker | To diagnose the level of wear that your chain has undergone. | Bikehand Bicycle Chain Wear Indicator Tool |
| Chain Breaker Tool | To split or connect chains using a connecting pin. Can also be used to loosen stiff links in the chain. | Universal Bike Chain Tool |
| Master Link Pliers | To disengage or attach chains using a master link. | Park Tool Master Link Pliers |
| Connecting Pins | To easily and quickly connect the two ends of a chain. | Shimano 10-Speed Chain Pins |
| Master (Quick) Links | To easily attach and detach the ends of a chain. | Ybn 11-Speed Bike Chain Quick Link |
| Bicycle Cleaning Kit | To clean and lubricate the chain. | Bike Cleaning Kit |
Once you’ve determined that your old bike chain is worn or faulty beyond repair it is time to replace it. Get your tools ready and get started.
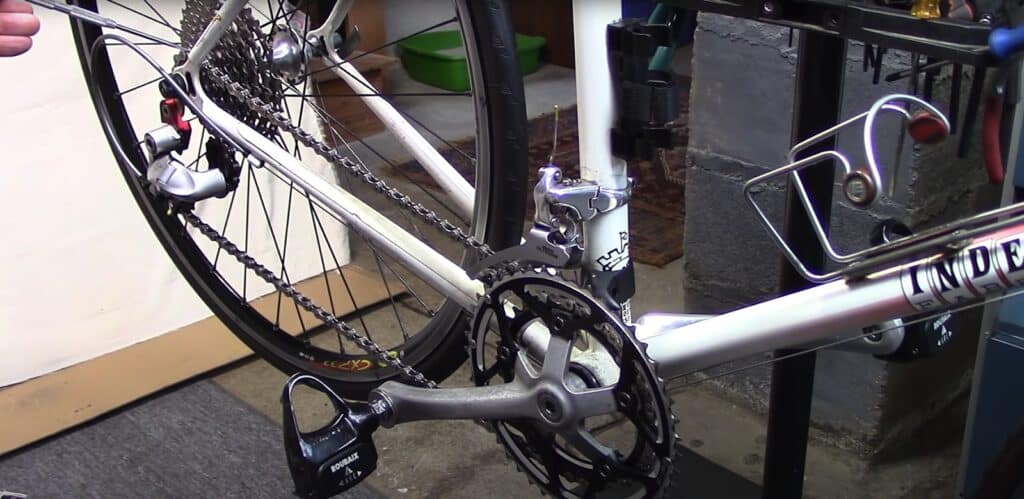
Step 1. Shift to the Smallest Gear Combination
The first step to replacing your bike chain is removing the old one. To make the removal process easier, shift the chain down to the smallest gear combination. That is, move the chain to the smallest front chainring and smallest rear cog.
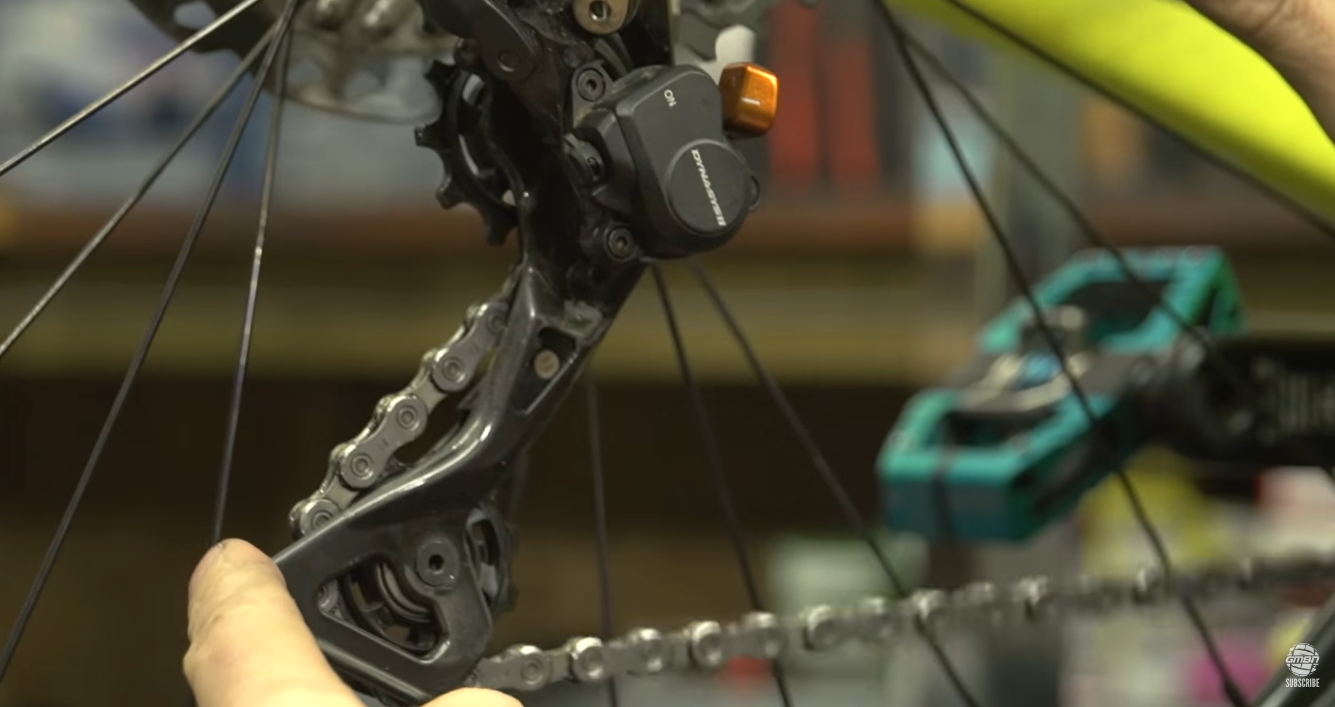
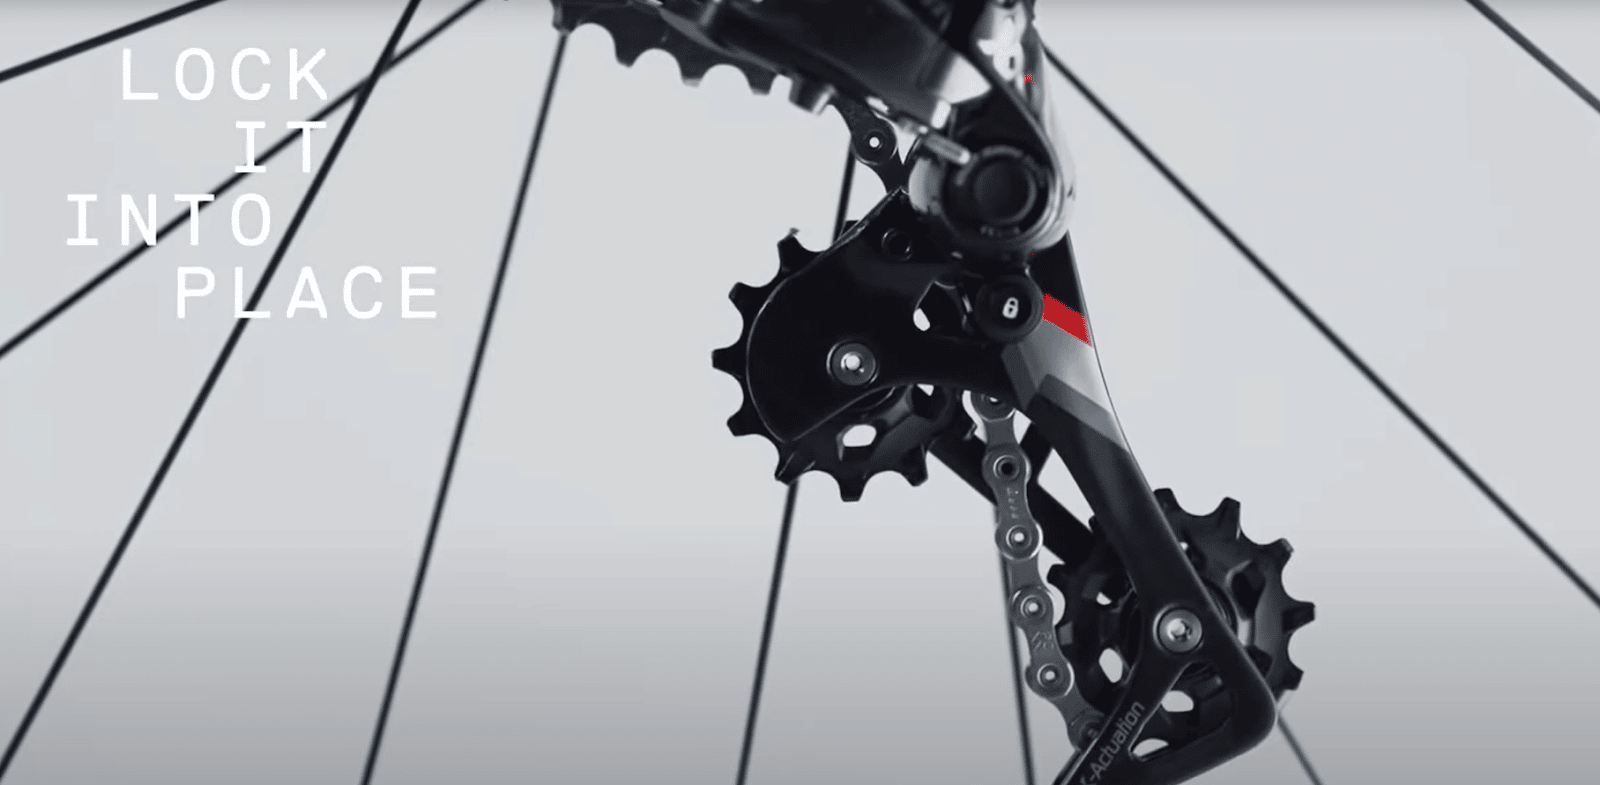
Step 2. Release the Chain Tension
Shimano derailleurs use a clutch mechanism to lock the chain in place and keep it under tension, as this article by Shimano explains. Turning off the clutch frees up the chain for easy removal. On the other hand, SRAM derailleurs have a Cage Lock option which you can engage to loosen the chain, as this SRAM infomercial demonstrates.
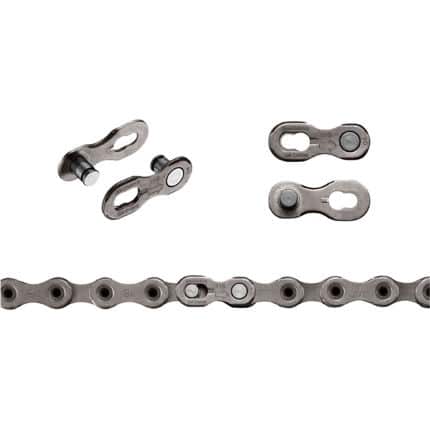
Step 3. Locate the Quick Link or Connection Pin
The next step is checking if the chain has a master link or connection pin system. Check the chain for any link with a different color and design like this. The link will be the quick link. If there is no quick link, then your chain will have a connection pin like these. The pin usually has an indentation for the chain tool. The link with the pin also has a slightly different color from the rest.
Step 4. Split the Chain using a Master Link Plier or Chain Splitter Tool
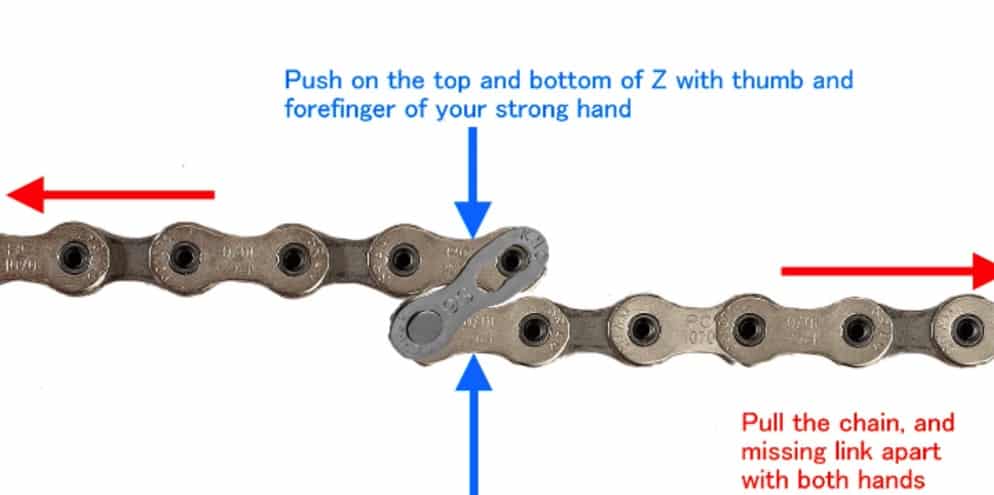
For a chain with a quick link, use a master link plier like this to disconnect it. Push the opposite end points of the link with the pliers and pop the links off.
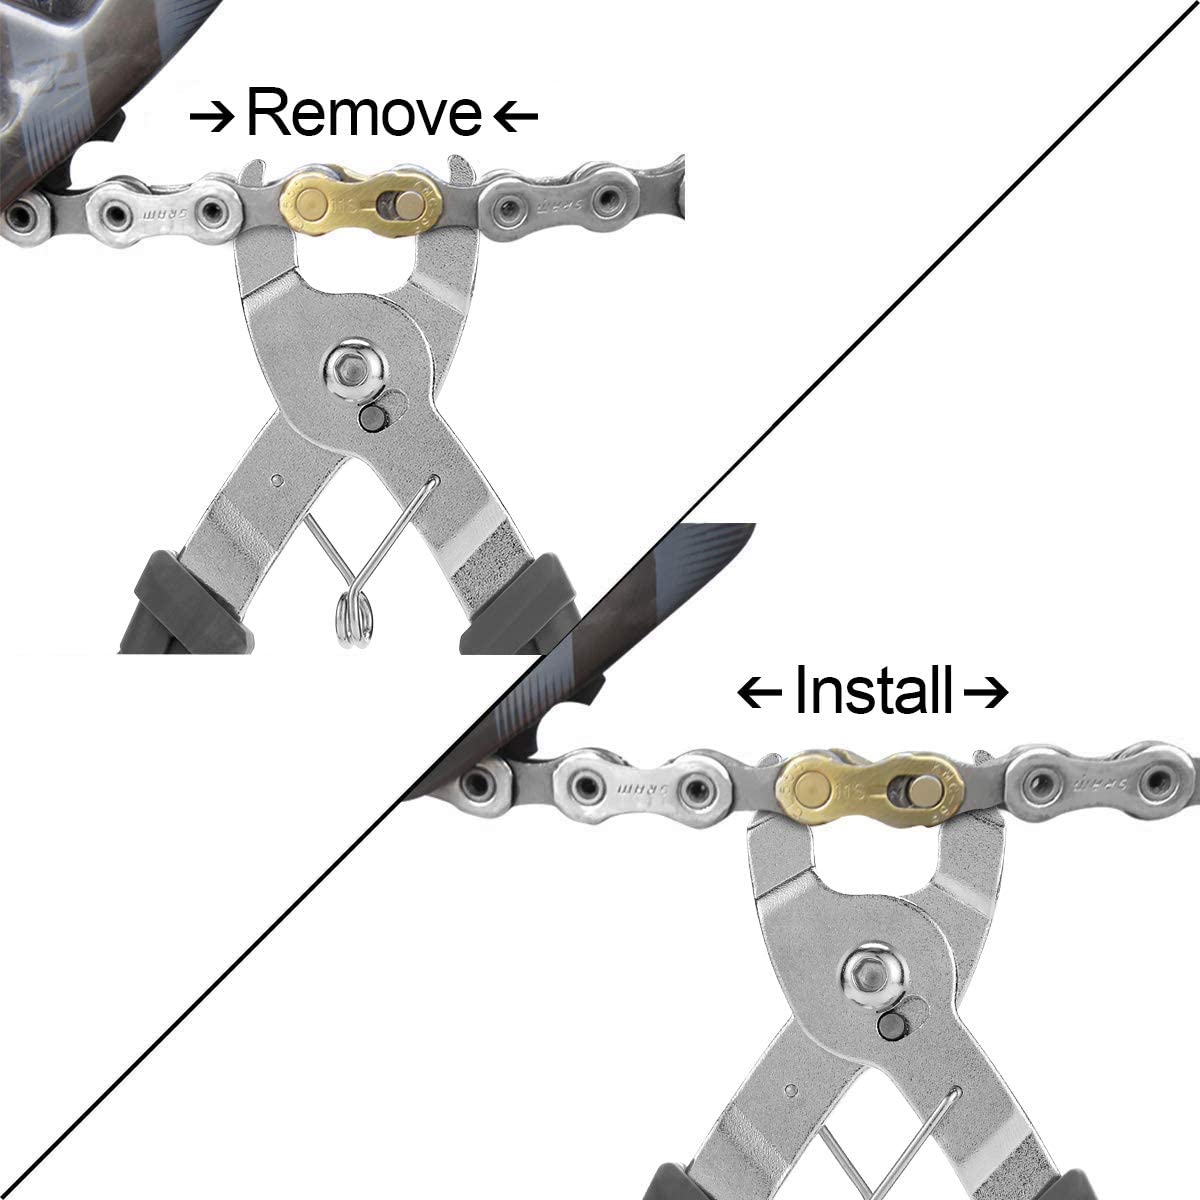
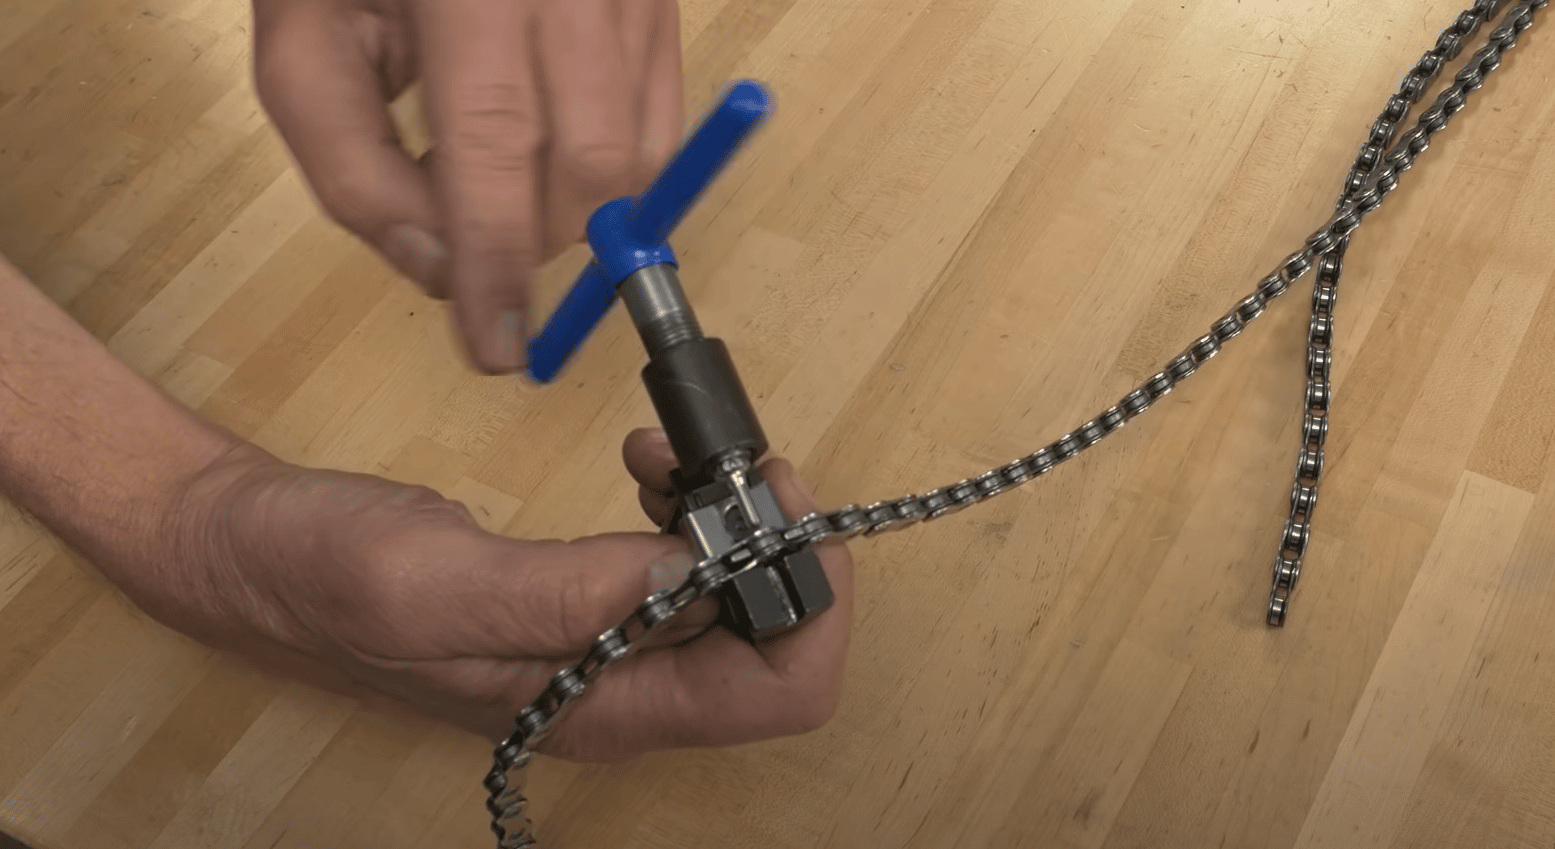
For chains with connection pins, use a chain tool like this to split the chains. Place and align the pin with the chain tool pin. Turn the handle of the tool clockwise to drive out the connection pin. Remove the chain tool from the chain. Make sure not to lose the quick links or the connection pins.
Step 5. Remove the Chain from the Bike
Carefully unthread the chain from the cassette, chainrings, and derailleurs. Then, pull the derailleur away from the cassette to prevent it from snapping into the cassette. Set the old chain aside for now.
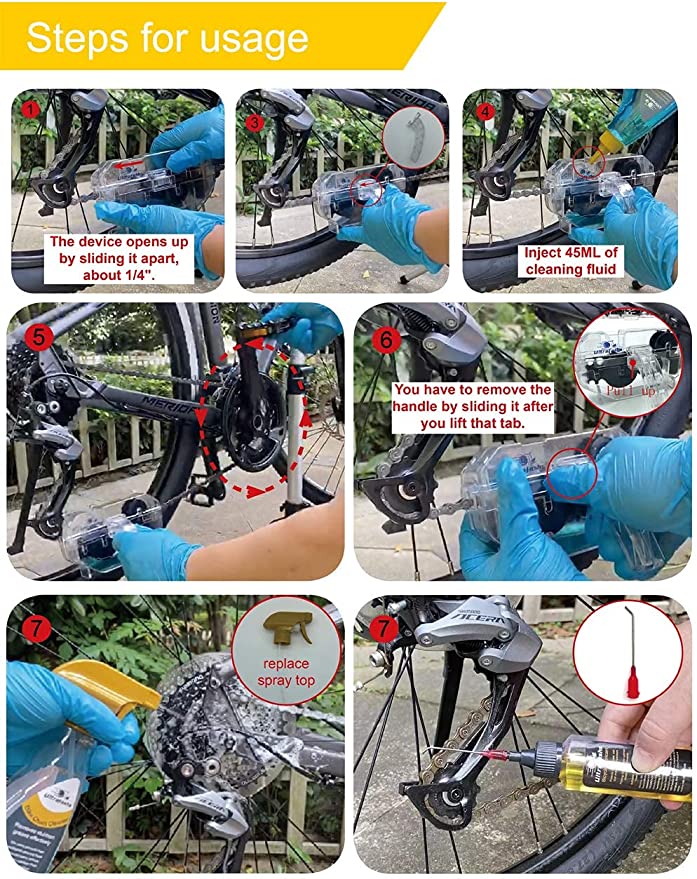
Step 6. Clean the Drivetrain.
Use a neutral detergent and brush to clean the cogs, cassette, and shifters of any dirt and grime. Next, degrease the components with a degreaser like this and re-lubricate the moving parts. This will help increase the efficiency of the drivetrain for your new chain. To protect your drivetrain from being caked with mud and grime, you can fit a fender onto your bike. Check out our article on how to install a mountain bike fender for a comprehensive guide detailing the process.
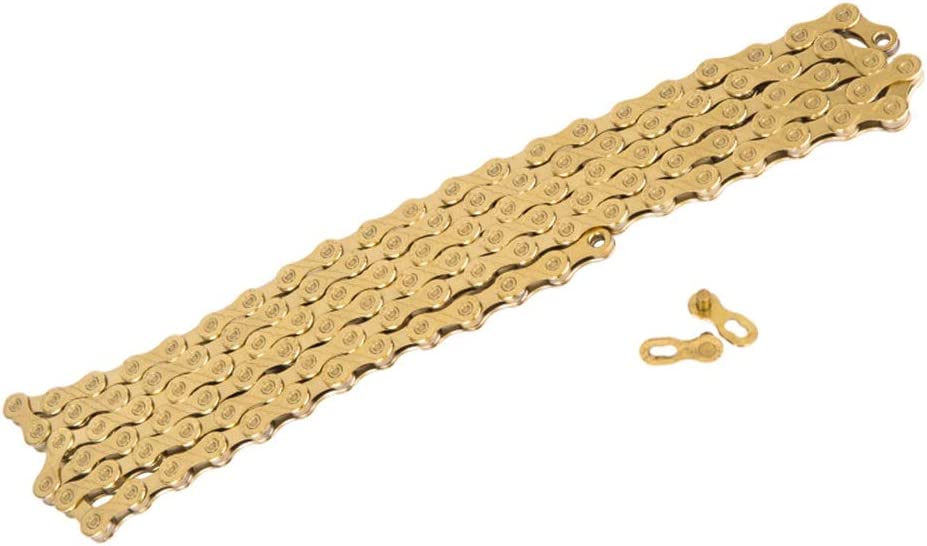
Step 7. Get a High-Quality Compatible Chain
Before purchasing your chain, check the number of rear cogs on your bike to get the cassette speed. Make sure the chain you’re getting has the same speed as the drivetrain. Also, check for the chain manufacturer’s recommendations as some chain brands are incompatible with other brands.
Step 8. Determine the Correct Chain Length
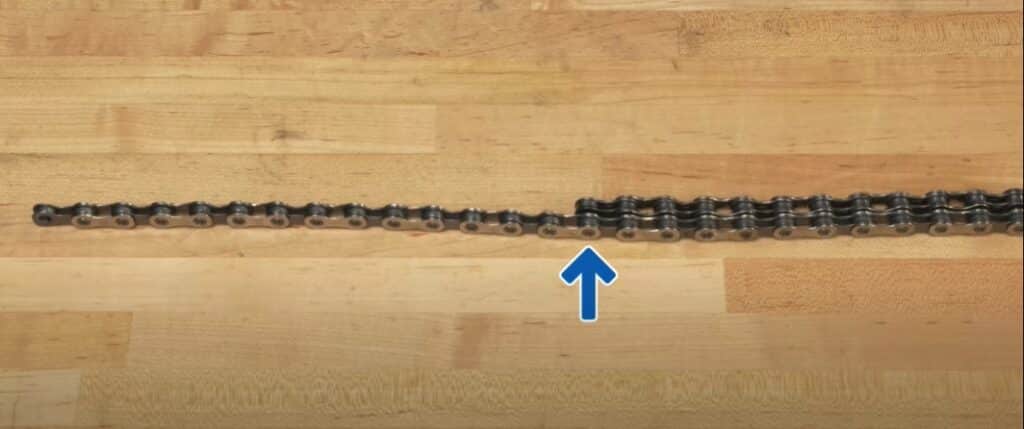
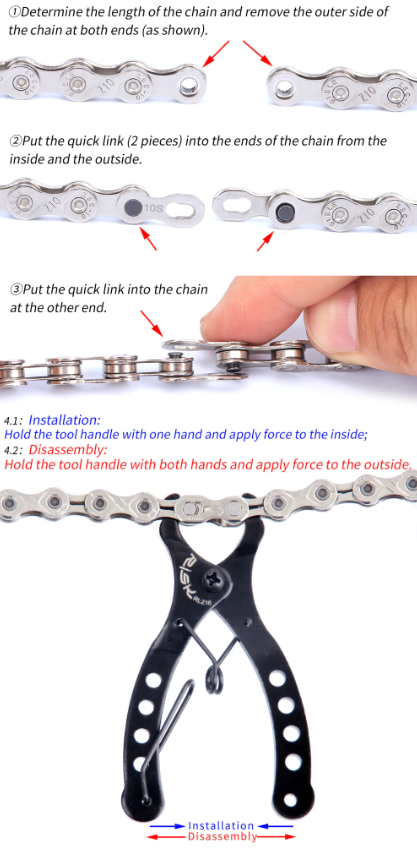
Before installing the new chain, you must obtain the proper chain length for your bike. Then, you can lay your old and new chains side by side and adjust the new chain to the old. Make sure you account for the increased length of your old chain due to wear and tear by making the new shorter by a few links, or just make sure that the new chain has the same number of links as the old one.
Alternatively, you can use a chain length calculation formula to get the accurate length. Here is the formula:
Bike chain length = 2 x Chainstay length + Number of teeth on largest front chainring/4 + Number of teeth on the largest rear cog/4 + 1.
Lastly, you can also use the largest front chainring and largest cog method. Thread the chain over the largest front chainring and largest rear cog and pull them tight together. Add 2 links to the connection point together with the master link to get the accurate length. Mark the spot where the chain should be broken.
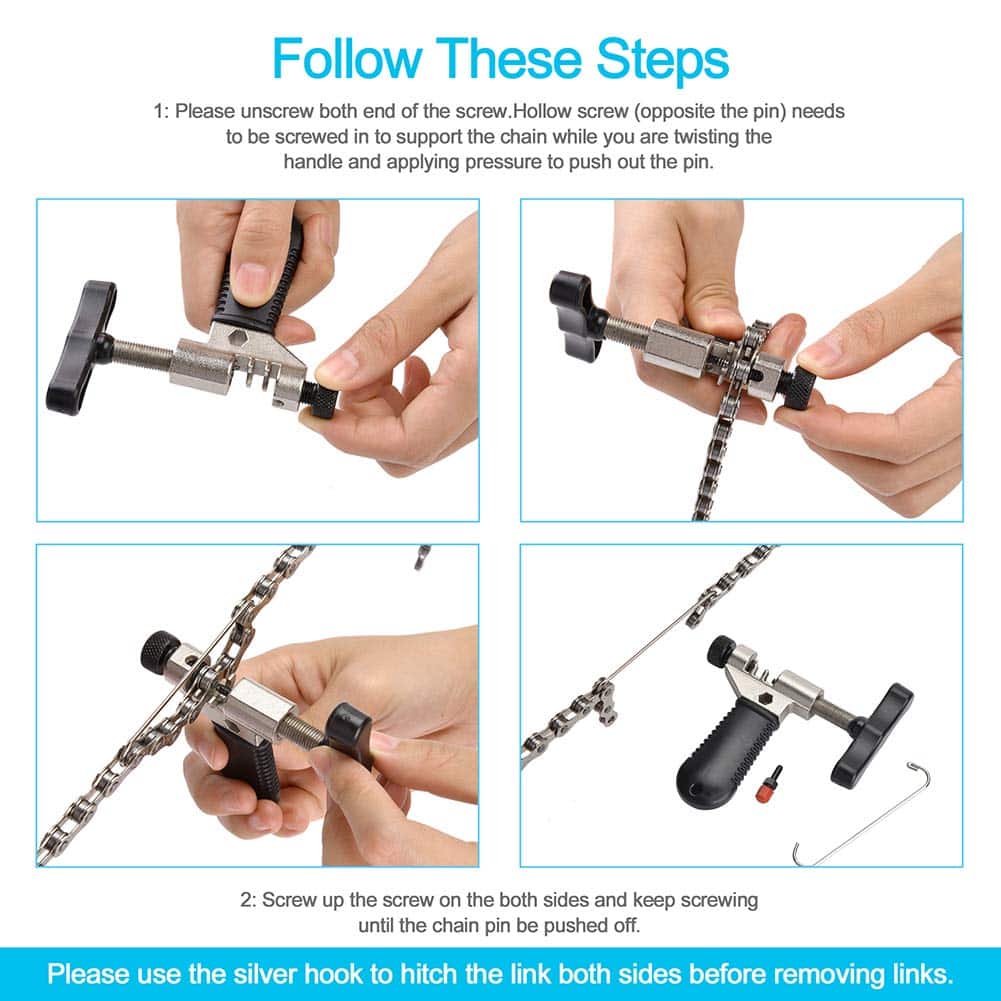
Step 9. Remove any Excess Links from the New Chain
Use your chain tool to break any excess links from the chain. Again, place the chain in the tool slot and connect the chain tool pin with the link pin. Tighten the handle to push out the pin. Be careful not to drive out the pin completely so you can still reconnect the links if necessary.
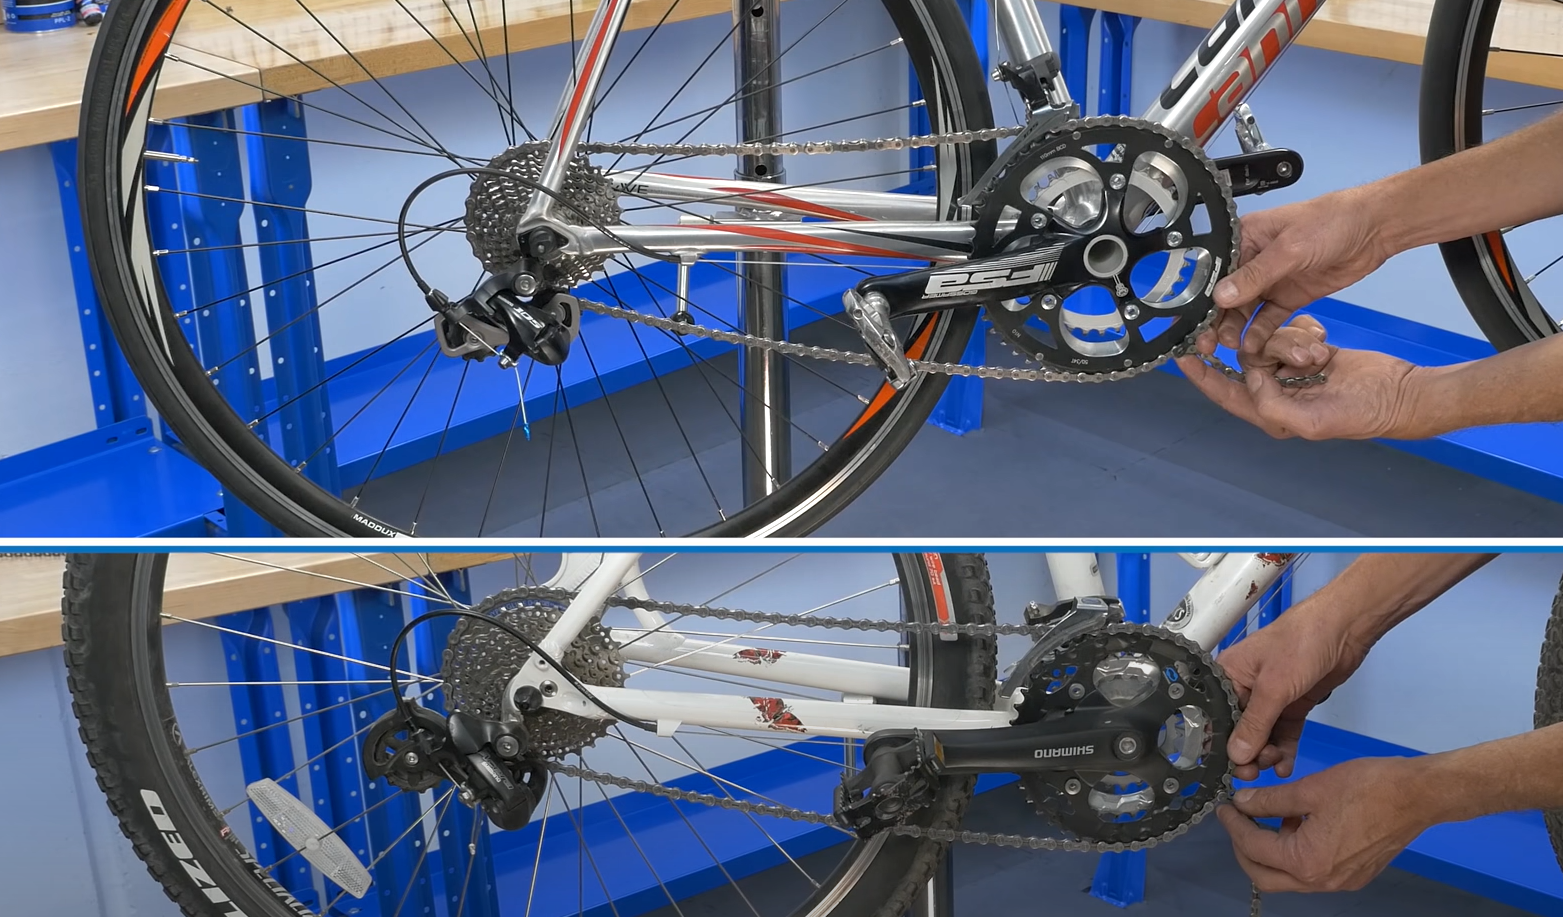
Step 10. Install the New Chain
Now that you have the proper chain length, the next step is to install the new chain onto your bike. First, ensure the derailleur is locked in place, or the clutch is turned off for easier installation. Next, thread the chain over the largest front chainring and through the front derailleur. Then, run the chain across and through the cassette around the smallest rear cog. Next, thread the chain around the upper jockey wheel and through the derailleur cage. Lastly, thread the chain around the lower jockey wheel and bring the two ends of the chain together. Cross-check that the chain runs in the right direction.
Step 11. Connect the Chain with Quick Links or Connection Pins
For chains with master link systems, lubricate the pins of the quick link. Next, slide the halves of the master link onto each end of the chain. You can then squeeze the center of the quick link and pull it together till the link snaps into place. If it proves difficult, you can use a master link plier to attach and snap the link in place.

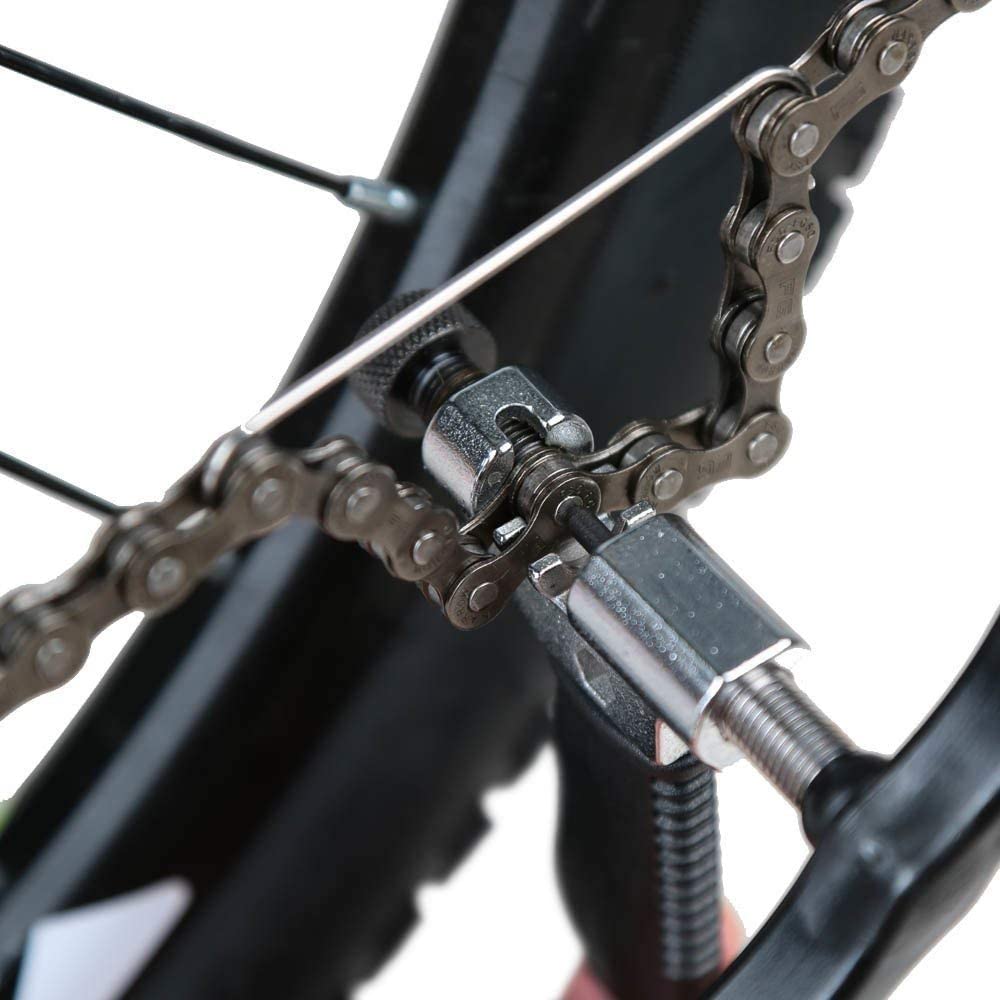
You can use a chain tool for chains with connection pins. Slot the connecting links in between the tool with the pins in place. Turn the handle of the tool clockwise to push the pins through the link. Break off the insertion part of the pin with pliers. See this manual from Shimano for more details.
Step 12. Test the Chain and Drivetrain for Proper Functioning
Check that the chain routes are running in the right direction and are properly installed. Ride the bike and shift the chain through all the gears. Ensure that the tension is right and the chain runs smoothly between gears. Use a chain tensioner like this to adjust the tension if necessary. Test the derailleurs for proper installation and alignment as well.
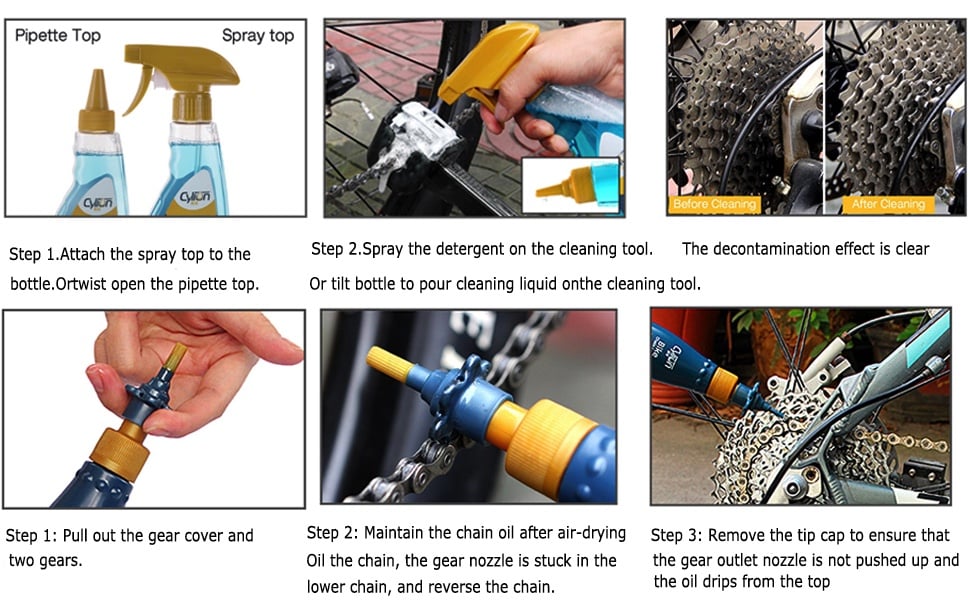
Step 13. Clean and Lubricate the Chain.
Get a cleaning kit like this and clean any dirt and grease off the new chain. Next, degrease and clean the chain with a dry cloth. Then after drying, lubricate the moving parts of the chain. This helps to reduce friction and increase the efficiency of your bike.
Similarly, you may want to take a look at our mountain bike chain guide installation step-by-step guide for more tips and tricks.
Do You Need a Mountain Bike Chain Tool to Change the Chain?
A mountain bike chain tool is an essential bike repair tool for easily disengaging and connecting chains during installation and removal. It can also be used to add or remove extra links from a chain. Additionally, a chain tool can loosen stiff links in a bike chain. Chain tools typically have an outer lot where you place the links and tighten them for connecting and disconnecting chains. They also feature an inner slot for loosening stiff chain links.
No, a mountain bike chain tool is not needed to change a mountain bike chain. The tool makes the process easier, but general-use long nose pliers can also be used to change the chain.
How to Remove a Mountain Bike Chain Without a Tool
The process of installing a mountain bike chain requires you to disconnect the old chain and then connect the new chain. You may also need to add links to or remove links from the chain for it to be the correct length. However, this could be difficult without a tool. Chains with quick links do not need a chain tool as the master link can be attached and detached by hand or with pliers. On the other hand, chains with connection pins will need a tool.
To remove a mountain bike chain without a tool, first use long nose pliers to remove the chain from the chainring, creating slack. Then, check for the quick link and press the two end points of the quick link with the pliers to release the clipping link and remove the chain.
| Tool Needed To Replace A Mountain Bike Chain Without A Chain Tool | Why It Is Needed | Example From Amazon |
| Chain Hook | Helps to release chain tension to help master link pliers work easily. | Chain Hook Stainless Steel |
| Master Link Pliers | Used to attach and detach chains by adding and removing the quick link. | Pro Bike Tool Master Link Chain Pliers |
Step 1. Release the Chain Tension
The first step in removing a mountain bike chain without a tool is to disengage the quick link. However, to make the process easier, it is necessary to release the chain tension and loosen the chain. There are several ways to do this, depending on the bike.
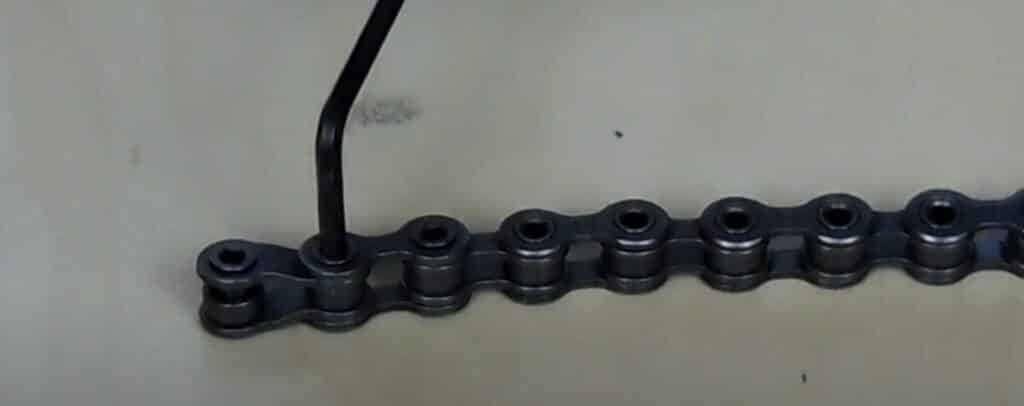
You can take the chain off the front chainrings to loosen it up for easy access. You can also turn off the derailleur clutch mechanisms for drivetrains that have them. For drivetrains with a Cage Lock mechanism, you can lock up the derailleur to make the chain slack. The last option is to use a chain hook like this to make the portion of the chain you're working on slack.
Step 2. Find the Quick Link
The quick link is usually quite easy to find in the chain. Check for any link with a different color and design from the rest. You can also run your fingertips over the chain on both sides to feel for the quick link. If you do not find any quick link, then your chain might have a connection pin system instead.
Step 3. Use Your Hands to Disengage the Quick Link
Before using pliers, try using your hand to detach the quick link. After finding the quick link, hold and compress the center of the link. Then push the ends of the link towards each other to unfasten the two halves of the quick link. This usually splits the chain for easy removal. However, some quick links might be difficult to take apart by hand. That's where the master link pliers come in.
Step 3. Use the Master Link Pliers to Disconnect the Quick Link
Master link or long nose general-use pliers can be used for chains with stiff quick links. This is especially true for chains with tighter tolerances, like 10-speed chains or higher.
To use the pliers to disengage your quick links, first place the endpoints of the quick links between the jaws of the pliers. Next, apply pressure on and squeeze the handle of the pliers. This pushes the corners together and should snap the quick link out of place. Finally, keep the quick links aside as you might need them for a new chain.
Step 4. Remove the Mountain Bike Chain
After disconnecting the quick links, remove the chain from the drivetrain components. Lock your derailleur or turn off the clutch mechanism to make this process easier. Then, unthread the chain from the front chainrings, cassette, jockey wheels, and derailleurs.
Choosing a Mountain Bike Chain Size Before Buying
The most important part of replacing your chain is getting the right mountain bike chain size. For optimal chain compatibility, you must approach this process carefully. The price of the chain you purchase will vary based on the chain's size, type, brand, and quality.
To choose the right mountain bike chain size for replacement, select a chain that increases efficiency, that has a speed rating that matches the MTB cassette speed, that has a quality coating to maximize durability, that is a high-quality chain, and that is easy to install.
1. Select an MTB Chain Style that Increases Efficiency
There are different types of mountain bike chain styles and the one you choose depends on your needs. The best chain for your bike compensates for your bike's insufficiencies and works smoothly to propel your bike forward.
If you need a lighter chain that works well with long-dropout bikes, then the standard full-link chains might be for you. However, you'll have to compensate for the decreased adjustability. On the other hand, half-link chains are best for single-speed bikes with shorter dropouts. Riders that are particular about precise settings on the bike will also prefer this style. While reading this you may be thinking that you need to upgrade your bike, in which case our article that addresses what mountain bike you should buy could be a handy resource for you.
Hollow pin chains work out for riders that want a lightweight option or bikes that are already heavy enough. On the other hand, solid pin chains are great for riders that need a strong chain and are not bothered by the extra weight.
2. Choose a Chain With a Quality Coating to Maximize Durability
Another factor to consider when purchasing your bike chain is the coating on the bike. The durability of your bike chain depends on its coating. Most bike chains use a high-end coating to enhance longevity. Chains like this have a Titanium Nitride coating, while others like this have Nickel plating. Some coatings help to reduce the effect of corrosion, some help the chain to be dust resistant, and others are added just for aesthetics.
Additionally, each chain manufacturer makes use of special brand coating treatments to improve the quality and durability of the chains. For example, according to the article by Shimano, the brand uses 'Sil-Tec' for its top-tier chains. The coating enhances water and dirt resistance, drivetrain efficiency, and shifting performance. This page on the KMC site lists the major quality coatings on their bikes which includes EcoProTeQ (EPT), Diamond Like Coating (DLC), Titanium Nitride (Ti-N), BlackTech, and Nickel plating.
Take note that the type of coating used will also factor in determining the price of the bike chain. Also, note that having a quality coat does not take the place of regular cleaning and lubrication of your bike.
3. Check Chain Speed Compatibility
Chains usually come with the chain speed labeled on the packaging. You can also check your cassette speed by counting the number of gears your bike has. You must purchase a bike chain that is compatible with your drivetrain speed. This is because the cassette speed increases, the cogs get thinner, and the width between them gets narrower. Also, different chain speeds have different standard sizes, as shown in the chart below.
As a result, you must be careful to choose the proper chain for your cassette/chainring set. For instance, an 8-speed chain like this on a 12-speed cassette will not fit properly and will likely slip off frequently. However, some chain speeds are interchangeable. For example, 8-speed chains can be used on 6 and 7-speed cassettes. We recommend checking the chain manufacturer's recommendations before combining chains and cassettes of different speeds.
4. Don't Buy a Cheap Chain that Will Break Easily
The price of your chain will depend on the speed, size, quality, coating, type, and manufacturer brand. High-end chains are usually more expensive than basic chains. In addition, the higher the chain speed, the more expensive the chain is. To get the best quality chain for your money, choose a trusted brand and ensure the chain is fully compatible with your drivetrain. Most chain manufacturers will recommend getting chains of the same brand as the drivetrain for optimal compatibility. The bike chain should also be durable and efficient.
5. Select a Chain that's Easy to Install
There are two main connection styles on the bike chain – the master link system and the connection pin system. Both systems have different strengths, so the one you choose is up to your preference and whichever is available. That said, the quick links are a bit easier to install and do not require using a chain tool, unlike connection pins.

Mountain Bike Chain Size Chart
As stated earlier, getting the right chain size and speed for your drivetrain is important. This ensures full compatibility between the components. Below is a bike chain chart to assist you in choosing the right chains for your bike.
| Drivetrain | Chain Length (in) | Chain Width (in) | Chain Example from Amazon |
| 5/6/7/8 Speed | 9/32″ | 3/32″ | Zonkie 5/6/7/8 Speed Bike Chain |
| 9 Speed | 1/4″ – 9/32″ | 11/128″ | Kmc 9 Speed MTB Chain |
| 10 Speed | 1/4″ – 9/32″ | 11/128″ | Sram Pc P-Lock 10-Speed Bicycle Chain |
| 10 Speed Narrow | 7/32″ | 11/128″ | Campagnolo Record 10-Speed Ultra Narrow Chain |
| 11 Speed | 7/32″ | 11/128″ | 11-Speed Bike Chain for Mountain Bike |
| 12 Speed | 13/64″ | 11/128″ | Shimano SLX CN-M7100 12-Speed Chain |