
How To Make Your Mountain Bike Look Cool
Biking has become an outlet for many riders to improve their state of health and be a part of an active community. However, since many bikes come in monotonous designs, finding a bike that best reflects your artistic expression might prove challenging. If you find yourself in this situation don’t worry because we’ve got you covered. This article covers simple yet significant ways to make your mountain bike look cool.
To make a mountain bike look cool add custom decals, stem caps, special spokes, bar tape, and paint.
According to this article by the International Mountain Bicycling Association, about 40 million Americans engage in mountain biking annually. If you’d like to join the MTB train and are wondering what mountain bike you should buy, our article details what to look out for when choosing a bike.
Try these tips to change the look of your mountain bike:
Tip 1. Add Custom Decals
Bike stickers, also called bike decals, are one of the most affordable ways to give your ride some extra oomph! Decals are temporary accessories available in various shapes, sizes, colors, and designs. If you ever get bored of seeing a design on your bike, you can switch it out for a new one that best mirrors your current taste and preference. Aside from the aesthetic benefits bike stickers offer, you can also use decals to identify your bike readily.
To add custom decals first choose where they are going to go and clean the surface, then apply the decal and remove the protective film, and lastly use masking tape to line up other stickers if necessary.

Materials Needed To Add Decals
| Material Needed | Why You Need It | Example From Amazon |
| Bike decals | To be applied onto your chosen area | Mountain Bike Stickers |
| Cleaning fluid | To clean the bike before application | Muc-Off Bike Cleaner |
| Microfiber cloth | To wipe any residue from the chosen surface | Amazon Basics Microfiber Cleaning Cloths |
| Masking tape | For ease of alignment if you’re adding more than one sticker | Amazon Basics Masking Tape |
You can also make your bike look cool by learning all of the different tricks a mountain bike can do. Be sure to read our related article to find out more.
How To Apply Decals to a Bike To Make an MTB Look Cool
After all the necessary materials have been organized and are ready, you need to ensure you’re in a reasonably stable environment, usually one without heavy wind and dust that could affect the application process. Then follow these steps:
Step1. Choose the Position for Your Decal and Prepare the Surface
Decide where you intend to apply your bike decal and clean the area properly. To clean the bike: spray your selected area with cleaning fluid and wipe off any excesses with a microfiber cloth. A cleaning agent like this will remove any muck or grime from your bike, which might interfere with the sticking agent while wiping with a microfiber cloth will remove residue and won’t leave any lint after the wipe.
Step 2. Apply the Decal to the Bike’s Surface
After cleaning the bike surface and leaving it to dry, peel off the backing of the bike decal. Note that most bike decals have an extra film over the design to protect the sticker during the application, don’t remove this film until after application. Place the sticky part of the decal on your bike and apply mild pressure over it. The pressure should be transferred from the center of the sticker to the edges. This motion will reduce the likelihood of air bubbles trapped under the decal and make your sticker look much more polished. Finally, carefully peel off the protective film from the surface of the sticker.
Step 3. To Apply More Stickers Use Masking Tape to Line the Stickers up Properly
If you want to add another bike decal in the same area and want a bit of uniformity, you may use a painter’s masking tape to improve alignment. Use the masking tape to make sure that the stickers are lined up and arranged the way you would like them to be and then repeat the prepping process and place the second decal in your chosen area.
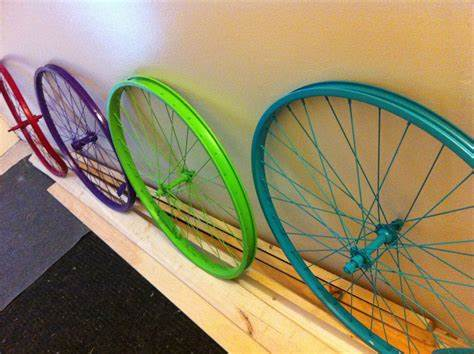
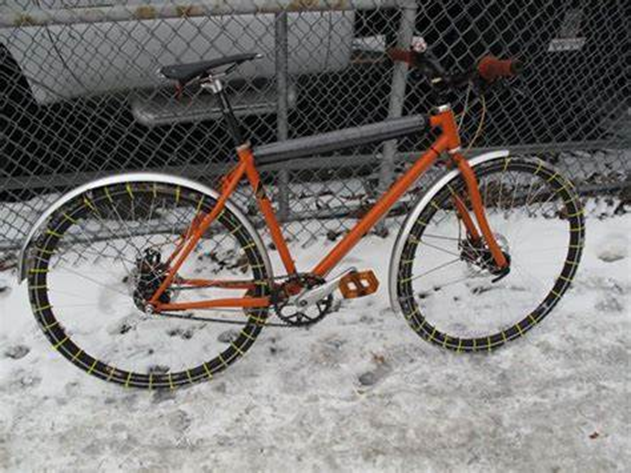
Tip 2. Modify the Spokes By Painting Them
Aside from being such a fundamental part of your bike, spokes are also a great way to showcase your artistic individuality. Spokes are the most noticeable components in your bike’s wheels. Hence, customizing these components would leave a lasting impression.
Modify the spokes by cleaning and preparing them, cover all parts that should not be painted, spray paint the spokes and rim, and lastly use a clear sealant to protect the paint.
This research from the International Journal of Wind Engineering and Industrial Aerodynamics explains that the aerodynamic characteristics of spoked wheels generally impact the overall cycling performance.
Spray painting your bike spokes is a creative way to improve your bike’s overall appearance and make it stand out. It is vital to make sure your chosen paint is suitable for metals. This is because the coat of paint also serves as a protective layer on your spokes, protecting your rods from environmental elements and increasing their longevity.
Materials Needed to Add Custom Spokes
| Material Needed | Why You Need It | Example From Amazon |
| Wire brushes | To clean the spoke rods | Muc-Off Bike Brush Set |
| Degreaser | To remove built-up dirt and grime | Finish Line Speed Degreaser |
| Spray paint | To paint the spokes | Krylon Metallic Paint |
| Masking tape | To cover unwanted paint areas | Amazon Basics Masking Tape |
| Clear sealant | To protect the paint on the spokes | RustOleum Aerosol Spray |
How To Spray Paint Bike Spokes To Make An MTB Look Cool
Follow these steps to paint your bike’s spokes:
Step 1. Clean and Prepare the Spokes
Before painting, it’s essential to clean and prepare the spokes. Use a wire brush to clean out any dirt or debris, then apply some degreaser on the rods to remove any grime. Wipe off the residue from the spokes and leave it to dry for some time.
Step 2. Cover all Parts That Must Not Be Painted
After cleaning, cover up the wheel rim, hub, and any area you wouldn’t want paint getting on with masking tape. After masking these areas, apply primer to the bike spokes. This will let the paint adhere to the surface and last longer.
Step 3. Spray Paint the Spokes
Paint the spokes in your desired color. Be careful not to apply too much paint so that it doesn’t run. It’s advisable to paint thin coats and wait for a coat to dry before applying the next one. Finally, apply a coat of clear sealant to prevent the paint from chipping off.
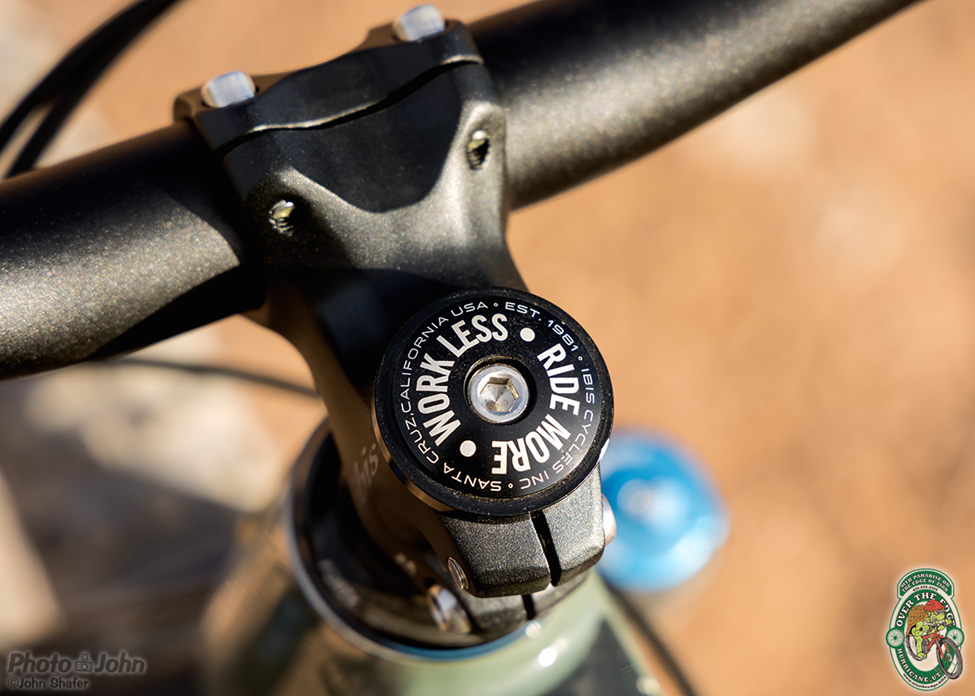
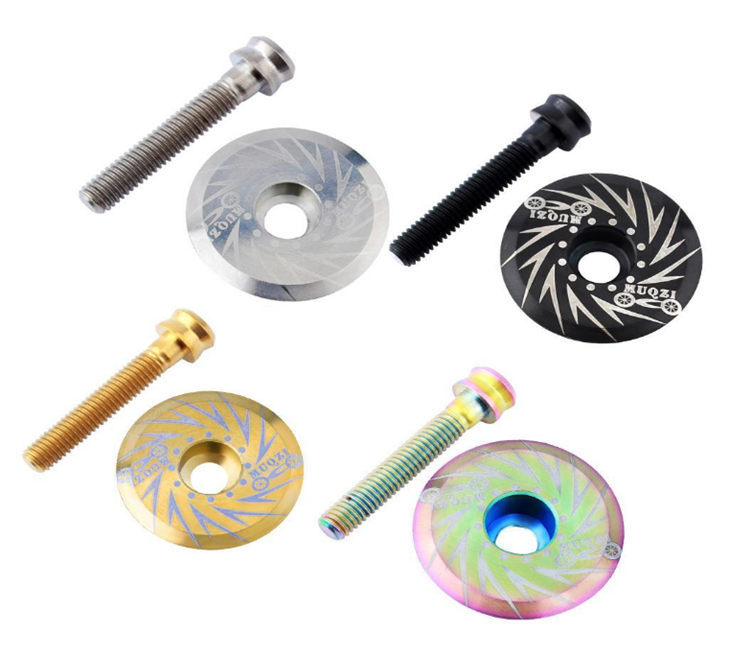
Tip 3. Replace the Stem Caps
Another subtle way of customizing your bike is by switching up your bike stem caps. The headset caps, also called the stem caps, are responsible for adjusting the preload on your headset bearings.
Also, according to an article by Dispatch Bike, since headset caps cover the top of the cut steerer tube, stem caps indirectly reduce the risk of riders sustaining injuries.
From an aesthetic point of view, bike stem caps are one of the most visible parts of your bike. You’ll spend time looking at your bike stems, especially when climbing. Give yourself an excellent view by switching up the outlook of your stem with uniquely designed caps.
Materials Needed To Add Stem Caps
| Material Needed | Why You Need It | Example From Amazon |
| Bike stem cap | To fix onto the stem | Dubbs Headset Top Cap |
| Allen wrench | To remove the stem cap bolt | MulWark Allen Wrench Set |
| Hex wrench | More suitable for hex-pattern stem cap bolt | Amazon Basics Hex Wrench |
| Screwdriver | To loosen the stem cap | Mlt10 Bike Multitool |
| Thread locker | For added protection by keeping the stem cap in place | ThreadLocker |
How To Install Stem Caps to a Bike for a Look That’s Cool
Once you’ve got the necessary materials, it’s time to begin the process:
Step 1. Loosen the Bolt of the Original Bike Stem Cap
First, loosen the bolt of the old bike stem cap. Depending on the shape of the bolt, you can do this with an Allen wrench or a Hex wrench.
Step 2. Remove the Bolt
Next, remove the stem cap bolt. Once your stem cap bolt is off, you may remove the stem cap. If this proves difficult, you may use a flathead screwdriver to pry the cap head off. Take care not to apply too much force, as this could damage the surrounding cockpit areas. After removing your old bike stem cap components, it’s time to put in the new cap.
Step 3. Position the New Cap and Attach it Using the Bolt
Position the new stem cap and thread the bolt through it and tighten it with the Allen wrench or screwdriver. Make sure not to tighten too much. For an added protection layer, you may add some thread locker onto the thread of the bolt. This will prevent the stem cap from loosening and keep it in place during rides.
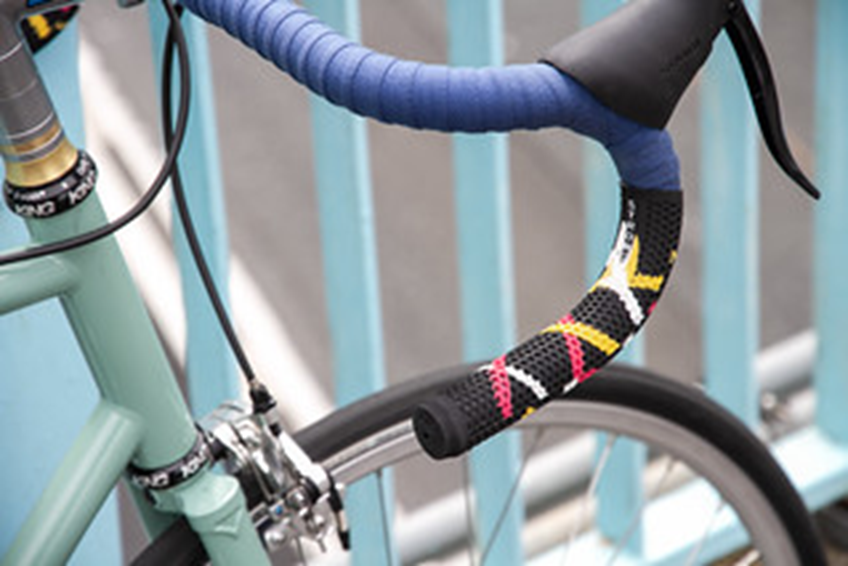
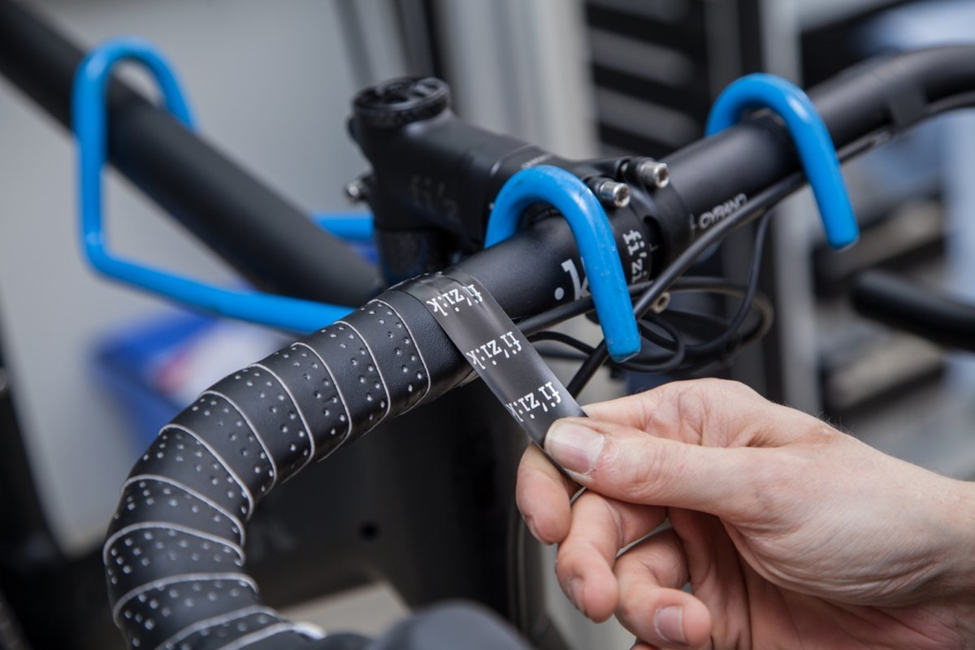
Tip 4. Add Unique Bar Tape
Another subtle way to customize your bike to make it more remarkable is by adding a bit of pizzazz to your handlebars. And what better way to revamp your handlebars than with some good old-fashioned bar tape? Handlebar tapes come in virtually any color, theme, and design. Bar tapes are also reasonably affordable and pretty simple to apply yourself.
To add bar tape remove the bar end plugs and lift the brake lever hood, then wrap the bar, and tuck the end into the bar and finish it off nicely.
Most riders prefer using bar tape on drop handlebars over flat options as they tend to do a better job at highlighting the tape design. If you need insight on choosing the right handlebar our tips and tricks for choosing MTB handlebar upgrades will prove useful.
Materials Needed to Add Unique Bar Tape
| Material Needed | Why You Need It | Example From Amazon |
| Utility scissors | To cut the tape | Amazon Basics Scissors |
| Bar tape | To wrap the handlebars | Domain Cycling Tape |
How To Add Unique Bar Tape To Make an MTB Look Cool
This is how you can add bar tape to your handlebar:
Step 1. Remove the Bar End Plugs and Lift the Hood of the Brake Lever Up
First, remove the bar end plugs and flip the hood of the brake lever upwards so that it is out of the way for the installation of the tape.
Step 2. Start Peeling the ADhesive Paper and Position the End of the Bar Tape
Next, peel off the adhesive paper from the back of the tape. Place one end of the bar tape around the handlebar, leaving about half an inch of the bar tape extended beyond the handlebar.
Step 3. Wrap the Tape Around the Handlebar
Next, slowly wrap the tape in a clockwise direction around the handlebar making sure that it overlaps.
Step 4: Finish It Off Nicely.
Once you’re done wrapping, tuck the extra tape into the handlebar and firmly push in the bar end plug. Continue wrapping the tape evenly around the handlebar until you’ve gotten around the length of the metal. Finally, cut a strip of extra bar tape and wrap it around the back of the brake lever for a more finished look.
You may also just need to add some mountain bike handlebar warmers. If that's the case, be sure to read our related article for more information.
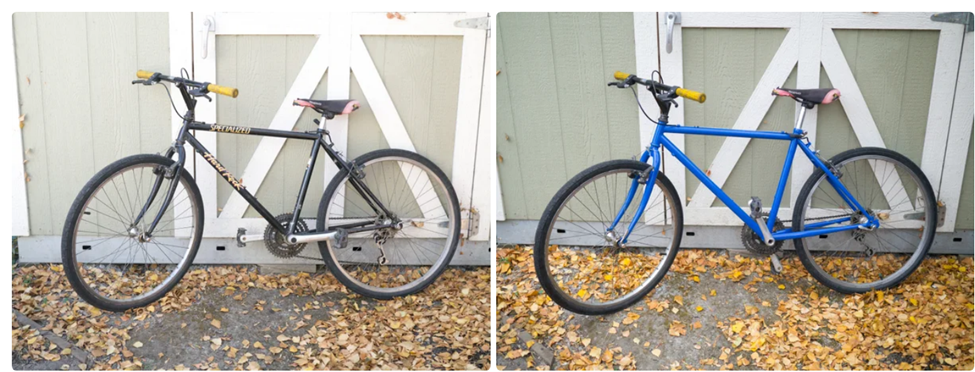
Tip 5. Paint the Frame
To make your mountain bike look cool, repaint your bike frame. your bike frame is what gives your bike its shape and holds all the components together. After a while, it’s common for your bike frame to get banged up and lose its shiny new look, and repainting the bike frame is a great way to give your bike a cool revamp.
To paint your frame, remove all removable parts, clean the frame surface, apply multiple coats of spray paint, leave it overnight to dry thoroughly, apply three coats of clear sealant, and re-attach all the parts to the frame.
Materials Needed To Paint the Bike Frame
| Material Needed | Why You Need It | Example From Amazon |
| Spray paint | To apply paint on the frame | Krylon Metallic Paint |
| Clear coat | To add a protective coating to the paint | RustOleum Aerosol Spray |
| Allen wrench | To take off the brake and bar stem | MulWark Allen Wrench Set |
| Chain tool set | To remove the bike chain | Akraf Bike Link Plier + Chain Breaker Splitter Tool + Chain Checker |
| Socket wrench | To remove the crank arms | Maxpower Socket Wrench Set |
| Crescent wrench | To remove the front fork | Crescent 4" Adjustable Wrench |
| Sandpaper | To sand the surface of the old paint | Fandeli Sheets |
| Degreaser | To remove dirt and grime | Finish Line Speed Degreaser |
| Microfiber cloth | To clean the frame surface | Microfiber Cleaning Cloths |
How To Paint the Bike Frame To Make an MTB Look Cool
This is how you paint the bike frame:
Step 1. Remove Everything That Is Attached to the Bike Frame
The first step to painting your bike frame is to remove all the components attached to the metal. Meaning the saddle, handlebars, wheels, and every other part that comes off. You may use the above-stated tools to do this. However, if you have difficulties removing certain parts, you may cover such areas with a plastic bag and masking tape.
Step 2. Clean the Surface of the Bike Frame
Once the bike frame has been reasonably stripped, apply some degreaser on the surface and wipe off any dirt with a microfiber cloth. Next, use fine-grit sandpaper to gently roughen the frame. The sandpaper would help eliminate some of the old paint and make the new paint stick on the surface much better. After sanding, wipe off the surface with a damp cloth to remove the debris.
Step 3. Apply Multiple Coats of Paint
Once cleaned, there are two ways to place your bike for painting. You could hang the bike frame by threading a wire through the head tube or put the frame on a covered, flat surface. After correctly positioning the bike, apply two to three coats of spray paint and wait for about five minutes between coats for each layer to dry properly. Repeat this process for about six coats of spray paint. After painting, leave the frame to dry overnight before applying the clear coat.
Step 4. Apply Three Coats of Clear Paint
Follow the same process with the clear coat but apply three coats and wait for about five minutes between each coat. After the frame has dried, reinstall the bike parts, and voila - your bike’s face-lift is done.
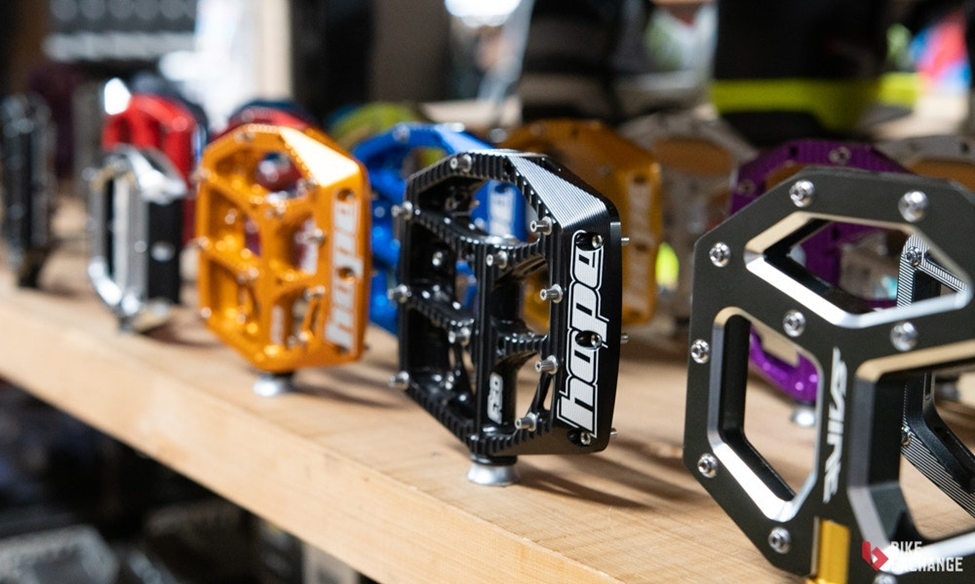
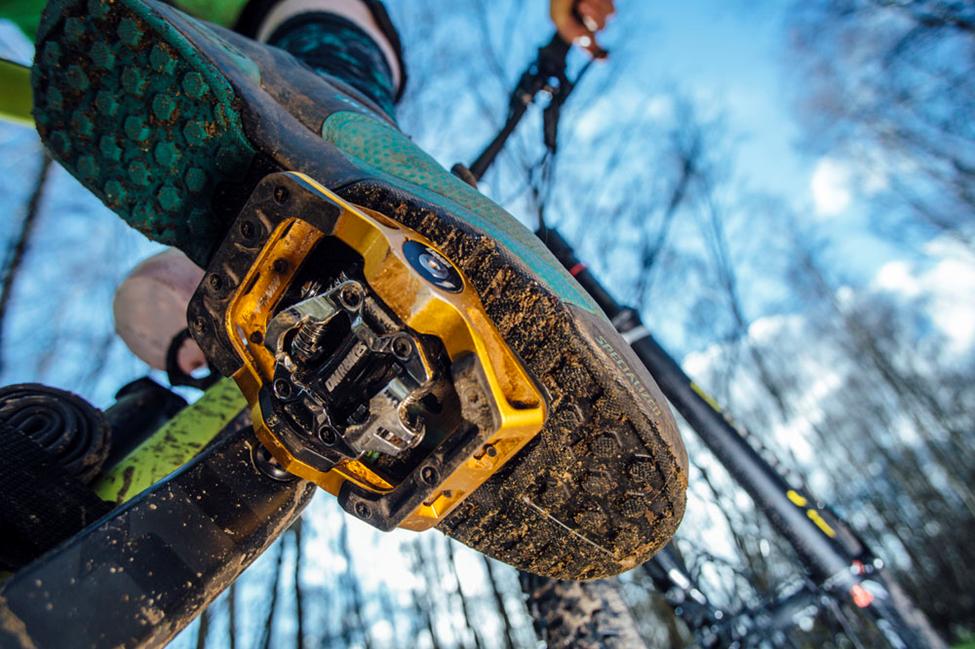
Tip 6. Swap the pedals
Another great way to pimp your bike to make it look fabulous is by swapping your pedals with more appealing alternatives. With the vast array of colors and designs available, you’re sure to find an option that will tickle your fancy.
To swap the pedals first position the crank arms, remove each pedal, attach the new pedals, and tighten them appropriately.
Aside from the numerous designs available, there are also different types of pedals, each of which has unique ways of affecting your riding performance. Check out our article on types of bike pedals and how to choose the right one for you for more information.
Materials Needed To Swap the Pedals
| Material Needed | Why You Need It | Example From Amazon |
| Bike pedals | To replace the current pedals | Puroma MTB Pedals |
| Pedal wrench | To remove the pedals | Bikehand Pedal Wrench |
| Hex wrench | Serves as an alternative for the pedal wrench | Amazon Basics Hex Wrench |
| Poly lube | To lubricate the pedal area | WD-40 Specialist Bike Chain Lube |
| Microfiber cloth | To wipe greasy surfaces | Amazon Basics Microfiber Cleaning Cloths |
How To Swap the Pedals To Make an MTB Look Cool
To swap your mountain bike pedals, follow these steps:
Step 1. Position the Crank Arm To Start Removing Your Current Pedals
The first step to swapping your bike pedals is removing the old ones from your crank arms. To do this, rotate the crank arm to a comfortable angle, advisably 90 degrees. After which, place a pedal wrench through the spindle flats of the pedals. You may alternatively use a Hex wrench if it doesn’t have a spindle flat.
Step 2. Remove Each Pedal
Once set correctly, place the wrench into the port at the back of the crank arm. Unscrew the pedals by pushing firmly on the tools you’re using and moving each of them in the appropriate direction. Do a clockwise rotation for the left pedal and an anticlockwise motion for the right one. Continue to rotate until each pedal is free from its crank arm as explained in our steps to change pedals on a mountain bike.
Step 3. Attach the New Pedals
After removing your old pedals, attach the replacement pedals. Search through the pedal spindles for the L and R indicators. These tell you which side each pedal belongs to and represents the left and right sides, respectively. Apply a decent amount of grease on the pedal threads to prevent them from seizing onto the crank during installation. Next, insert the pedal into the crank at a right angle. You want to set it so that the pedal thread is in line with the thread of the crank.
Step 4. Tighten Each Pedal Appropriately
Finally, place the pedal wrench into the spindle flats or the hex wrench into the ports of the pedal. Tighten the left pedal in an anticlockwise direction and the right one in a clockwise direction. Different manufacturers have different requirements for setting your pedal torque so it is advisable to tighten until you feel a bit of resistance, or better yet, check out the manufacturer’s recommendations to prevent over-tightening the spindles.
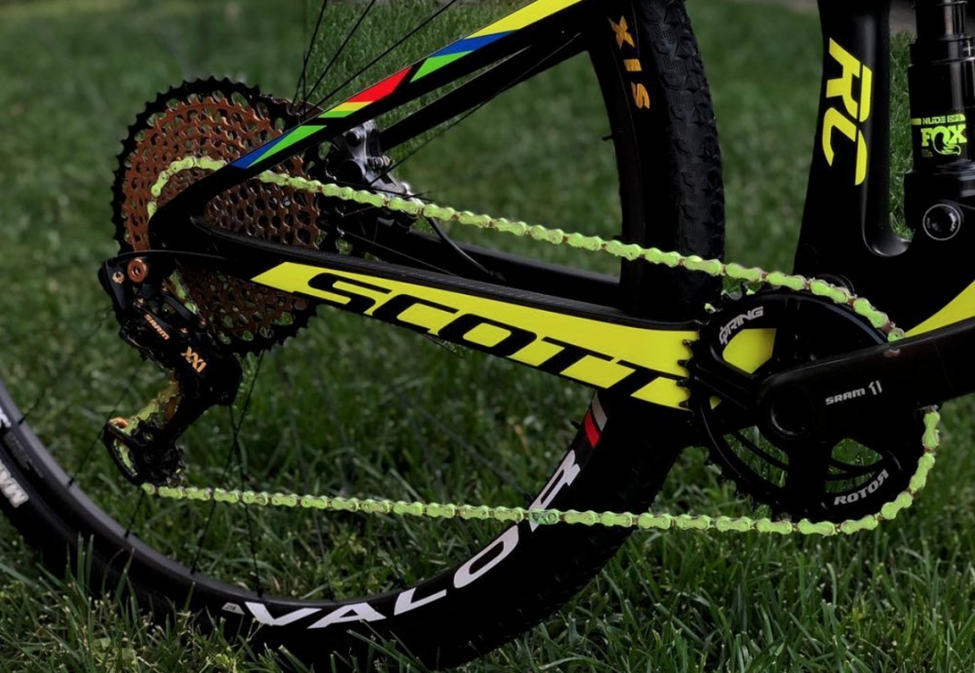
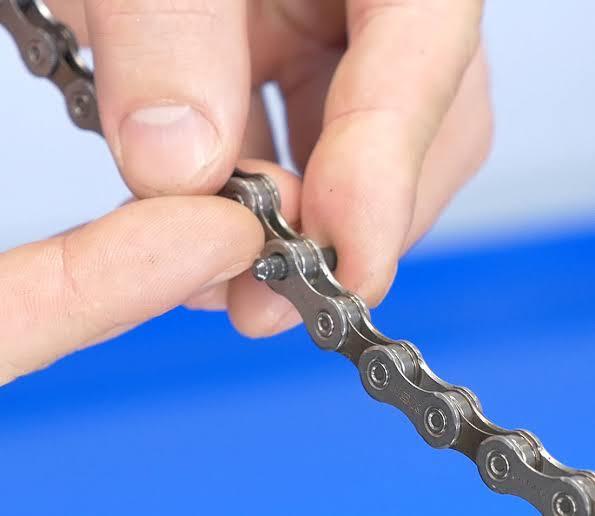
Tip 7. Replace The Bike Chain
If your bike chain is beyond repair and needs replacement, an excellent way to make your mountain bike look cool is by opting for a more visually-appealing alternative.
To replace the MTB chain undo the quick link or the connecting pin, remove the old chain, size the new chain correctly, and install the new chain.
The Department of Transportation’s Bicycle Safety Report highlights that chain-related accidents are one of the most common causes of bicycle accidents. A broken, loose, or skipping chain increases your risk of having a bike accident and puts you and those around you at significant risk. That being said, it’s crucial to clean your bike chain and replace it when needed constantly. You may want to check our tips for quick and proper MTB chain maintenance for a step-by-step guide on how to go about this process. And while you’re at it, you may also refer to our article on when to replace a mountain bike chain for helpful information.
Materials Needed to Replace the Bike Chain
| Material Needed | Why You Need It | Example from Amazon |
| Bike chain | To replace the old one | Bike Chain Kit |
| Protective gloves | To shield your hands during installation | Lamont Nitrile Gloves |
| Chain breaker | To split chain links | Akraf Chain Breaker Tool |
| Quick link pliers | For chains with quick links | Oumers Bike Link Plier |
| Chain lubricant | To lubricate friction-ridden areas | UltraFashs Bike Chain Cleaning Set |
How To Replace the Bike Chain To Make Your MTB Look Cool
Before working on your bike chain, wear suitable workshop clothing and cover your hands with protective gloves. After dressing appropriately, you can start replacing your old bike chain.
Follow these steps to replace your MTB chain:
Step 1. Undo the Quick Link
A quick link has a set of unique interlocking plates, while a joining pin is usually a rivet with a different color from surrounding rivets. If your chain has a quick link, you may unlock the link with a pair of quick link removal pliers. Place the pliers on either side of the link’s pins and apply some force to detach the link. Alternatively, if your chain is beyond repair and you don’t intend to use it again, you may use a chain breaker on one of the rivets instead of unlocking the quick link.
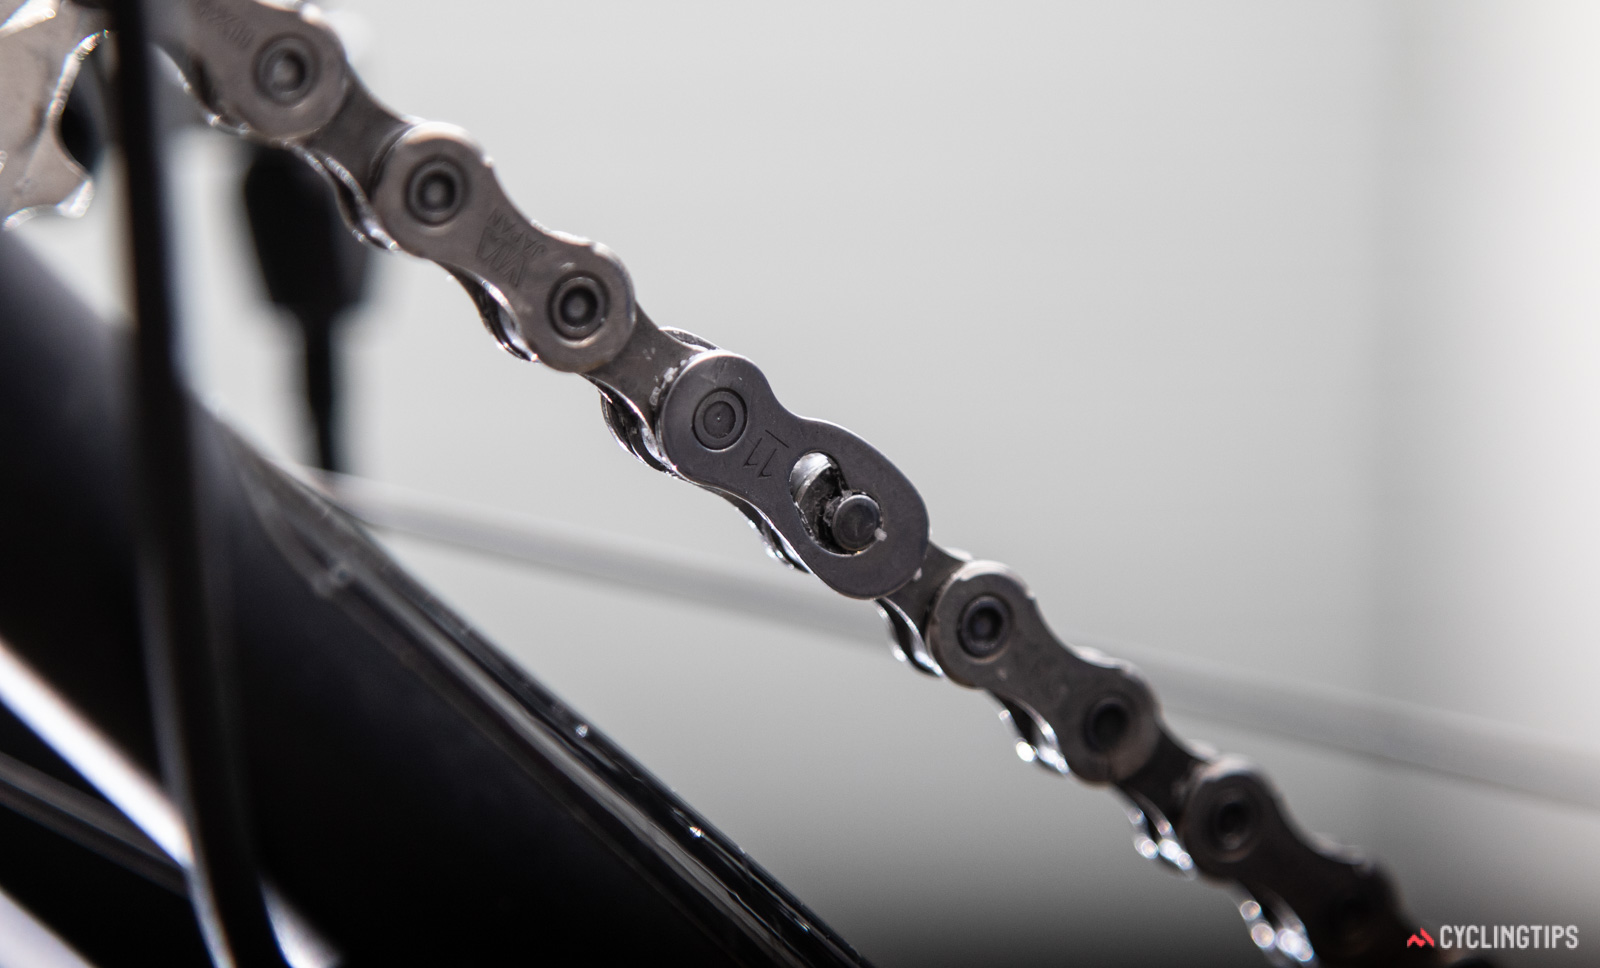
Step 2. If the Chain Has a Joining Pin Use a Chain Breaker Tool
If your chain has a joining pin, a chain breaker will help remove the chain. Drive the tool through the rivet and detach it from the chain. Hold the chain breaker straight to prevent bending, as this could damage the instrument.
Step 3. Size the New Chain
Now that your old chain is off, it’s time to install the replacement. New chains are usually made in longer lengths and it’s vital to ensure your chain is a suitable length for your bike. You can check out our tips to choose the number of links in a mountain bike chain to size your MTB chain properly.
Step 4. Install the New Chain
Once your chain is cut to the appropriate length, you need to connect the two ends of the chain. Thread one end of the chain through the rear derailleur and connect the two ends using a master link or chain pin. If you’d like a visual guide on replacing your bike chain, this video tutorial by the Global Cycling Network would prove useful.
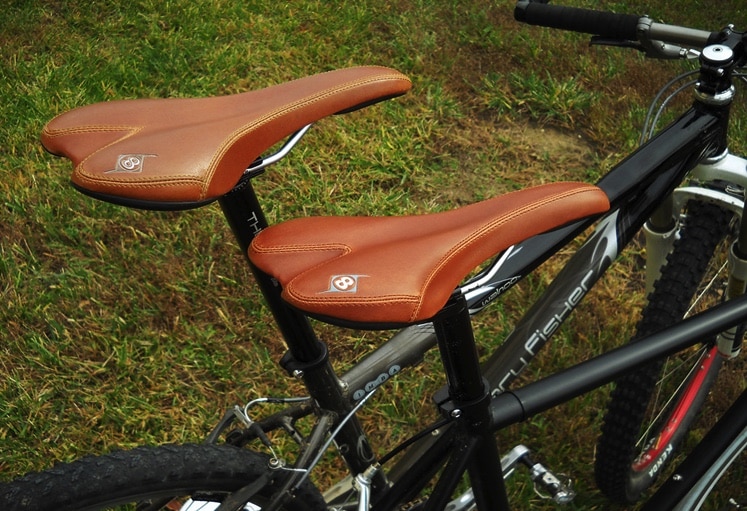
Tip 8. Install a Custom Saddle
The bike saddle, also known as the bike seat, supports your sit bones while riding. Thanks to the different shapes and designs, manufacturers have created saddles that offer ergonomic and performance-based benefits while biking.
To install a custom saddle stabilize it, undo the old saddle, fit the new saddle but don’t tighten it, adjust the position of the saddle, and tighten the bolts holding the new saddle.
Check out our tricks for choosing a mountain bike saddle for a detailed guide on choosing a bike seat suitable for you. Aside from the numerous health benefits, bike saddles can also be an aesthetic addition to your bike and can significantly make your mountain bike look a lot more appealing.
Materials Needed To Install a Custom Saddle
| Material Needed | Why You Need It | Example From Amazon |
| Bike saddle | To replace the old seat | Wittkop Bike Seat |
| Hex tool | To remove the bike saddle | Tekton Hex Key Set |
How To Install a Custom Saddle To Make an MTB Look Cool
Step 1. Stabilize Your Bike To Work on It
Set your bike against a sturdy wall or fit it into a bike stand if you have one.
Step 2. Loosen the Clamp Bolts Under the Saddle
Next, use a Hex tool, a 4mm or 6mm option should do the trick to loosen the clamp bolts under the seat post. If your seat post has one bolt, turn the top half of the saddle clamp at a 90-degree angle and lift the seat off the bottom half of the saddle. If your seat clamp has two bolts, take one bolt out, twist your saddle sideways and lift the seat from the loosened clamp.
Step 3. Install the New Saddle
Insert the new seat over the saddle clamp and loosely tighten the set screws using the wrench.
Step 4. Adjust the Position of the Saddle
Adjust the saddle’s height and angle, and test each adjustment until you achieve one comfortable for you. Our article on how to fit a mountain bike saddle would prove helpful in setting your saddle correctly.
Step 5. Tighten the Bolts Under the Saddle
Once you’ve attained comfortable saddle dimensions, you may firmly tighten the bolts under your seat clamp.
How To Make a Mountain Bike Look More Pro
After an extended period of time, it's not uncommon for your bike to start wearing out. The type of problems a mountain bike will develop depends on critical factors like how it is being used, where it is being used, the kind of mountain bike, and the maintenance habits of the rider.
To look more like a pro, replace and clean worn-out parts, add anodized components to the bicycle, and upgrade riding gear.
Each of these factors presents unique problems and has specific solutions to resolve such issues. Our article on common mountain bike problems, causes, and solutions will help you handle frequent MTB issues. Regardless of the bike presentation, with the right tools and techniques, you can tweak your bike and keep it in a state that always makes it look good.
Depending on what aspect of your bike you wish to revamp, different upgrade options are available to suit different needs. It's all dependent on what your preferences are and how you decide to find expression in improving your bike aesthetics and making it look more professional.
Follow these tips to keep your bike looking sharp:
Tip 1. Clean or Replace Worn-Out Parts
It is pertinent to ensure your bike is in pristine condition to promote riding safety. Safety benefits aside, fixing what's broken is an effective way to give your ride a more professional look.
Perform routine inspections of your bike components, including the handlebars, saddle, wheels, spokes, and bike chain. Check for scratches, chips, and wearing out on the stated areas. Once identified, depending on the degree of damage, you may use the appropriate tools to perform the necessary changes. Our ultimate list of tools for mountain bike maintenance could be an excellent resource for you to figure out what tools you will need and how to carry out proper bike maintenance.
Conversely, your bike’s parts might not need full-blown replacement but thorough cleaning. A degreaser like this and a microfiber cloth like this would help wipe off the grime from the bike’s kinetic components. Cleaning your bike will not only brighten its luster but also reduce cycling friction which will invariably improve your riding performance.
Tip 2. Add Anodized Components
An article by the Aluminium Anodizers Council states that anodization helps make the bike metals stronger, shinier, and long-lasting. This chemical process involves a negative electrode (cathode), a positive electrode (anode), and an electrolyte. The cathode gives off hydrogen, while the anode gives oxygen. Both elements form a nice even layer of oxidation, which protects the coated metal. Anodization protects your bike components from harsh weather conditions, and the added layer shields the surface from wearing out.
Another cool thing about anodized metals is they come in a vast array of colors. This is possible by mixing dye during the anodization process, meaning you have the ability to custom color your anodized bike parts to your liking.
Tip 3. Color-Matched Zip-Ties
This article by Mpora details the many benefits of having zip ties and how they are instrumental to a cyclist's tool kit. Whether fixing a deflated bike wheel, repairing a broken spoke, or improving the tire grip on slippery roads, you can never go wrong with zip ties.
With the several uses of these ties, it's not uncommon to have quite a number of them tied to different parts of your bike. And if you aren't a fan of having several differently-colored ties strapped around your bike, consider sticking to a uniform-colored zip tie that compliments your bike's existing color scheme.
Tip 4. Upgrade Riding Gear
As funny as it may seem, when riding your mountain bike, you are, in a sense, a part of the bike setup. The gear you sport, such as your helmet, riding shorts, shoes, and so on, all contribute to how your bike looks from an observer's point of view, so why not give them a show?
Consider replacing worn-out accessories with newer, more suitable materials. This reduces the risk of potential riding accidents, and upgraded gear like this improves your overall riding aesthetic and makes you and your bike look much more professional.
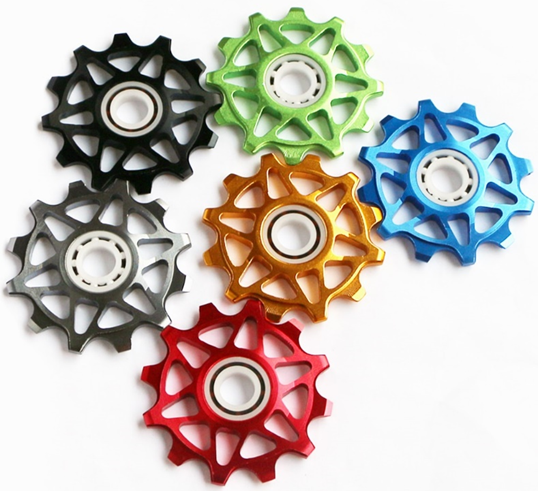
Tip 5. Install Ceramic Jockey Wheels
This article on Wikipedia defines a jockey wheel as "a wheel-based mechanical system used for steering and guidance." These components, coupled with the derailleurs, play a significant role in your navigation and control while riding. While jockey wheels are usually made with metal, particularly steel and alloy, ceramic jockey wheels have been found to offer significant benefits.
The ceramic material makes the jockey wheels roll faster, encouraging faster cruising speeds and saving about 6-9W more energy. If you wish to improve your riding performance and give your bike a more professional look, ceramic jockey wheels like this will be a game changer.
Should I Take My Bike to a Bicycle Customization Shop?
Thanks to the gift of the internet, it's pretty easy to DIY several bike upgrades with little-to-no assistance. Most times, all you need to do is watch a tutorial video, get the necessary tools, and follow the steps to effect the desired changes to your bike. However, as tempting and cost-effective as doing bike upgrades yourself may be, it might not always be the best choice.
Make use of the services of a bicycle customization shop to make a mountain bike look cool by repainting the bike frame, adding anodized components, and replacing old bike parts.
Bike customization shops are better equipped to cater to your biking needs and usually have more experience knowing the best techniques to effect the necessary changes.
If you're a cycling newbie or have limited bike customization experience, you would be doing yourself a huge favor by taking your biking problems to professionals instead. While specific bike customizations like adding decals or handlebar tape are pretty easy to do on your own, more complicated processes like painting your bike frame or switching to anodized components might prove more complicated. This is because several bike components can be pretty sensitive, and making customization mistakes could cost you more in the long run. With all that said, it's in your best interest to look up bike customization shops near you and leave the more complicated bike revamping needs in the hands of professionals.
