How to Make Bike Pedal Straps – Step-by-Step
Pedal straps were the original method of securing bike riders’ feet to their pedals before clipless pedals were invented. They are also a great way for beginner to intermediate riders to become comfortable with having their feet attached to the pedals while cycling. Bike pedal straps come in standard sizes, so if your feet are significantly larger or smaller than most people’s feet, then it might be a good idea to make bike pedal straps instead of buying them.
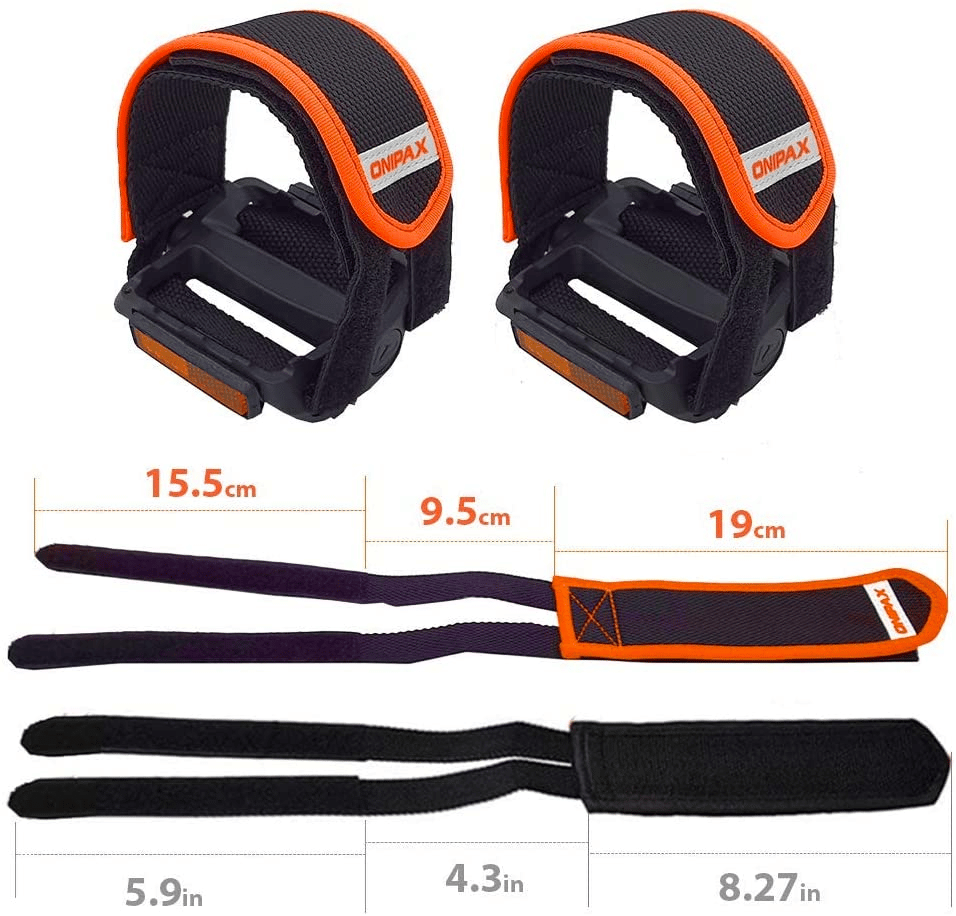
Bike pedal straps can be made using leather, nylon fabric, or velcro. To make bike pedal straps first measure the top of the foot from one side across the instep to the other to calculate the fastening strip. Then measure the width of the pedal. Add the instep length and the pedal length to calculate the total length of the two strips that will be threaded through the pedal and over the foot.
Bike pedal straps can be made of any durable and water-resistant fabric secured around the foot with either velcro, button snaps, or ties. If you’re considering different types of pedals why don’t you look at our article that compares toe clips and other pedal options before you get started on making your own pedal straps?
This might be a good place to learn the difference between pedal straps vs. cages. Make sure to read our related article to find out more.
How to Make Leather Pedal Straps
DIY leather bike pedal straps have the advantage of not requiring any sewing because the piece that covers the top of the foot and the two straps which are threaded through the pedals can be cut in one continuous piece and secured in place with press studs. Leather pedal straps are good for casual road cyclists who want to create a retro look for their bicycles. They are durable and can be water-repellant if the leather is treated.
To make leather pedal straps first measure the pedals and the rider’s feet while wearing their cycling shoes. Create a template for the all-in-one pedal straps, trace that template onto the underside of a piece of leather using a marker, cut out the leather straps, make holes for the button snaps using a leather punch, install the button snaps with a snap tool, and attach the leather pedal straps to the pedals by threading the longer narrow straps through the pedals, arching the broad section over the top of the pedal, and threading the shorter narrow straps through the pedal gaps on the other side. Snap the buttons closed underneath the pedal before using.
If you have pedals on your bike that you cannot use such as clipless ones, when it comes to changing them you may find that they have a different thread size. If this is the case then read through our complete guide on mountain bike pedal thread sizes to see what to do about this. Once your replacement pedals are attached you can go ahead and make your DIY pedal straps.
Materials Needed to Make Leather Pedal Straps
| Material | Why You Need It | Example from Amazon | Price |
| Leather Faux Leather | For a retro-looking pedal strap Less stretching than genuine leather | RingSun Genuine Leather Sheets Faux Leather PU Fabric Leather | ~$30 ~$30 |
| Hole Punch | To make the holes that will be used to secure the straps to the foot | Heavy Duty Leather Hole Puncher for Belts, Watch Bands, Straps | ~$15 |
| Press Studs/Button Snaps | The fasteners that will hold the foot straps in place | 12 Sets Heavy Duty Leather Snap Fasteners Kit (includes hole tool) | ~$15 |
| Tape Measure | To measure how much leather is required to make the straps | Soft Tape Measure Double Scale | ~$5 |
Step 1. Measure the Pedal Width and the Size of the Foot
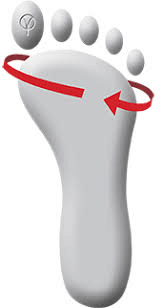
Start by measuring the total circumference of the instep while wearing the shoes you’ll use when riding—measure from one side over the top of the foot to the other side—this is where the broad top strap will sit. Measure the width of the pedal and add it to the instep measurement, this will be the total length of the long thin straps that will thread through the pedals and the broad strip that will go over the top of the foot, and secured under the pedal.
Step 2. Create a Template Based On the Measurements
Add an extra inch to both ends of the straps so that you have a comfortable overlap on your pedal straps. Our example is calculated based on an instep measurement of 9-inches and a pedal width of 5-inches (which you can adjust to your own measurements). Copy, scale, and print our template below for an easy bike pedal outline that you can trace onto your leather surface.

Step 3. Trace the Template Onto the Leather and Cut it Out
Trace the template onto rigid cardstock like this so that it retains its shape for multiple uses. Turn the leather over so the wrong side is facing up, and trace the template onto it using a sharpie pen like this or chalk marker like this. We prefer a chalk marker because it can be wiped off with a damp cloth. Use sharp fabric scissors to cut out the pedal strap outline.
Step 4. Mark the Positions of the Holes
Check the size of the pedal straps by threading them through the pedals and over your feet to make sure they will have enough overlap. While you have the straps in position measure and mark where the button snap closures should be placed on each strap. The longer straps will be placed under the shorter straps and clipped closed, so be sure to mark the long straps on the right side of the leather, and mark the short straps on the underside of the leather.
Step 5. Punch the Holes
Punch holes into the ends of your straps using a hole punch like this. If you wear various shoes when riding then consider making additional holes in your straps so that you have varying lengths to suit different shoe widths.
Step 6. Attach the Button Snaps
When attaching the button snap closures ensure that the bottom part of the snap is installed on the longer strap and the top part of the button is installed on the shorter straps. The additional holes made in the previous step can accommodate extra snaps so that the extra bit of leather can be safely clipped away and doesn’t become a hazard. This video tutorial explains how to install button snaps on leather.
Step 7. Thread the Pedal Straps Through the Pedals
Install the pedal straps onto the pedals by threading the long narrow straps through the pedal. Then curve the broad leather strap over the top of the pedal, and thread the shorter straps through the pedal on the other side. Now press the snap buttons until they clip and the pedals straps are secure. Our article about how to thread a pedal strap provides more in-depth instructions on how to attach your bike pedal straps.

You might also be interested in learning the difference between pedal straps vs toe clips. If so, make sure to read our related article to find out more. Additionally, our step-by-step guide on how to remove mountain bike pedals is another article you might find useful. Be sure to check it out too.
How to Make Velcro Pedal Straps
You can use any fabric you want for the strap portion that fits over your feet, to add personality to your bike. You can also choose different ways to attach or connect the straps of your pedal straps for example leather snaps, as mentioned, and velcro.
To make velcro pedal straps first measure the feet of the rider to calculate and cut the number of webbing straps and fabric needed. Then sew the nylon webbing to the fabric and attach the velcro straps to the webbing and the fabric. Finally, thread the handmade pedal straps through the pedals.
This video tutorial explains how to make bike pedal straps by cutting a thick piece of webbing into two strips on one side and attaching the velcro to these strips and the broad piece of nylon that covers the foot. You could also use narrower webbing strips to make the long straps that thread through the pedals and attach those to the broad nylon fabric by using a sewing machine.
Materials Needed to Make Velcro Pedal Straps
| Material | Why You Need It | Example | Price |
| Webbing | Nylon webbing is durable and water-resistant | Nylon Webbing 3/4 Inch 26 Yards 26 Mixed Colors | ~$20 |
| Nylon/polyester cotton fabric | The patterns and color combinations can add interest to the bike | 56 Pieces 10 x 10 Inch Multi-Color Fabric Patchwork Cotton Mixed Squares Bundle | ~$20 |
| Industrial sewing machine needle | Strong needles ensure the stitches are secure | 50 Organ Dbx1 Industrial Sewing Machine Needles | ~$10 |
| Velcro strips | To fasten the pedal straps securely | Melsan Industrial Strength Sticky Back Fasteners Hook and Loop Tape | ~$10 |
| Polyester thread | When sewing nylon or polyester it is better to use polyester thread to ensure the stitches are strong | Singer 150-yard All Purpose Polyester Thread | ~$5 |
Step 1. Measure the Pedal and Your Foot
The top of the strap needs to fit comfortably across your foot so measure your foot with the shoes that you will use most often when riding. Measure the width of the pedal as well as the gaps in the pedal so that you can purchase webbing that will easily thread through them.
Step 2. Calculate the Nylon Webbing and Fabric Length Needed
If you are using regular fabric then take the measurement of your foot and double the length and width, and add 2 inches for the seams.
Step 3. Sew the Webbing to the Fabric
Sew the fabric pieces inside-out to form a tube, turn it right-side-out and then secure the webbing to the fabric. We recommend melting the edges of the webbing so that they don’t fray over time.
Step 4. Sew the Velcro to the Webbing and Fabric Strips
Attach the Velcro strips to the top piece of fabric and the webbing straps. The piece of Velcro with the hook surface should be sewn to the underside of the top piece of fabric or webbing, and the Velcro piece with the loops should be sewn to the top side of the thin webbing straps. This tutorial from B+C Guides explains how to do this.
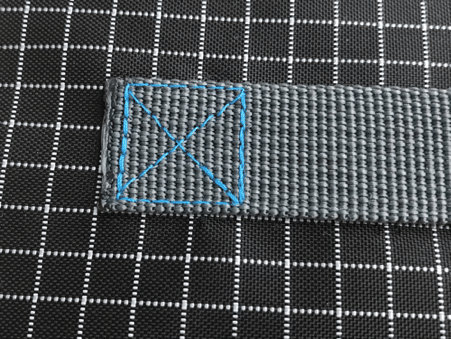
Step 5. Reinforce Joins with a Boxed-X Stitch
If you want to make sure the webbing is attached securely then do a reinforcing square on the edges of each side. This video tutorial explains how to do a reinforced box stitch.
Before you start riding again, make sure to read through our detailed guide to mountain bike armor pieces to see what you might need for your next adventure.
Step 6. Thread the Velcro Pedal Straps onto the Pedal
Finally fit your handmade pedal straps onto the pedal by threading the thin strips through the gaps, placing them over the foot, and pressing the top strap in place so that the Velcro hooks can secure it.
Similarly, be sure to check out our step-by-step guide to mountain bike pedal strap replacement. You'll surely find loads of additional information in that article too.
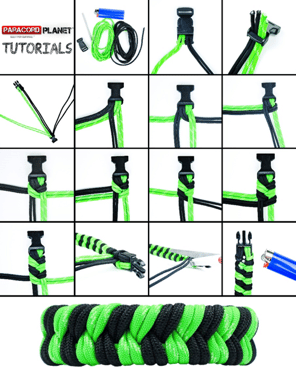
How to Make Fixie Pedal Straps
Fixie pedal straps are the name given to pedal straps that are used with fixed gear bicycles.
To make fixie pedal straps first measure the size that the straps need to be, then attach the lengths of cord to something so that they can be braided. Next, braid the cords together until the desired length is achieved. Finally, cut the cords and melt the edges to prevent fraying. Attach the braided pedal straps to the pedals by tying them on.
Fixie bikes are one type of bicycle that you may have or that you may be thinking of getting. Before you do, check our article about what mountain bike you should get as there could be another option that would be better for you.
It is even possible to make pedal straps for a fixie bike like this one. Fixie pedal straps can be made using any materials that hold a comfortable arched shape that will secure the feet to the pedals. This video tutorial explains how to make pedal straps using paracord, which can be substituted for other types of nylon cord that you might have at home.
Materials Needed to Make Fixie Pedal Straps
| Material | Why You Need It | Example | Price |
| Paracord | A stretchy, durable cord will ensure the pedal straps last and are water-resistant | 28 Colors Paracord 550 Combo Crafting Kits | ~$15 |
| Nylon Cord | As an alternative to paracord | Mandala Crafts Nylon Satin Cord` | ~$10 |
| Lighter | To melt the cord ends and prevent fraying | Torch Lighter Butane Lighter Waterproof Windproof Lighter | ~$10 |
Step 1. Measure the Existing Pedal Straps
If you already have pedal straps that you are replacing with the braided ones, then measure them to see what length you want the new straps to be. When braiding cords you will need to cut pieces that are five to six times the completed length to ensure there is enough cord.
Step 2. Knot the Cords on One End
Knot the cords on one end so that there are six strands connected that you will weave the cords through. Some people hook the cords onto a chair leg in order to keep them straight as they are being woven.
Step 3. Make a Fishtail Braid with the Cords
Starting with the right side cord, weave it over the first three cords, and under the last three cords. Then take the left side cord and weave it over the first three cords on the left, and under the last three on the right side. Pull them tight to neaten the braid. You will continue these steps until the braid is the required length.
Step 4. Cut the Cords and Melt the Edges
When the braid is the correct length then you can tie off the braid and cut the individual cords. But remember to leave a tail that is long enough to tie the braided strap to the pedals.
Step 5. Attach the Braided Pedal Straps to the Pedals
Place the straps on the pedals with the long cords towards the outside of the pedals on either side of the bike. Thread these cord tails through the pedal gaps and under the pedals so that they can be tied to the outside edge of the pedal. Trim the excess cord so that there aren’t any long pieces that may become a hazzard. If you want to learn more about pedal strap safety then read our article about whether pedal straps are dangerous.