
What to Do if a Mountain Bike Chain is too Short
Riding with an undersized mountain bike chain is an accident waiting to happen. As one of the essential components of your drivetrain, the bike chain needs to be correctly sized and installed to ensure a seamless and safe riding experience. However, installing and measuring a bike chain accurately is a skill most riders lack or ignore, and yet it is extremely important that you recognize this and know what to do if your mountain bike chain is too short.
A mountain bike chain is too short if shifting gears is difficult, the derailleur tension is incorrect, or the chain measures less than the appropriate length for the bike. To fix a short chain, replace it with a longer chain or repair it by adding more chain links.
Diagnosing whether a chain is too short can be quite tricky and so, in this article, we provide a comprehensive guide to fixing an undersized mountain bike chain. We discuss everything you need to determine if your chain is too short and to repair the issue. Further, we cover how to replace a bike chain properly and avoid the problem in the first place.
As this research paper by the Irish Transport Research Network discusses, the bicycle is the most efficient means of employing human power for transport, compared with walking and the motor car. In terms of efficiency of operation, manufacture and road maintenance, it is a much more favorable alternative to other options. The factors majorly responsible are the bike chain and pedaling efficiency. If you wish to learn more about achieving optimal pedaling efficiency, read our article on how to choose mountain bike pedals for grip maximization.
Symptoms That a Mountain Bike Chain is too Short
When it comes to cost, weight, and energy efficiency, the bike chain has no equal. It helps to transmit mechanical power from your pedals to your rear wheel efficiently and effectively. However, a bike chain that’s too short not only decreases your bike’s efficiency but also wears the drivetrain down, reducing its lifespan.
Symptoms that a mountain bike chain is too short are difficulty in shifting gears, a stretched derailleur cage, and drivetrain damage.
In addition, it is a safety hazard as your chain can snap while shifting under load. As this book by Lennard Zinn on bike maintenance discusses, a broken chain can easily damage other bike components. It can tear off the front derailleur cage or jam into the rear dropout. As a result, it is crucial you know how to detect that your chain is too short.
Just as riding with a chain that’s too short is dangerous, so is riding with a chain that’s too long. A chain that’s too long won’t fit properly and will keep skipping gears and slipping off as you ride. This could lead to the chain jamming in the spokes or cassette, causing injury if your foot gets caught. If you keep experiencing chain drop while riding, check out our article on how to easily fix a mountain bike chain that keeps coming off for a complete guide.
Symptom 1. Difficulty Shifting Gears
One of the major signs that your chain is too short is difficulty shifting gears, especially to the largest gear combination. A mountain bike chain that’s really short will be unable to move onto the largest front chainring and largest rear cog combination. If you find that you can’t make the shift to the largest sprocket easily, then your chain is too short. In contrast, a correctly sized chain will smoothly shift through all the rear gears on the small front cog and large cog. You’ll be able to switch to the large/large combo cleanly.
With an undersized chain, you might still be able to shift through all the rear gears on the small front cog, however shifting to the lowest gears will prove difficult. The chain might jam in place and rip the derailleur off. In addition, the short chain could bend the chainring or gear teeth. It can also start falling off frequently as there’s not enough slack. For more information, check out this video tutorial on common shifting problems riders experience, by the Global Mountain Bike Network.
Another cause of difficult shifting is old or faulty gear shifters and shifting cables. They’ll fail to maintain proper chain tension while riding, leading to chain jumping and skipping gears. If you find this to be the problem, fix or replace the shifters and shifting cables as soon as possible. Our article on how to fix a mountain bike grip shifter that is stuck goes into more detail. Our related articles on how to choose mountain bike grip shifters and our mountain bike grip shifter installation guide will also come in handy. Similarly, learning how to replace a mountain bike chainring might also be a helpful skill to know that will keep your bike up and running for years.

You may also find interest in learning how to easily fix a mountain bike that won't shift to low gears. Be sure to take a look at our related article for more detailed information.
Symptom 2. Stretched Derailleur Cage
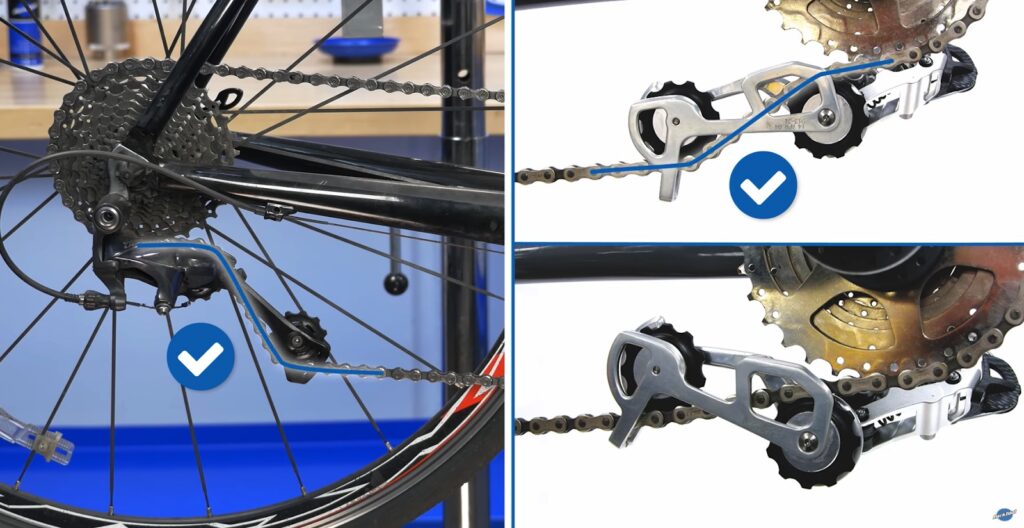
Another sign that your mountain bike chain is too short is an overextended derailleur cage. The rear derailleur is responsible for shifting rear gears by moving the chain at the rear sprockets. Setting up a chain with insufficient length will exceed the derailleur’s wrap capacity, leading to the derailleur cage being stretched out and almost being parallel to the chainstay. This stretch disengages the upper jockey wheel and puts a lot of tension on your rear derailleur. As a result, you could jam, bend or even break your derailleur and damage your bike frame when riding over rough terrains. If this is the case for you then you may need to replace it with one like this.
If your derailleurs are bent or misaligned, your whole gearing mechanism will be affected. It disturbs tension in your shifting cables, making it difficult to shift gears. Your bike chain is also more likely to fall and get stuck. This issue can lead to serious long-term damage to your bike. This Shimano manual provides a guide to installing, adjusting, and maintaining your rear derailleur.
Symptom 3. Drivetrain Damage
An undersized chain is one of the factors that can absolutely wreck your drivetrain. The drivetrain comprises all the parts needed to propel your bike forward. The key components include the cranks, front and rear chainrings, cassette, derailleurs, pedals, and the chain itself. As you ride and shift through gears, the components pull and rub on each other, causing wear and tear. With a chain that’s too tight or short, this is even more pronounced. This is because the drivetrain requires some chain slack to function efficiently and seamlessly.
Instead of the sweet silence of a quiet and efficient bike, your drivetrain will be noisy and make it difficult to pedal or change gears. As a matter of interest if you find that your bike pedals are not working well for you then it may be necessary to replace them with pedals with a better grip like these. Our article on how to change pedals on a mountain bike will take you step-by-step through this process.
In addition, riding with a short chain will wear your drivetrain faster, decreasing longevity and bike performance. It is essential you lengthen or replace your chain to prevent your drivetrain from suffering these consequences and to avoid having to replace the entire drivetrain with something like this.

How to Know if Your Bike Chain is too Short
To maximize your cycling experience, your drivetrain must operate at optimum efficiency. One way to ensure this is to check that your mountain bike chain is not too short or tight.
A sign that a mountain bike chain is too short is if it skips gears. To know if the bike chain is too short, measure the bike chain, assess the derailleur tension, and assess the gear shifting capabilities.
It is dangerous to test if your bike chain is too short while riding. Even soft pedaling with an undersized chain can damage your bike components. If you have difficulty shifting gears or notice the bike is not running well, stop riding and examine it. Do not try to forcibly change difficult gears while riding. It is best to use a bike stand like this to inspect for any issues.
If you would prefer to do this and any other repairs yourself, check out our ultimate list of tools needed for mountain bike maintenance.
Step 1. Measure the Bike Chain
The first step to checking if your chain is undersized is to measure the chain. Before that, you must familiarize yourself with standard chain measurements. A mountain bike chain consists of outer and inner plates, rollers, and a rivet. Each pair of outer plates form an outer link and inner plates form an inner link. Each outer link and inner link constitute a half-link. One full link is made up of one outer and one inner link, measuring 1 inch. So, a chain with 60 full links will have 60 outer links and 60 inner links and measure 60 inches.
Now to check for the correct chain size for your specific drivetrain, you can make use of the chain length formula: L= 2 (C) + (F/4 + R/4 + 1). Where L is the bike chain length in inches, C is the chainstay length (distance between the middle of the crank to rear axle) to the nearest ½ inch, F is the number of the teeth on the largest front chainring, and R is the number of teeth on the largest rear sprocket.
The number of teeth on the chainring and cog usually shows on the component. If it does not, you’ll have to count. To make the calculation easier, you can make use of a programmed web chain length calculator or an android app for calculating chain length. Once you have the theoretically appropriate chain length in inches, you can then get the number of links required using the formula described above. Our article that discusses how to size a mountain bike chain gives more information about this process.
The next step is to take off your mountain bike chain. For more details on removing your mountain bike chain, check out our step-by-step instructions on how to replace a chain on a mountain bike. You can then count the number of links on your chain and check if it matches your calculations. If it is deficient, you need to lengthen the chain by adding extra links from a chain like this.

Calculate your proper chain length using your chainstay, front chainring, and rear cog. Source: ilovebicycling.
Step 2. Determine the Derailleur Tension
You can also inspect the derailleurs to ensure they’re under enough tension. Begin by fully extending the rear derailleur. Shift the chain to the large/large gear combination and keep clicking the derailleur till there are no clicks left in the shifter mechanism. Next, shift through the different gears and check if some gears are skipped or if there is difficulty shifting to either a smaller or larger cog. Also, check if the rear derailleurs remain aligned and centered over the gear while shifting. You may need to use a derailleur hanger alignment tool like this to help align these components if they are damaged or bent.
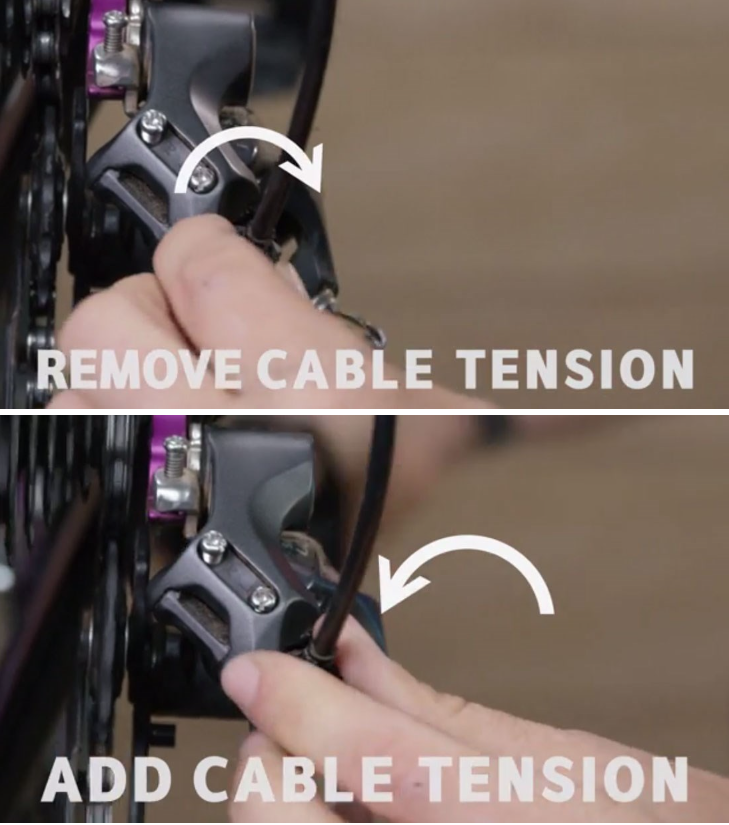
If the chain does not shift easily to the next smaller cog, then the inner cable tension is too high. On the other hand, if the chain does not shift easily to the next larger cog, then the inner cable tension is too low. You can make use of a barrel adjuster like this to fine-tune this adjustment. Turning the barrel adjuster clockwise lessens the wire tension, moving the derailleur closer to the rear wheel. Conversely, turning the adjuster counter-clockwise increases the tension, moving the derailleur back towards the frame.
You can also make use of the B-screw to test the chain tension. The B-screw is usually located behind the rear derailleur and helps to adjust the distance between the pulley and cogs. Turning the B-screw counterclockwise with an Allen key like this moves the pulley closer to the cogs, decreasing the chain tension. On the other hand, turning the B-screw clockwise increases the distance between the pulley and cogs, and increases the chain tension.
Step 3. Assess Shifting
The final check to determine if you have sufficient chain length is to assess the shifting mechanism. The bike chain connects the front gears/front derailleur to the rear gears/rear derailleur and so, a problem with the chain will affect the bike’s ability to shift gears. For mountain bikes, you shift gears by operating set paddles or rotating set dials forward and back with your thumb.
The left-hand shifter controls the front gears by switching the chain up and down the different chainrings up front. On the other hand, the right-hand shifter controls the rear gears by shifting the chain up and down the cassette. The front gears are useful for sudden changes in terrain as they cause large adjustments in gearing while the rear gears are used for small adjustments to gearing.
For single-speed bikes, there are only two gears – one front chainring and one rear cog. As a result, they do not require any shifters. Bikes with shifters usually have 1 to 3 front chainrings (attached to the pedal crank arm) and between 7 to 12 rear cogs on the cassette (attached to the rear wheel). The smallest rear cog is the hardest gear while the largest is the easiest, so moving your chain from the smallest to the largest will make pedaling easier. For the chainrings, the largest is the hardest gear while the smallest is the easiest. Therefore, moving your chain between the largest and smallest eases your pedaling effort.
To test the shifting mechanism of your bike, begin by placing the bike on a stand like this. Next, pedal lightly while using the shifter to move the chain between the different gears. If your chain skips, slips, or jumps gears while cycling the pedals, then there’s most likely a problem with the drivetrain. Check if the chain tension is too high or if the derailleur cage is stretched too tight to confirm if your chain is undersized.
Also, check that the gear shifters are in good condition. The shifters connect to the derailleurs through a housed steel cable. They are responsible for creating tension by pulling in the cable or lessening tension by releasing the cable. The two most popular types of shifters are trigger and grip shifters, and they determine the efficiency of your shifting mechanism. Read our article comparing trigger shifters vs. grip shifters to determine which is best for you.

What to Do if You Cut Your Mountain Bike Chain too Short
Having an undersized chain usually occurs during the process of installation. As a result, it is essential to know how to install your bike chain properly. In particular, you should be able to measure the appropriate length for your chain – not too long or too short.
If a mountain bike chain is cut too short, replace the chain or lengthen it by using a connector pin or by adding links. To replace a mountain bike chain remove the old chain and replace it with a new one that is the right length. To lengthen a mountain bike chain using a connector pin place the pin in the chain, tighten the pin through the chain using a chain tool, and snap off the tip of the pin. To lengthen a chain by adding a chain link, split the chain using a chain tool, add extra links in place, and reconnect the chain.
Our step-by-step instructions for mountain bike chain installation cover the entire process in extensive detail. In the event that your chain is too short, fix the issue as soon as you can and never ride with an undersized chain.
You’ll need a few tools to fix a bike chain that’s too short. If you want to put together a tool kit, our mountain bike tool kit essentials guide could be quite helpful. And in our article on how to choose a mountain bike tool bag that locks we discuss how to pack and transport your tools safely so that you can be prepared for any on-trail emergencies or just regular bike maintenance.
How to Replace A Mountain Bike Chain That’s Too Short
The best option when your chain is cut too short is to simply replace the chain. Riding with a short chain wears out the chain and drivetrain faster and so your chain could be significantly worn out. In this case, it is better to replace the chain with a new chain that’s cut to the correct length rather than lengthening the old chain with new links. This will help prevent any shifting problems and further damage to your drivetrain.
You can make use of a chain wear indicator like this to check for the degree of wear on the chain. In addition, you might also find it difficult to add extra chain links and your chain might not even be able to accommodate extra links. In either case, a better option would be to replace the chain and install a new correctly sized chain. Check out this YouTube video tutorial by the Global Mountain Bike Network for more information.
Materials Needed to Replace a Mountain Bike Chain That’s Cut too Short
| Tool | Use | Example from Amazon | Price |
| Chain Tool | To split or connect your bike chain using a connector pin.To loosen any stiff links in your chain. | Oumers Universal Bike Chain Tool with Chain Hook | ~$10 |
| Master Link Pliers | To easily detach and reattach your chain quick links. | Park Tool Master Link Pliers MLP-1.2 | ~$20 |
| Degreaser | To clean your MTB chain. | Finish Line Citrus Bike Chain Degreaser | ~$15 |
| Chain Lube | To lubricate your MTB chain. | Finish Line Dry Teflon Bike Chain Lube | ~$10 |
Here are the steps to replace your mountain bike chain that is too short:
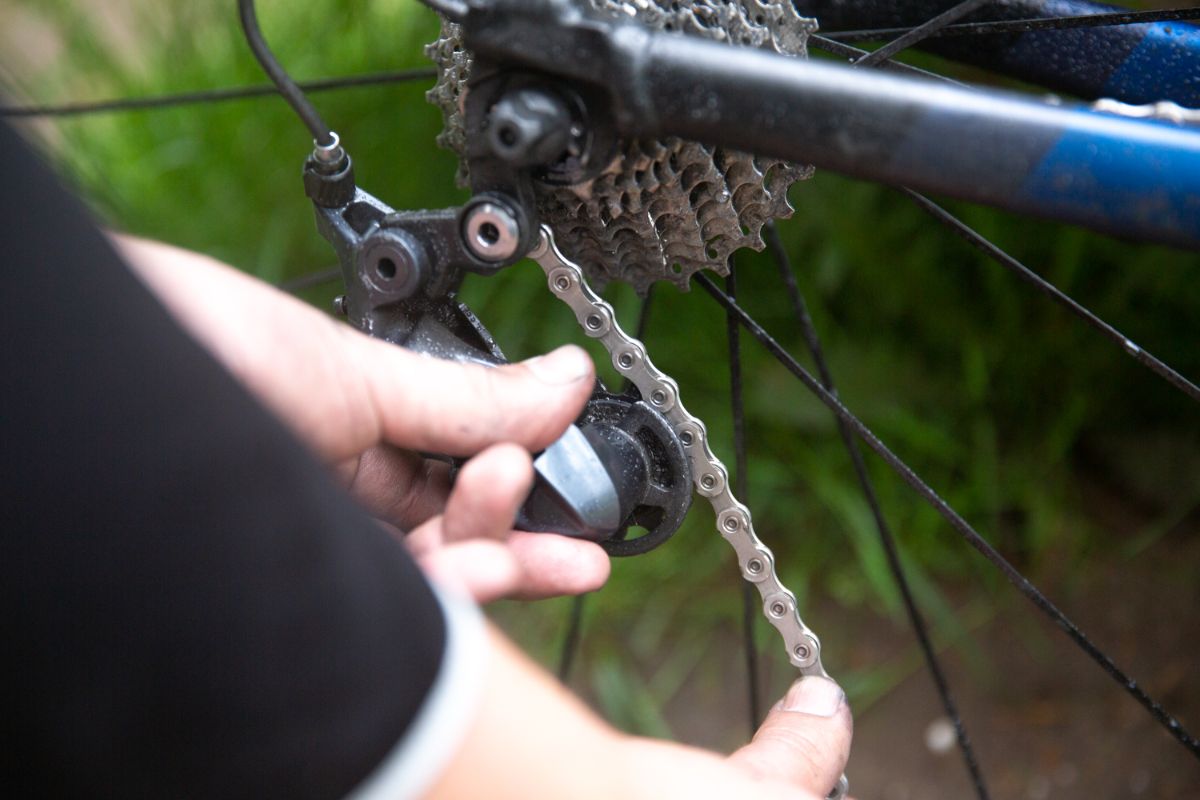
Step 1. Remove the Old Chain
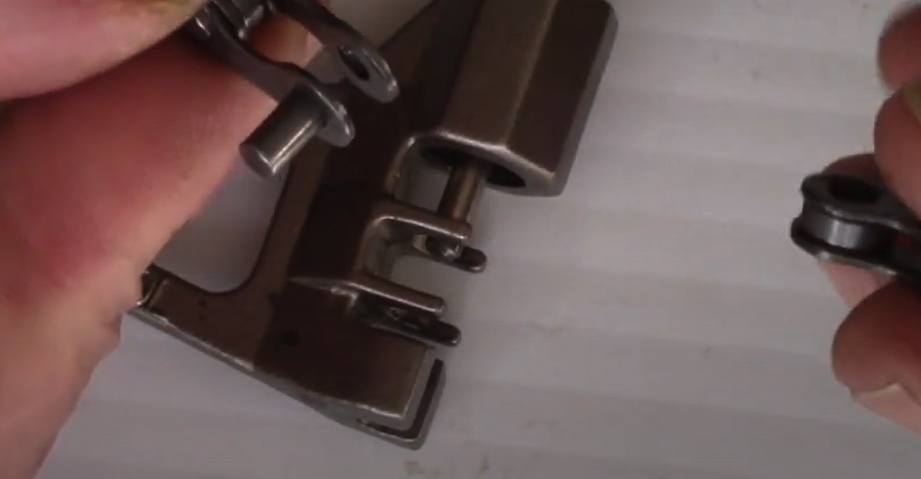
To begin the process of replacing your bike chain, you must first remove the old chain. First, shift the chain down to the small/small gear combination – smallest front chainring and smallest rear cog. Next, release the chain tension. This process differs depending on the type of derailleur you have. If using a Shimano derailleur with a clutch mechanism like this, turn off the mechanism to free up the chain, as this article by Shimano describes. For SRAM derailleurs like this, engage the Cage Lock to loosen the chain tension. This step gives you easy access to the quick link and connection pin of the chain.

Now that you’ve released chain tension, locate the quick link or connection pin, whichever system your chain uses. The quick link usually has a different color and design from the rest of the chain. The connection pin usually has an indentation meant for a chain tool. For chains with a quick link system, make use of a master link plier like this to disengage the link and disconnect the chain. Alternatively, for chains with connection pins, make use of a chain tool like this to drive out the pin and split the chain.
After disconnecting the chain, unthread the chain from the drivetrain components. Guide the chain off the cog teeth, jockey wheels, derailleurs, and chainrings and remove it from the bike.
Step 2. Choose the Correct Chain
When choosing your new chain, you must pick one that is compatible with your drivetrain. Your chain speed should match the speed of your cassette. Check for the size of the cogs, the number of rear cogs, and gear combinations of the drivetrain. The chain speed determines the external and internal width of the chain. Generally, the cassette speed usually corresponds with the chain speed. So, an 11-speed cassette like this will usually require an 11-speed chain like this. Most cassettes and chains usually come with their speed labeled on them.
In addition, read through the manufacturer’s specs and instructions. Some chain brands like Campagnolo are only compatible with cassettes of the same brand, according to this page on their site. Some brands like SRAM and Shimano are cross-compatible with each other. Also, check for the manufacturer’s operating instructions.

Step 3. Check the Chain Length
This is the step that usually goes wrong, resulting in a chain that’s either too long or too short. As a result, it is essential to carefully go through this process. Every bike and drivetrain will require its own specific chain length so you need to get the right size for your chain. The new chain will usually have more links than you need. They are usually sold in standard lengths of 96 to 126 links. So you’ll have to shorten it to the appropriate length for your drivetrain before completing the installation process. Check out this article on chain length sizing by Park Tool for additional information. There are three main ways of determining the right chain length:
Compare the New Chain With the Old Chain
This is not particularly relevant if your old chain was too short. The method involves laying or hanging the old and new chains side by side and checking for the right length. It is best to make use of the number of links rather than the length in inches because the chain usually lengthens over time as it gets worn. So assuming your old chain was the correct length, check for the number of links and cut your new chain to the same number. On the other hand, if your old chain was too short and you want to replace it, simply discard it and calculate the right chain length using either of the remaining methods.
Use the Chain Length Formula
As we’ve described above, you can make use of the chain length formula to get the right chain size for your drivetrain. You’ll need to get the number of teeth on your rear cog and largest front chainring, usually labeled on the components. You also need to measure the length of the chainstay – which is the distance between the middle of the pedal crank arm and the rear wheel axle. You can then use the formula:
Bike chain length = 2 x Chainstay length + (Number of teeth on largest front chainring/4 + Number of teeth on the largest rear cog/4 + 1)

Use the Largest Chainring and Largest Cog Test
Take your new chain and wrap the chain around the largest front chainring and the largest rear cog without going through either of the derailleurs. Bring the two ends of the chain together till they overlap. You should leave one full link (an outer and an inner link) to allow for enough chain slack. To compensate for chain growth and accommodate the motion of the suspension while riding, ensure you measure the length while the suspension is compressed. Remove the extra links and keep them as spares in case of chain breakage on the trail.

Step 4. Thread the Chain Through the Derailleur
Before installing your new chain, clean your drivetrain using a cleaning kit like this. Clean and lubricate the chainrings and cassette using a neutral detergent and lubricant. Also, brush off any dirt from the drivetrain components.
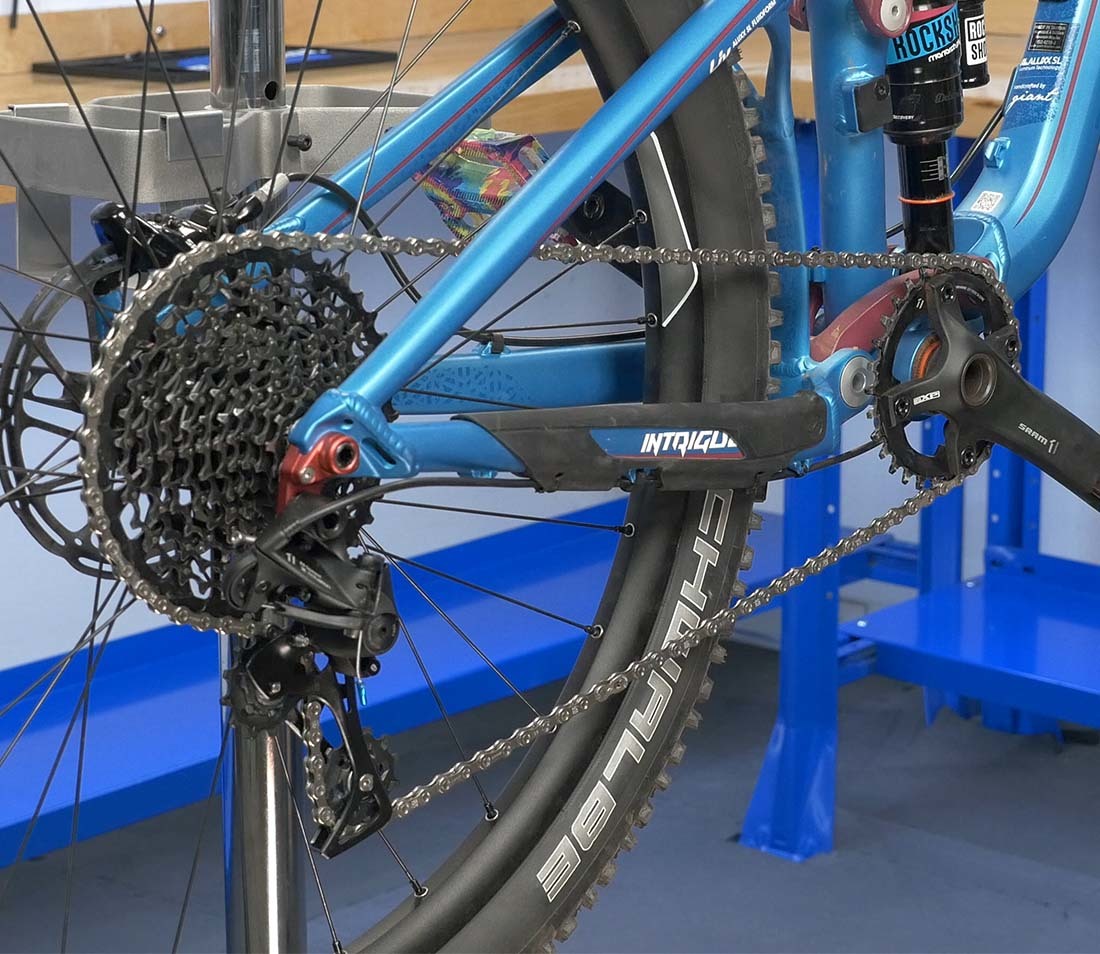
The next step is to route the chain properly. Check that your gear is still in the smallest chainring and smallest cog combination. Then guide your chain up through the rear derailleur, over the upper jockey wheel and the lower jockey wheel. Ensure the chain goes through the prong of the rear derailleur cage. Next, thread the chain over the smallest rear cog and through the front derailleur cage. Finally, guide the chain over the smallest front chainring and bring the two ends together.
If the chain uses a master link system, connect the two ends of the chain using a quick link and master link pliers. If it uses a connection pin system, connect the two ends using the pin and a chain tool.
Step 5. Test the Installation
Shift the chain up and down to check that the installation was properly carried out. Ensure that the shifting is seamless and efficient. Check that the derailleur is not overextended or misaligned in the large/large gear combination. Also, ensure your drivetrain is not noisy or squeaky as you cycle through the gears. Also, ensure you properly degrease your chain and lubricate it before riding.
How to Lengthen A Mountain Bike Chain That’s Too Short By Adding Chain Links
This is a quick fix to a chain that’s too short. Rather than replacing the entire chain to install new correctly-sized ones, you can simply add extra links to lengthen the chain. This method will also come in handy if your chain suddenly breaks while riding. You can easily remove the damaged links and replace them with new extra links. Check out this video tutorial by Roadtrek Rich for a demonstration of this method.
Materials Needed to Lengthen a Mountain Bike Chain That’s too Short By Adding Chain Links
| Tool | Use | Example from Amazon | Price |
| Chain Link | To lengthen a bike chain that’s too short. | Zonkie Bike Chain 116 Links | ~$20 |
| Chain Tool | To disconnect a chain by pushing out the chain pin and reconnect a chain by driving in the chain pin. | Bbb Cycling Chain Rivet Tool | ~$20 |
| Chain hook | To release chain tension for easy access to the chain. | Joint Chain Hook Repair Tool | ~$10 |
These tools will come in handy in the event of emergencies as you ride. Our article on mountain bike tool bag ideas provides tips on packing the necessary tools for your rides.
Here are the steps to lengthen your mountain bike chain that is too short by adding a link:
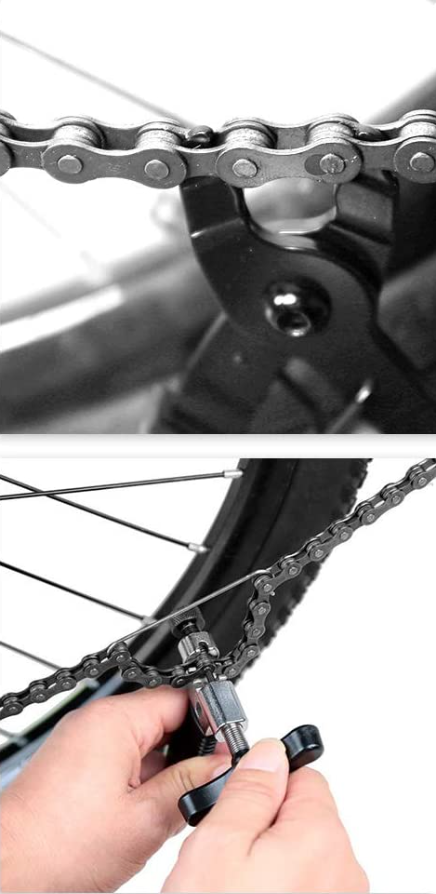
Step 1. Split the Chain
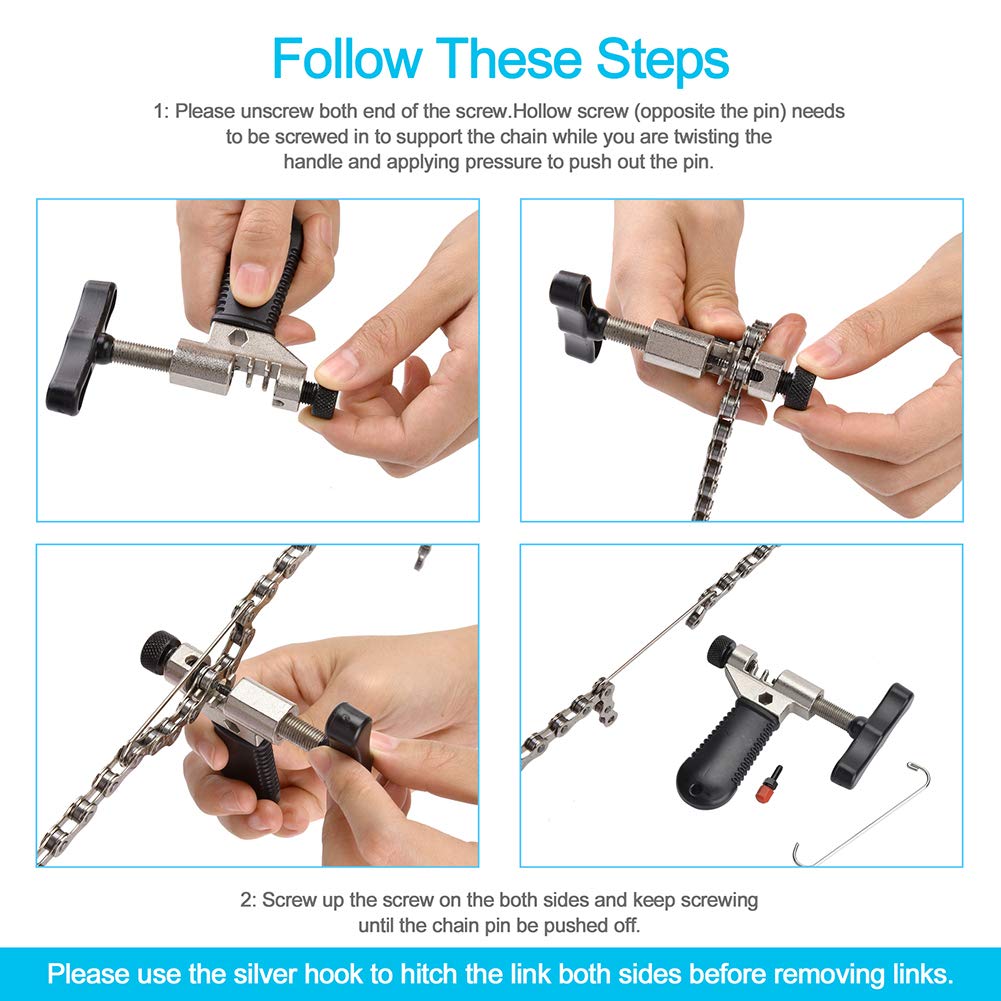
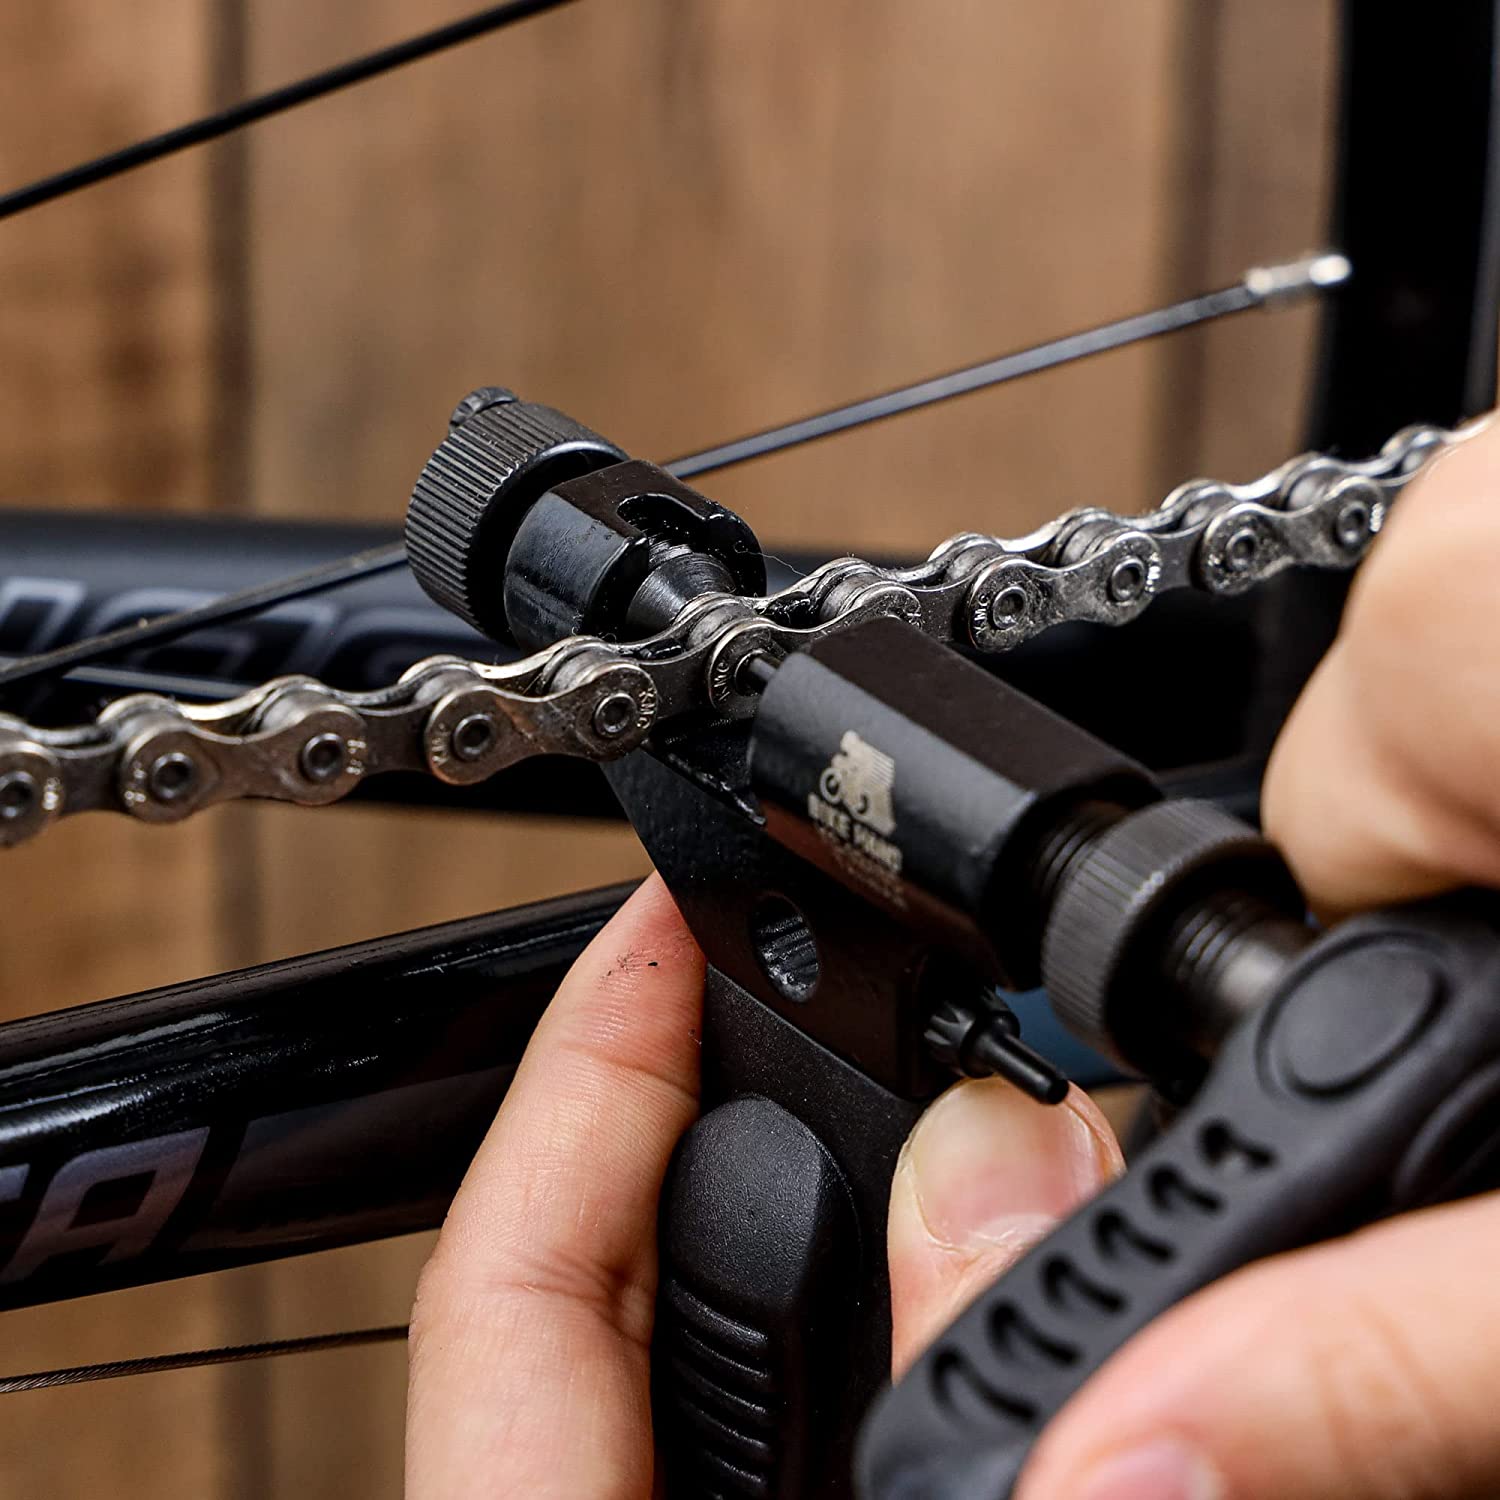
When adding an extra link, the first step is to split the chain. As before, get your chain tool from a set like this and turn the handle counterclockwise till the chain tool pin is backed out of the outer slot. Place your chain in the outer slot and tighten the tool clockwise till the chain tool pin connects with the ends of your chain pin. Continue tightening the handle till the chain pin is pushed out to the other side.
Once you have the pin sufficiently out, the chain should still be loosely connected. Then twist and pull the chain to disconnect it.
Step 2. Maintain the Pin Length
As you tighten the chain tool, take care not to push the current link out completely. It should only get far enough till it is placed halfway through the first of the two outer chain plates. If you push the chain pin completely, you won’t be able to get it back in the link. As a result, you’ll be forced to either remove that link and shorten the chain or replace the chain entirely.
To prevent this, pay careful attention as you turn the handle of the chain tool. Once you get close to the end as you push out the chain pin, you should feel some resistance as the handle becomes a bit harder to turn at which point you should stop tightening the chain tool. Simply give the handle another half a turn to get the perfect spot for disconnecting the chain.
Step 3. Add Links To the Chain
Next, get the extra link or links you want to add to your chain. If you want to add more than one link, use the method described above to split the number of links from your spare chain. Then, get your chain and the links and twist the ends back together till the chain pin clicks into the inner link.
Step 4. Join The Chain
To reinstall the chain pin, place the connected chain once again in the outer slot of the chain tool. Position the pin so it faces inward toward the chain tool pin. Then start tightening the chain tool handle clockwise till the tool pin starts pushing the chain pin back through the link. Keep tightening until a little portion of the pin pokes out through the other side. Take a look at both sides to check that the pin protrudes by roughly the same amount on either side. This process can also result in a stiff chain link. Loosen the link by flexing it from side to side or using the inner slot of the chain tool to spread the link. Clean and lubricate the chain for optimum efficiency as we explain in our guide that provides quick and proper mountain bike chain maintenance tips.
How to Lengthen A Short Mountain Bike Chain Using Connector Pins
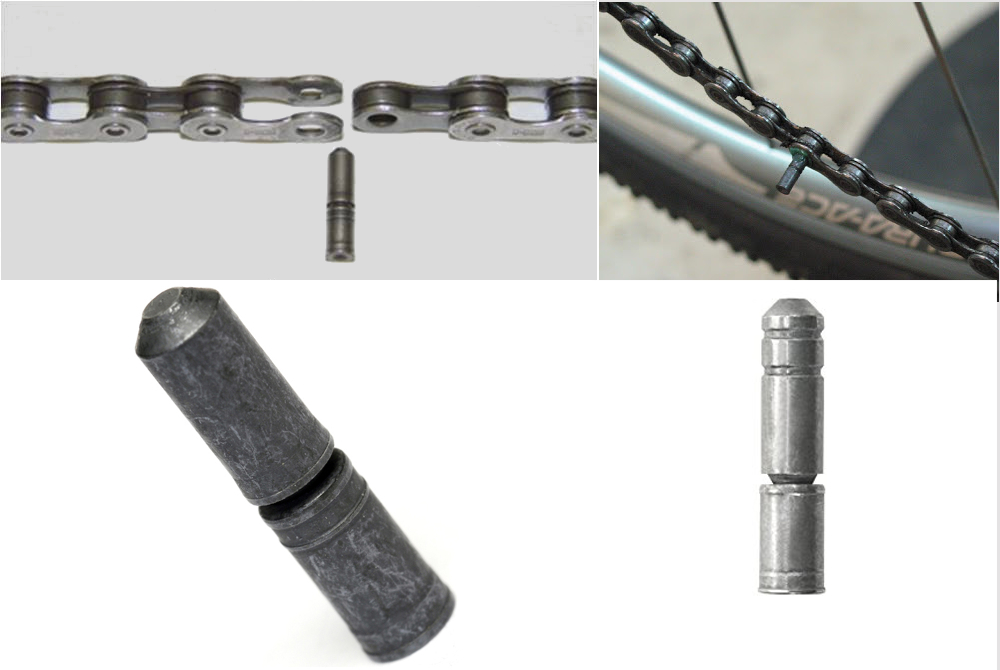
If your mountain bike chain is too short but still relatively new, then you might want to lengthen it by adding extra links to the chain. You can also use a connector pin like this to connect your lengthened chain. Shimano chains like this usually make use of a connector pin system to ensure strong chain connection and attachment. We’ll go through both methods in the following sections.
Before inserting the connector pin, ensure you get a pin that’s compatible with the chain. Different chain brands have different chain pins for their products. For instance, Shimano chains usually come with two chain sub-pins. For 8-speed chains, the sub-pin looks like a black rivet while the pin for a 9-speed chain has sub-pins that look like a silver rivet. They usually have a second segment with a pointed bullet-shaped tip that can be snapped off. Additionally, the pin is twice as long as the standard chain rivet with a groove in the center of its length.

Materials Needed to Lengthen a Chain With a Connector Pin
| Tool | Use | Amazon Link | Price |
| Connector Pin | To connect and disconnect bike chains. | Shimano 10-Speed Chain Pins | ~$15 |
| Chain Tool | To easily install and remove connector pins. | Bikehand Bike Chain Rivet Tool | ~$20 |
Here are the steps to lengthen your mountain bike chain that is too short:
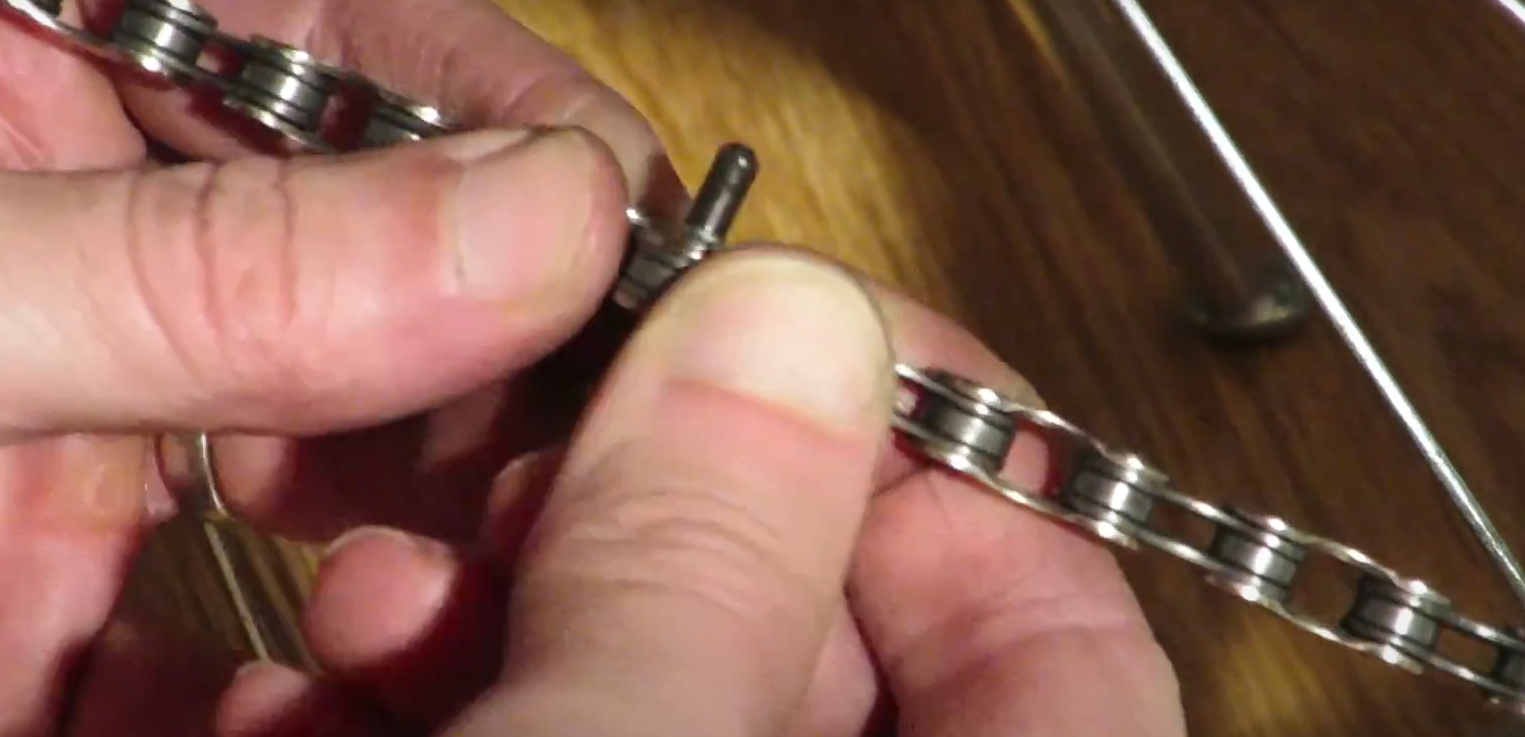
Step 1. Place Connecting Pins in the Chain and Add New Links
The first step is to push the pin through the connecting links of the chain. According to this book on Public Safety Cycling published by the International Police Mountain Bike Association, it is best to insert the pin through the ‘virgin’ holes left open in the outer plates. These are holes that have not had a pin pushed through or a rivet removed before. This is because if you push out a pin and insert a new pin in the same link, the retaining force of the pin will be lessened. The chain will usually be weakened at that position and prone to breaking or snapping there. Also, ensure you use the appropriate pin for the chain.
Push the pin into the new outer plate holes with your fingers. Ensure you push with the pointed end first. The pin should insert through the hole about halfway. You then need a chain tool from a kit like this to push it further.
Step 2. Use a Chain Tool to Tighten and Drive the Pin In
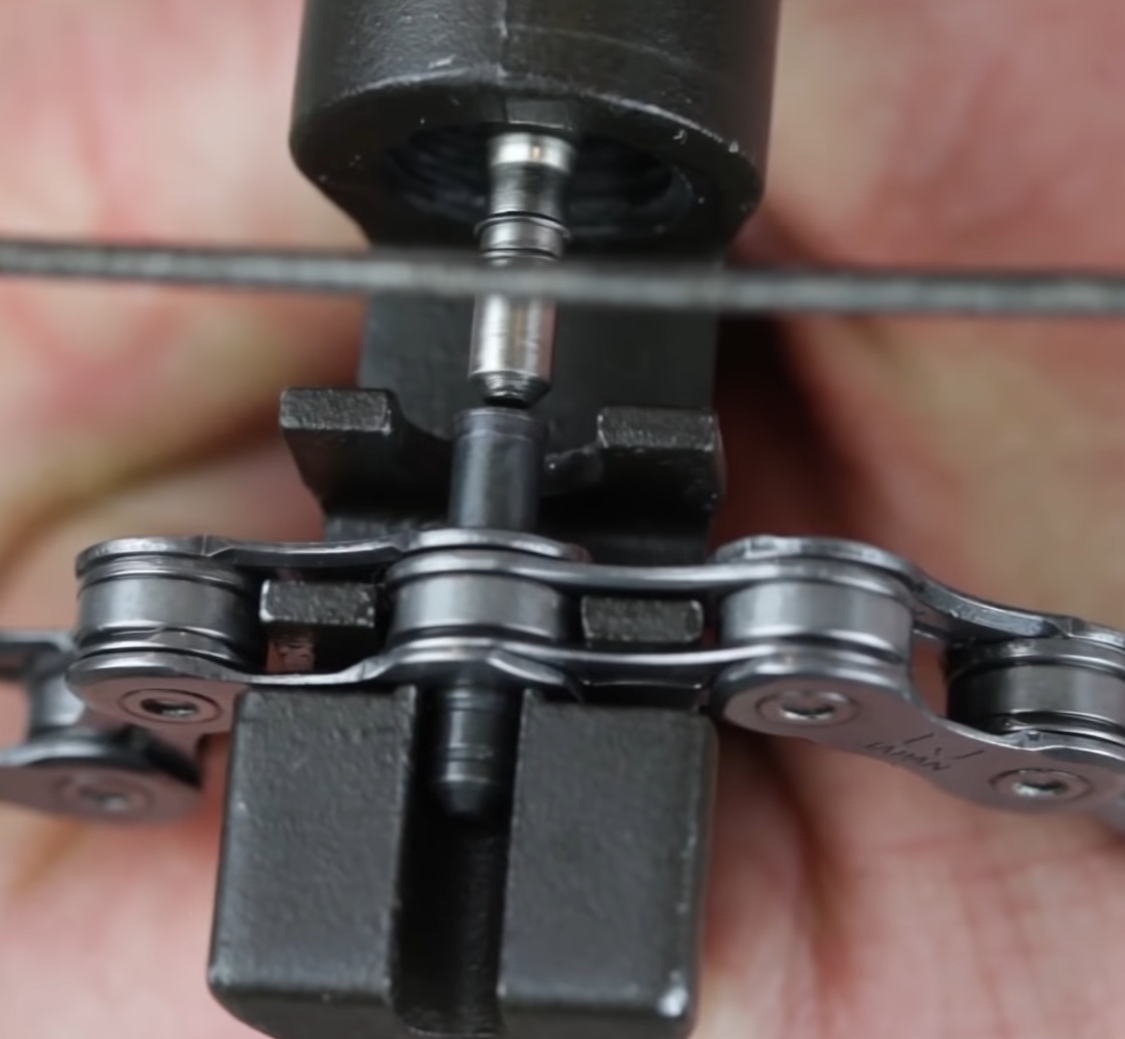
The next step is to tighten the pin using a chain tool as shown in this video tutorial by Made Good Bikes. To set up the chain tool, turn the handle of the tool counterclockwise till the chain tool pin is backed out of the outer slot. Now, place the chain in the outer slot and position the connector pin so that it faces inward toward the chain tool pin.
Next, tighten the tool clockwise till the chain tool pin connects with the connector pin of the chain. Continue tightening the chain tool till the pin is pushed completely through the link. You must use quite a bit of force as both ends of the pin are thicker than the middle. When the pin is through, ensure there is only as much left sticking out the tail end as the other chain rivets. Check that the head of the pin is flush with the plate.
Step 3. Test the Chain
The final step is to test the range of movement of the chain to ensure it moves freely. Reconnecting the chain can compress the chain links together leading to a stiff link. If the chain link is stiff, it will be unable to bend properly while moving through the rear derailleur jockey wheels. You can loosen the stiff links by bending and flexing the link from side to side in its natural direction between your index finger and thumb.
You can also make use of the chain tool to loosen stiff links. Place the links in the second set of teeth (the inner slot) of the chain tool. Tighten the chain tool pin clockwise a quarter of a turn. This spreads the link and loosens up the chain link plates.
Step 4. Snap the Connector Pin Off
After pushing the pin through the link, you should have the leading half of the pin protruding out of the other side. Break off that portion using a pair of pliers like these. Due to this step, you usually cannot reuse the connector pins when disconnecting and reconnecting the chain. This step is particularly necessary for Shimano sub-pins. According to this article by VeloNews, Shimano pins stretch the hole with the leading tip and then allow the hole to constrict again by necking down. This could actually damage the hole and weaken the chain at that point. On the other hand, Campagnolo chain pins have a smoother, gapless transition from the insertion tip to the pin. The design allows for easy insertion and removal of the tip after installation.
Apply chain lube like this on the moving part of the chain to finish the process. This allows for smooth pedaling and gear shifting and helps reduce friction and rusting.
